
Message Me
No Internet? No problem: Use Bash, Node-RED, or Python to send and receive SMS text messages and turn your Raspberry Pi into an SMS-based server. By Pete Metcalfe
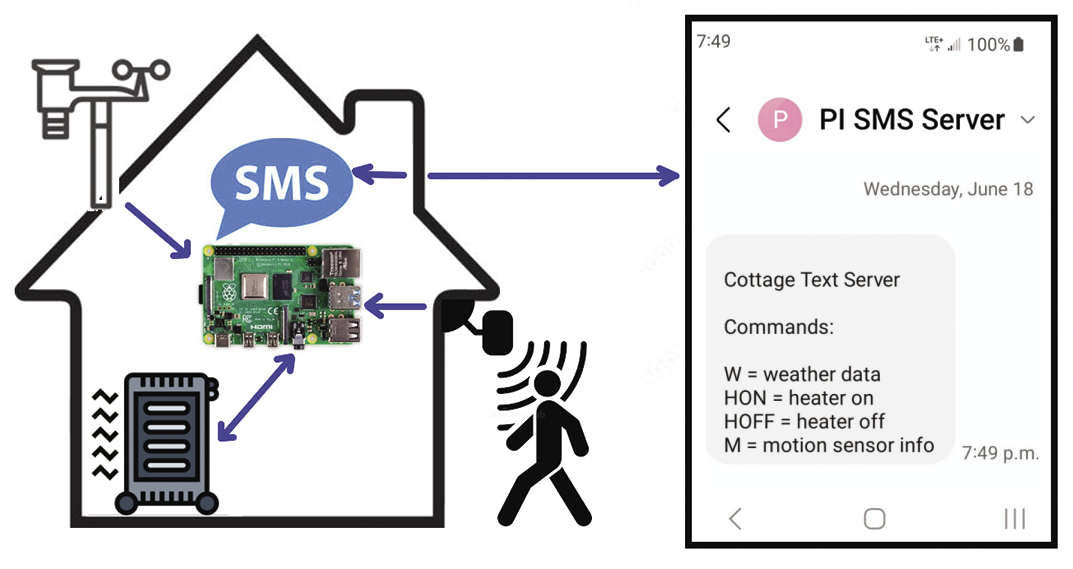
There are many remote locations, such as cottages and trailers, that have cell coverage, but only limited or expensive Internet access. For situations like this, a Raspberry Pi can be configured to monitor and control your remote devices using Short Message Service (SMS) text messages (Figure 1).
For an SMS server project, I found that a Raspberry Pi offered me the best options for device connectivity and programming choices. However, a Linux laptop or an Arduino module could also be used.
To connect a Rasp Pi to a cellular network there are several Global System for Mobile Communications (GSM) hardware options available (Figure 2). USB to GSM serial port boards are a nice low cost option ($15-$25) that can be used with both laptops and Raspberry Pi modules. Another option is to use a Raspberry Pi or Arduino shield. Several available versions are based on the older SIM800 and SIM900 chip sets ($15-$50). To get a more up-to-date full-featured option, SIM7600 4G compatible shields can be used ($75-$100).

It’s important to check the specs and reviews before you select a module. I had to return a couple of modules: The first was 2G only, and the second didn’t support the North American cellular standards. In the end, I settled with the more expensive SIM7600 PI shield from Waveshare which worked flawlessly.
GSM modules communication is done with text Attention (AT) commands. Terminal tools like Minicom are an excellent way to manually test modem communications. The GSM modem port and communications speed will vary depending on your equipment; for my hardware, it was /dev/ttyUSB2 at 115,200 baud.
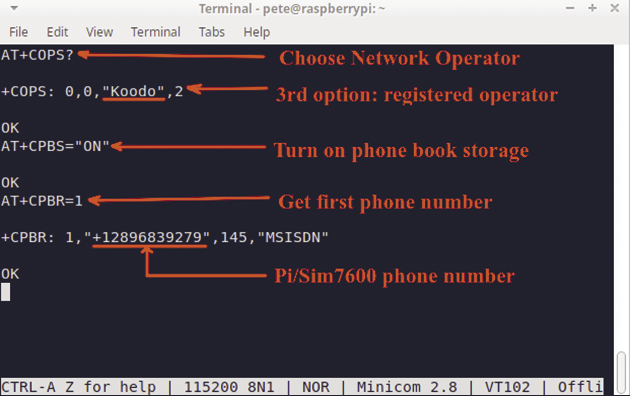
Figure 3 shows a Minicom test to check the cellular network provider and return the SIM’s phone number. The command AT+COPS? will query the modem for available network operators. If the modem/SIM are able to connect to a network, then the third item in the response will show a valid operator (Koodo in my case). To get the local Pi/SIM phone number, two commands are used. First, AT+CPBS="ON" turns on the phone book storage, then AT+CPBR=1 reads the first item in the phone book which is the local number.
Minicom is handy for quick tests, but it isn’t the best approach for programming. The command-line utility atinout has been around for a while, and it’s extremely useful for creating small scripts that execute AT commands and return the responses. Below are the steps to install atinout.
# Get a local copy of atinout
git clone https://github.com/beralt/atinout
# compile the source
make atinout
The atinout utility will execute commands that are piped to it, for example:
# atinout example to show the network U
provider
echo -e 'AT+COPS?' | atinout - U
/dev/ttyUSB2 -
Once the basic communications are successful, the next step is to send and receive text messages.
Send and Receive with Bash
You can send an SMS text message by redirecting an echo command to the connected modem device. Listing 1 shows the required commands. There are three key lines:
- In line 6,
AT+CMGF=1sets the modem into text mode. - Then,
AT+CMGS="2899381234"(line 9) defines the phone number where the text is going. - The final step (line 12) sends the message and a Ctrl+Z (
\x1a) terminator, which signals the end of the message string.
Listing 1: Send an SMS Text Message with Bash
01 MODEM="/dev/ttyUSB2"
02 NUMBER="2899381234"
03 TEXT="This is a text msg from Bash"
04
05 # Set text mode
06 echo ‑e "AT+CMGF=1\r" > $MODEM
07
08 # Send the recipient number
09 echo ‑e "AT+CMGS=\"$NUMBER\"\r" > $MODEM
10
11 # Send the message text followed by Ctrl+Z
12 echo ‑e "$TEXT\x1A" > $MODEM
Other than a message text string, all AT commands need to be terminated with a \r newline character.
To read unread messages, use the AT+CMGL="REC UNREAD" statement; to access all the messages, both read and unread, use AT+CMGL="ALL". The read messages are returned in a string that includes the index, phone number, date/time, and message text:
$ # Request the latest unread messages
$ echo -e 'AT+CMGF=1;+CMG1="REC UNREAD"' | atinout - /dev/ttyUSB2 -
+CMGL: 28,"REC UNREAD","+12899385300","","25/10/09,15:23:59-16"
Hi, test msg from a phone
In this example, I’ve combined two AT commands in a single line using a semicolon with the second command not needing the leading AT string.
Now that you are able to read and send SMS messages, you can create a script that sends a simple menu and manages user input.
Create a Bash SMS Server
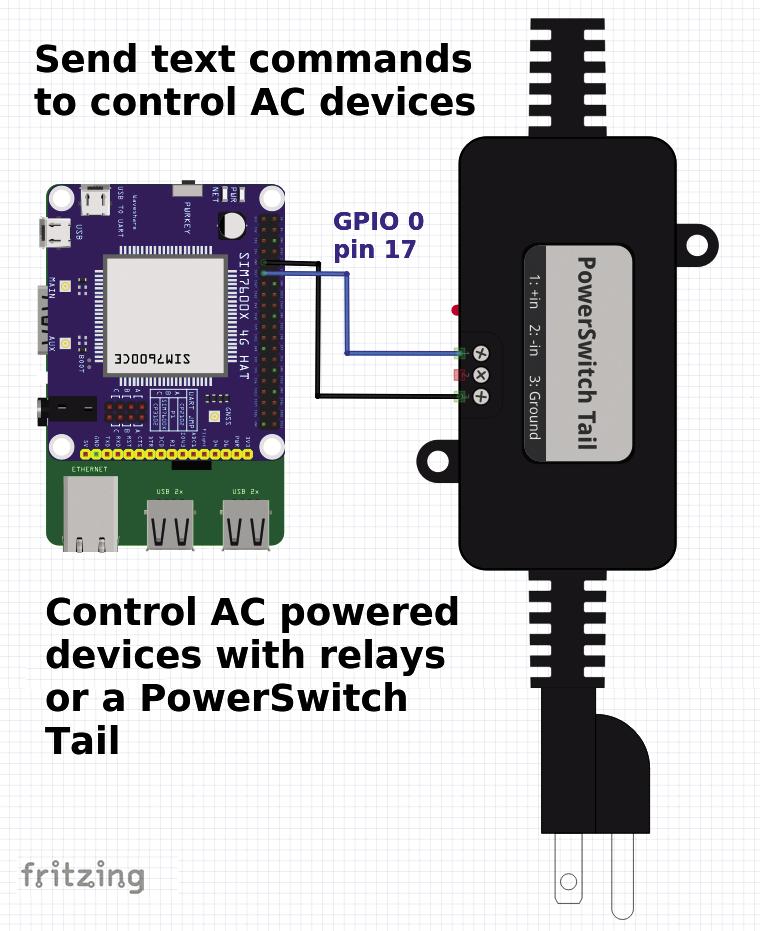
For the Bash SMS project, I used an older PowerSwitch Tail (Figure 4), but there are several low cost options and newer alternatives. A cheap and simple approach is to cut a power cable and wire it to a standalone relay module (costing about $5). To manage multiple devices, you could use an IoT Power Relay.
My goal was to create a Bash-based server that accepts SMS text messages and takes some action based on the command. Figure 5 shows a command and response sequence that presents a default menu of available commands. A LON message turns a light on, while LOFF turns it off. Listing 2 shows the Bash script smsmenu.sh that runs this SMS server.
Listing 2: Bash SMS Server with Menu and User Commands
01 #!/bin/bash
02 #
03 # smsmenu.sh ‑ look for incoming text messages and do actions
04 #            ‑ actions are to turn ON/OFF a light on GPIO pin 0
05 #
06
07 # Use a function to send SMS messages, $1=number, $2=message
08 function sendmsg {
09         MODEM="/dev/ttyUSB2"
10         NUMBER=$1
11         TEXT=$2
12
13         # Set text mode
14         echo ‑e "AT+CMGF=1\r" > $MODEM
15
16         # Send the recipient number
17         echo ‑e "AT+CMGS=\"$NUMBER\"\r" > $MODEM
18
19         # Send the message text followed by Ctrl+Z
20         echo ‑e "$TEXT\x1A" > $MODEM
21 }
22
23 # Default message is a menu of commands
24 MENUMSG="PI SMS Server\n\nCommands:\n\nLON ‑ lights on\nLOFF ‑ lights off"
25
26 gpio mode 0 output;  #Set GPIO pin 0 as an output
27
28 # cycle every 10 seconds looking for new messages
29 while true; do
30         # check for new unread messages. Show incoming msg. If nothing OK is returned
31         msg=$(echo ‑e 'AT+CMGF=1;+CMGL="REC UNREAD"'  | atinout ‑ /dev/ttyUSB2 ‑)
32         echo "$msg"
33
34         # If string contains "+CMGL:" there is a new message
35         if [[ "$msg" =~ "+CMGL:" ]]; then
36                 echo ‑e "New Message:\n$msg"
37                 # Get the array line, it start with +CMGL
38                 # The number is the 3rd item, also trim for just the number
39                 caller=$(echo $msg | awk ‑F, '$1 ~ /CMGL/ {print substr($3,4,10) }')
40                 echo "Caller:$caller"
41                 # Look for commands write to GPIO pin 0
42                 if [[ "$msg" =~ "LON" ]]; then
43                   echo "In msg: LON"
44                   gpio write 0 1
45                   sendmsg $caller "Lights Turning ON"
46                 elif [[ "$msg" =~ "LOFF" ]]; then
47                   echo "In msg: LOFF"
48                   gpio write 0 0
49                   sendmsg $caller "Lights Turning OFF"
50                 else
51                   # Not a valid command, send menu
52                   echo "Sending Menu"
53                   sendmsg "$caller" "$MENUMSG"
54                 fi
55         fi
56         sleep 10
57 done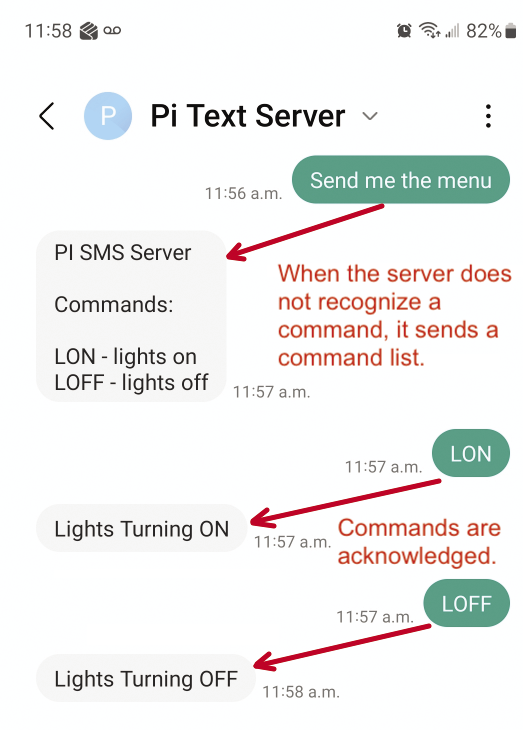
The sendmsg function in this script (lines 8-21) accepts two arguments, the phone number and the message string, and creates control sequences that it writes to /dev/ttyUSB2. The General Purpose Input/Output (GPIO) pin that controls the power relay is set as an output on line 26.
A while loop cycles every 10 seconds looking for new incoming messages (lines 29-57). If there is a new message, the returned string will contain the +CMGL: list message tag (line 35). I’m parsing the string with an awk command (line 39)
# Get the caller from the message response
caller=$(echo $msg | awk -F, '$1 ~ /CMGL/ {print substr($3,4,10) }')
which simplifies data extraction – at least when you’re familiar with the tool’s syntax: Searching the web for “AWK examples” will return various introductory texts. This example first finds the line that contains “CMGL” (with awk -F, '$1 ~ /CMGL/), then it extracts the third item on that line ($3), and trims it for just the number.
- Custom user commands can be found using wild-card searches within the returned message string. For example, lines 42-45 check for the LON (lights on) command.
The Bash SMS server meets all my requirements. However, Bash doesn’t have the rich support for remote sensors or devices like Node-RED or Python.
A Node-RED Example
You need no special nodes for Node-RED to communicate with a GSM modem. As with the earlier Bash examples, you can use AT commands to send and receive text messages.
For the Node-RED example, I want to text temperature values from a BME280 environmental sensor to a dedicated phone number every day at 8:00am. The logic for this project (Figure 6) uses six nodes: an inject, two change, a BME280, a function, and a serial out node.
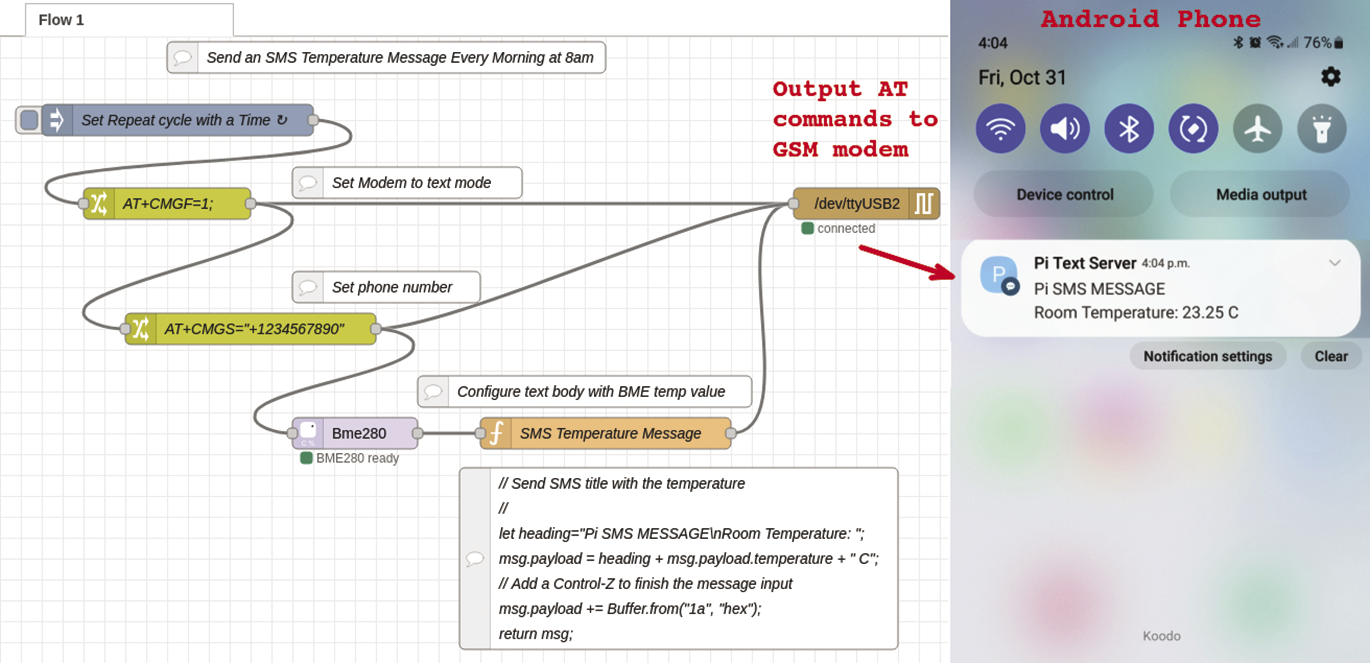
- The inject node can be set to cycle based on a time, like 8:00am, but it also can be manually toggled while you’re in the test phase.
- The change nodes are defined with two AT commands:
AT+CMGF=1sets the modem for text, andAT+CMGS="some number"defines the outgoing phone number for the text message. - The function node uses JavaScript to create a message payload that consists of a heading, the BME280 temperature, and a termination character (Ctrl+Z =
0x1a).
Send and Receive with Python
In the earlier Bash examples, I used the atinout utility to manage AT command responses with a GSM modem. Python lets you do this without external tools: Listing 3 shows a code snippet that defines a serial interface to the GSM modem and implements a send_message function. Note, as with the Bash example, you will need to adjust the port definition and possibly the port speed for your setup. Also, depending on your hardware, the response time may vary. In this example, I’ve added an extra second before reading the serial port.
Listing 3: Python Snippet to Manage AT Commands
# Python function to manage AT commands and responses
#
import serial

# connect to the GSM Modem port
# Note: adjust for your port and perhaps speed
ser = serial.Serial('/dev/ttyUSB2', 115200, 5)

# Function to send an AT command and get a response
def send_command(command):
    ser.write((command + '\r').encode())
    # To be safe add an extra 1 second response wait
    sleep(1)
    return ser.read_all().decode()
To send a text message in Python, pass the AT commands to send_message like this:
# Send a text message in Python
send_command('AT+CMGF=1') # set text mode
send_command('AT+CMGS="1234567890"') # set phone number
# Send msg body with a Control-Z end-of-msg character
send_command('Text message body' + '\x1A')
Managing new unread messages is a little cleaner in Python than it is in the Bash version: The AT+CMGL="REC UNREAD" command (get unread message list) will return a response message with the index, status, sender number, time, and message in a comma-separated string that Python can easily split into its parts:
# Read unread text messages in Python
send_command('AT+CMGF=1') # set text mode
# Get unread messages
response = send_command('AT+CMGL="REC UNREAD"')
# parse the response to get the new message and phone number
index, status, sender, time, message = U
response.split(",",4)
Once you can smoothly send and receive messages, you can create some useful applications. For my cottage, I have set up a Python SMS server that lets me check the inside temperature and remotely turn on or off an AC powered device.
Summary
Controlling remote devices through text messages is a good solution for locations with expensive or challenging Internet connections. However, managing AT commands can be a little tricky. I found that sending incorrect commands can leave the GSM modem waiting for the correct response or in error mode. This is especially the case when you create a text message that lacks the terminating Ctrl+Z character.
Unlike a cell phone that can store messages internally, a GSM modem will run out of memory storing messages, so it’s important to periodically clear the message buffer. Use the AT+CMGD=,1 commands to delete all read SMS messages (leaving the unread ones) or AT+CMGD=,4 to delete all messages including the unread ones.
I’ve covered basic sending and receiving of text messages. The AT command set also offers advanced features like sending audio files and support for Multimedia Messaging Service (MMS) that you can use for image and video transfers.