
Access the Raspberry Pi’s GPIO
The wiringPi library, which many Raspberry Pi fans have grown attached to over the years, is no longer under maintenance by its developer. An alternative, in the form of Pigpio, has arrived just in time.
For as long as the Raspberry Pi has been around, wiringPi has served as a library for accessing the GPIO. With the related gpio tool, programmers could quickly manage the GPIO at the command line. Many Raspberry Pi projects build on this library.
Not least because of frustration about what were in part rude email communications from some users, developer Gordon Henderson decided to discontinue his one-man wiringPi project in August 2019 after releasing his last version. He explained in great detail on his website why he had stopped developing the library. The post, which has since been deleted, is still available on the Wayback Machine internet archive. For more information, see the box “The Two Sides of Open Source.”
The open source community makes many software projects available to the general public. Open source thrives on enthusiasts who develop projects in their spare time. All too often, however, it happens that these developers do not get any recognition for their work. On the contrary, many people expect developers to provide the kind of professional support you would want from a corporate vendor, and people are even insulted if bugs are not fixed immediately. As a result, projects repeatedly disappear because developers no longer want to work under these conditions.
Another phenomenon relates to developers who upload a library or tool to GitHub and simply leave it orphaned after some time. Usually, it takes some time to notice that a particular library no longer works with the current version of the underlying programming language. I have often stumbled across Python libraries that developers never ported to Python 3. Oddly enough, the people responsible often don’t remove their outdated projects. To make matters worse, you also find a plethora of documentation that no longer works. Especially with beginners, for whom the Raspberry Pi is the first step into the world of programming, this outdated detritus often causes people to drop the small-board computer (SBC) in frustration.
If you want to continue using the Raspberry Pi’s GPIO, you need to look for an alternative to wiringPi. The successor is Pigpio, which also reads the Raspberry Pi’s GPIO but uses a daemon to do so. At first glance, the Pigpio library seems to offer everything you might need for your projects. In this article, I take a closer look at the library to see if this first impression is correct.
Pigpio
Much like wiringPi, Pigpio lets you access the GPIO of the Raspberry Pi. However, you need to be aware of some differences. The first thing to notice about the pigpio library is that it requires a running daemon to work. On the one hand, the daemon continuously consumes a bit of the Raspberry Pi’s CPU time, which is not a problem for most projects. On the other hand, a daemon has some advantages – more on that later.
Both wiringPi and Pigpio are based on C code. Similar to wiringPi, Pigpio has a tool to access the GPIO ports at the command line. Unlike wiringPi, though, it uses the BCM pin designations (Figure 1), which although not a genuine problem, does require some getting used to.

Wrappers for Java, Node.js, Ruby, and Perl, among others, help integrate the library into different programming languages. The Python module is part of the library itself. The complete documentation of the library with many examples can be found on the project website.
Installation
Pigpio installs to Raspberry Pi OS with the commands:
$ sudo apt update
$ sudo apt upgrade
$ sudo apt install pigpio
The commands you need to start, stop, and enable daemon autostart on boot are:
$ sudo systemctl start pigpiod
$ sudo systemctl stop pigpiod
$ sudo systemctl enable pigpiod
The daemon expects a number of parameters at startup. An overview, including a description, can be found on the Pigpio homepage. To change the parameters of the daemon permanently, make the appropriate changes in the systemd service unit (/lib/systemd/system/pigpiod.service). The most common parameter change needed is in the line that disables the remote socket interface by default:
ExecStart=/usr/bin/pigpiod ‑lJust remove the ‑l switch to get autostart to work.
Pigs
The pigs command-line utility is a simple tool to access the GPIO through the daemon. Simple functions like digital in and out can be accessed, but you can also access I2C, SPI, UART, and the complete range of PWM functions. Myriad parameters let it address all the functions of each GPIO port. Listing 1 shows some sample commands that illustrate how pigs works in principle. An overview with all the parameters can be found on the project website.
Listing 1: Pigs Functions
### Set GPIO10 to 1
$ pigs w 10 1
### Set GPIO10 to 0
$ pigs w 10 0
### PWM base frequency fr
### Set GPIO4 to 8 kHz
$ pigs pfs 4 8000
### Set GPIO4 PWM to 0% $ pigs p 4 0
$ pigs p 4 0
### Set GPIO4 PWM to 50% $ pigs p 4
$ pigs p 4 127
### Set GPIO4 PWM to 100% $ pigs p 4
$ pigs p 4 255
PiScope
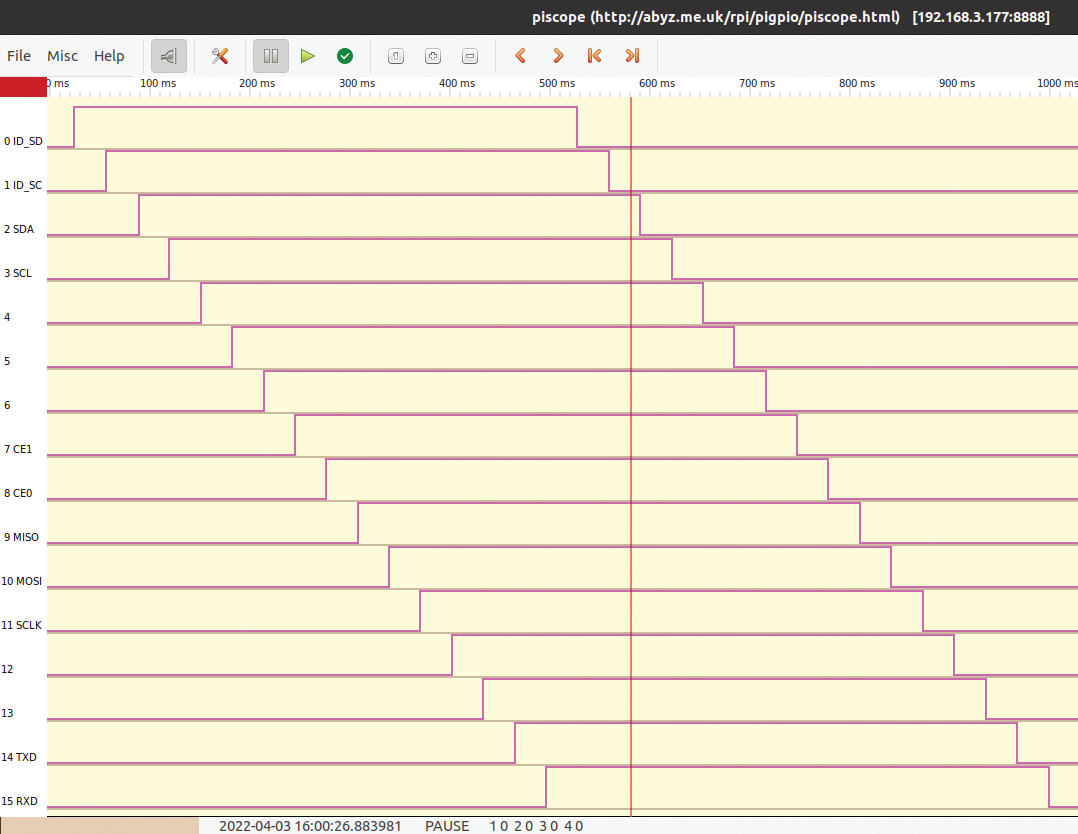
Among the many possibilities offered by pigs, nothing maps the wiringPi gpio ‑readall function – and for good reason: To read the status of the GPIOs, Pigpio uses the PiScope tool (a Raspberry Pi-based oscilloscope), which is a GTK+3 application that runs on all operating systems. It connects directly to the Pigpio daemon and fetches the GPIO data, even if other programs are already connected to the daemon. In this way, you can conveniently debug projects that use the GPIO.
Figure 2 gives you an impression of how the tool comes up. The output shown here was generated by a program that switches GPIOs 0 to 15 on and off one after another. So I could access GPIOs 0 and 1, as well, I started the Pigpio daemon with the masking parameter ‑x 0xFFFFFF.
I go into two of the several ways to install and use PiScope in detail. The most obvious variant is to install the tool directly on the Raspberry Pi and run the output through the Raspberry Pi:
$ wget abyz.me.uk/rpi/pigpio/piscope.tar
$ tar xvf piscope.tar
$ cd PISCOPE/
$ make hf
$ make install
$ ./piscope
This approach downloads the sources directly to the Pi and compiles them on the spot. PiScope then connects to the Pigpio daemon over the localhost interface. Depending on which basic installation of Raspberry Pi OS you use, you might need to resolve some dependencies.
The second variant is a bit more tricky. You need to download the binary version of PiScope to a Linux machine and connect to the daemon on the Raspberry Pi over the network. In this case, PiScope takes the IP address of the Raspberry Pi from the PIGPIO_ADDR environment variable, which you will need to set up accordingly:
$ wget https://abyz.me.uk/rpi/pigpio/piscope.tar
$ tar ‑xvf piscope.tar
$ cd PISCOPE/
$ export PIGPIO_ADDR=
$ ./piscope.x86_64
In the test, I was able to run PiScope on Ubuntu in this way without any problems. If you are interested in the other installation variants, you will find more details on the tool’s website.
Conclusions
The Pigpio library is without a doubt useful as a powerful alternative to wiringPi. All common programming languages have wrappers and modules. The available tools let you work smoothly, and the daemon even supports monitoring the GPIO over the network.
You will quickly get used to the different naming convention for the individual GPIO pins, compared with wiringPi, when working with Pigpio. However, one small thing stood out: For more than a year, the project has been dormant on GitHub. I hope this is simply because no changes have been necessary since then.