Programming in BASIC
To write programs in BASIC, you just need a machine that can run a BASIC interpreter. We showcase a few options, from old home computers to FPGA-based machines to emulator programs, to get you started running BASIC.
Back in the 1980s, turning on a computer meant starting the built-in BASIC interpreter. The experience was instant: You just plugged in the power cord or flipped the power switch, and half a second later you could start typing in a program.
You, too, can experience the joys of programming in BASIC (short for “Beginner’s All-purpose Symbolic Instruction Code,” but nobody ever spells that out). All you need is a machine that can run a BASIC interpreter. Your options include old home computers such as the Commodore C64 and the Sinclair ZX Spectrum, retro machines such as the FPGA-based Spectrum Next or the software-emulator-based TheC64, and emulator programs for your regular computer (which can be installed locally or run in the web browser). In this article, I’ll cover some BASIC fundamentals and then discuss your machine options for trying out BASIC.
The BASIC language
First, let’s have a look at the language itself. BASIC is older than the first home computers. It was originally invented in 1964 and then ported to almost every kind of computer over the following decades. There is no standard that guarantees program compatibility across the various machines and BASIC versions they support. Instead, many BASIC dialects have been created. In the early days of computing, memory was an expensive resource, and the BASIC interpreter code had to fit inside ROM chips with typical sizes of 16KB to 64KB. Later home computer generations often provided improved BASIC interpreters with extended sets of internal commands.
However, there are some language properties that all of the old BASIC versions had in common. First of all, they all used line numbers to bring order into the collection of program lines. With these line numbers, users could quickly change or remove a line of code or add a line between already-existing lines – all without a sophisticated text editor. You had to use the LIST command to make the computer show all the program lines (in order), and changing a line often meant typing in a new version (headed by the right line number) that would then replace the old line with that same number. BASIC programmers often used line numbers that were multiples of 10 so that between every line of code they would have enough space to insert additional code (e.g., by adding lines 51, 52, 53, and so on between lines 50 and 60). Better BASIC variants had a RENUM (renumber) command that re-assigned numbers to the lines.
But BASIC line numbers do more than simply order the program lines. Each number is also a target that you can make the program jump to via the GOTO (sometimes: GO TO) statement. For example, if you had a home computer back in the day, these three lines (Figure 1) will make perfect sense to you:
10 PRINT "Hello! ";
20 GOTO 10
RUN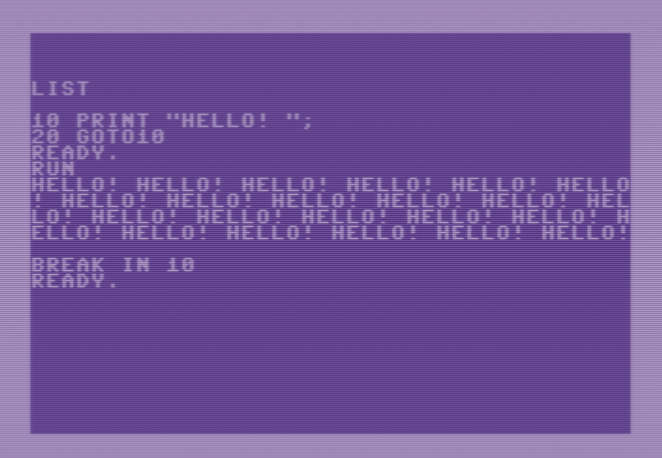
Line 10 makes the BASIC interpreter print out the word “Hello!”, and line 20 sends it back to line 10, leading to another round of execution of the PRINT statement, followed by yet another jump back to line 10, and so on – forever (until you press a specific key or key combination to make it stop). In programming, this is called an endless loop.
BASIC is well-known for the GOTO keyword. Making the machine “go to” a different code location lets developers use the same primitive control flow used in Assembler languages.
Editing Code
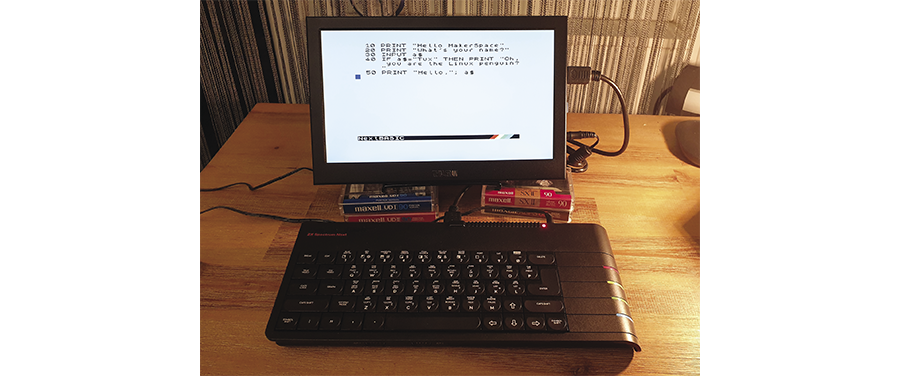
If you’re used to developing code in a modern IDE, with a powerful editor that handles multiple source files, syntax highlighting, code folding, searching and replacing with regular expressions, and other niceties, you need to lower your expectations. The oldest BASIC interpreters let you “edit” a single line of code by typing it in: Use the cursor keys to navigate to an empty line on the screen and start with a line number, say 10. Then type the command you want to store in line 10.
10 PRINT "Hello MakerSpace"Pressing the Return key will add this line to the current program. Depending on the BASIC interpreter you use, it might not always be possible to use lowercase and uppercase characters simultaneously.
Now, what about changing a line of code? That depends on the BASIC version (and the machine) you use. For example, on both a Commodore C64 and a PC-XT running GW-BASIC, it works like this: As long as you can see line 10 on the screen, you can make changes to it. Use the cursor keys to navigate the cursor onto that line, and then move to the position where you need to make changes. If you do not see the line, you can make BASIC print it by typing
LIST 10to get that specific line; if you want to see the whole program, type LIST. Typically, you can also provide a line range (LIST 10-90). In most BASIC interpreters, overwriting is the default behavior: Type new characters to replace the ones under the cursor. Some interpreters let you switch to insert mode and back (try pressing the Insert key if your keyboard has one), which is helpful if you need to make the line longer. If there is no insert mode, you need to retype most of the line’s code. Again, pressing Enter will commit the change to the current program.
Other BASIC versions provide an EDIT command. For example, on the Amstrad CPC you can type
EDIT 10to enter a line editing mode (which you can only leave by either pressing Enter and saving the changes to this line or pressing Esc to leave the original line intact). Figure 2 shows a virtual Amstrad CPC emulated by Retro Virtual Machine editing a line of code.

Later BASIC implementations provide easier editing. For example, MMBasic, a dialect that runs on the Maximite series of modern-day home computers, has a built-in full-screen editor that behaves like a modern text editor, and it allows you to get rid of line numbers. Instead you can introduce “labels” that serve as GOTO targets, and you use those labels only where needed. However, these modern BASICs lack the retro charm.
Input, Output, and Variables
A program that doesn’t interact with the user is a bit boring. You can use the INPUT and PRINT statements to read from the keyboard and write to the screen. But where to store the input? Just like modern languages, BASIC lets you use variables to store values, such as numbers (integers and floats if the BASIC dialect supports it) and strings – and that’s it. Other types or composite types (like C structures) are not available. The only extra language feature is the array, which is a collection of numbered variables of the same type.
Variables in BASIC need not be declared (except for arrays); you can simply start using them. Notice, however, that most BASIC dialects require you to add a type postfix for string or integer variables. For example, on the Commodore C64, typing the line
A=1.23 : A%=2.34 : A$="HELLO"will result in setting the floating-point variable A to 1.23, the integer variable A% to 2 (not 2.34!), and the string variable A$ to "HELLO". If you need an array, say of 20 parameter strings, you could declare it with
DIM PARAM$(20)and then access individual array members as PARAM$(0), PARAM$(1), …, PARAM$(20). Note how the numbers range from 0 to 20, so the DIM statement actually defines an array of 21 strings. Also note that some BASIC dialects limit the length of a variable name. If you go beyond that limit, you might get error messages, or the BASIC interpreter might treat variables as identical if their names only differ in the latter characters.
Figure 3 shows both ways of storing a value in a variable: In line 10, a value is assigned directly (NOW=2022), whereas lines 30 and 50 use the INPUT command to read a string and a number from the keyboard. If you enter non-numeric characters at the input prompt from line 50, C64 BASIC will print the error message “Redo from start” and ask again. More advanced BASIC versions let you provide an error handler that catches this type of usage error.
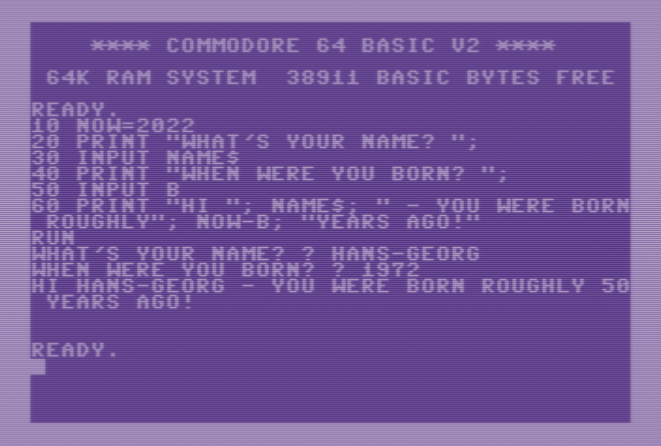
The PRINT statement combines several elements to form a long output line: There are strings ("HI "), string variables (NAME$), and math expressions (NOW-B), separated by semicolons.
Looping
Using variables, you can program a loop. Some BASIC dialects provide several types of loops (such as WHILE…WEND or REPEAT…UNTIL), but there is one kind of loop that’s available in every BASIC version: the FOR…NEXT loop. It works like this:
FOR I=1 TO 10 : PRINT I; : NEXT I
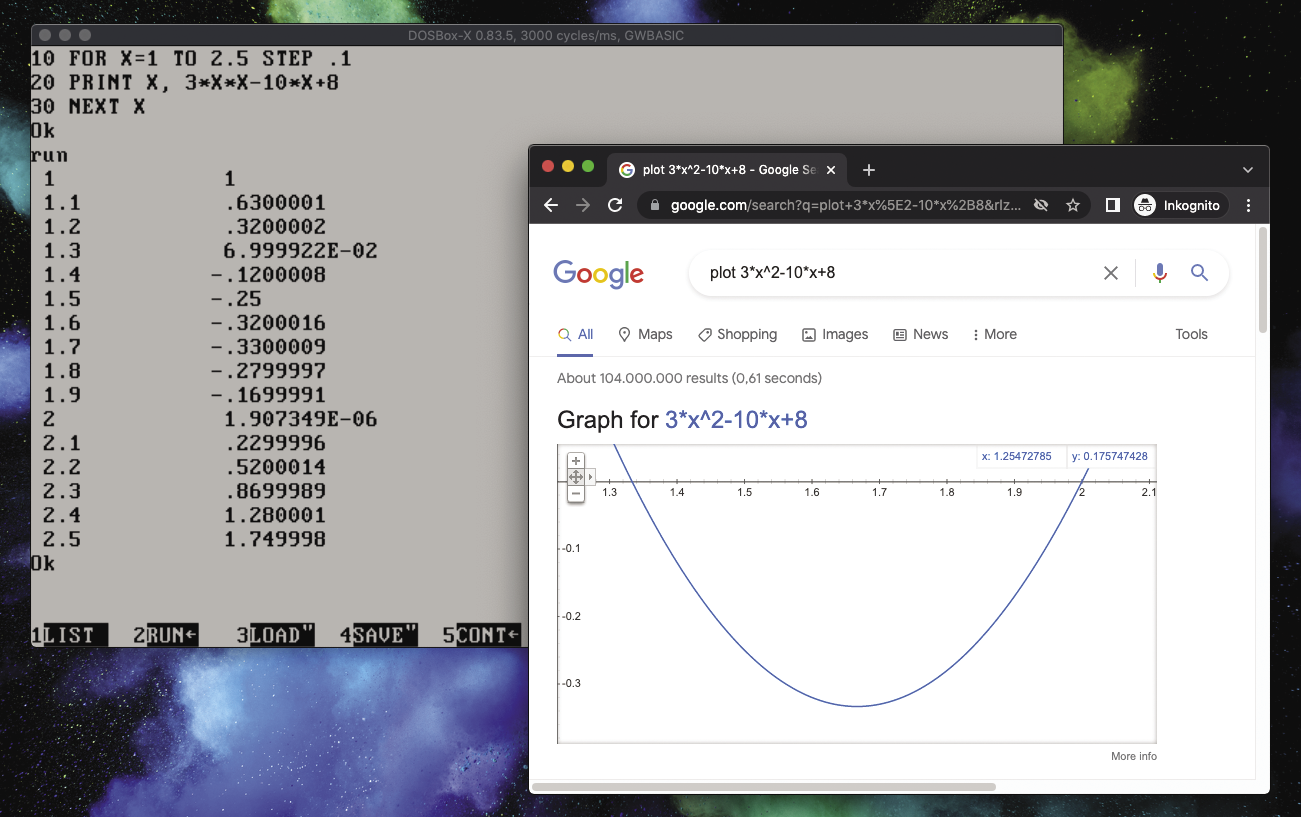
1 2 3 4 5 6 7 8 9 10You can use this to quickly print a value table for a mathematical function. For example, if you want to find the roots of the quadratic function f(x)=3x2–10x+8 and you suspect that they are somewhere between 1 and 3, you could try the following code:
10 FOR x=1 TO 3 STEP 0.1
20 PRINT x, 3*x*x-10*x+8
30 NEXT x
A loop in BASIC works like this: After the FOR keyword you provide a variable name. This will be the loop variable, and it will change its value every time the loop “body” (in this case, the code in line 20) is executed. In this example, BASIC will assign values between 1 and 3 to the variable x, and the increment from one iteration to the next will be 0.1. The TO keyword is mandatory (FOR variable = start TO end), but the STEP part and the increment value after it are optional: If you drop them, BASIC will work with the default increment of 1. You can also count down by providing a negative increment.
Thus, BASIC will run the PRINT statement in line 20 with x values of 1, 1.1, 1.2, 1.3, …, 3, and it will print out x and f(x) for each of those values. This will not find both roots precisely (Figure 4). In this case, it’s also showing problems with the precision of GW-BASIC’s math operations (because f(2) should be 0), but in a next step the interval and stepping could be modified to get closer to one of the roots. Of course, if you’re online, you can just type plot 3*x^2-10*x+8 into a Google search bar and look at the graph, or – even better – type solve 3*x^2-10*x+8=0 and get the roots as well as an explanation of how they were found.
Let's Get Graphical
Alternatively, you can build your own function plotter. The commands for coloring dots (individual pixels) on the screen differ between machines; Listing 1 provides a very simple example for the Amstrad CPCs. (Please note that every BASIC program, no matter how absurdly simple, absolutely has to start with a few comment lines that state its purpose and credit its author; I adhere to that convention.) The left window in Figure 5 shows the result. Plotting the curves takes a few seconds because the BASIC interpreter on the Amstrad CPC is not very fast.
Listing 1: Function Plotter, Amstrad CPC
10 ' sin and cos function graphs (CPC)
20 ' (c) 2022 Hans-Georg Esser
30 CLS
40 FOR i=0 to 639
50 y=SIN(i/20)*20+50
60 z=COS(i/20)*20+50
70 PLOT i,2*y,2
80 PLOT i,2*z,1
90 NEXT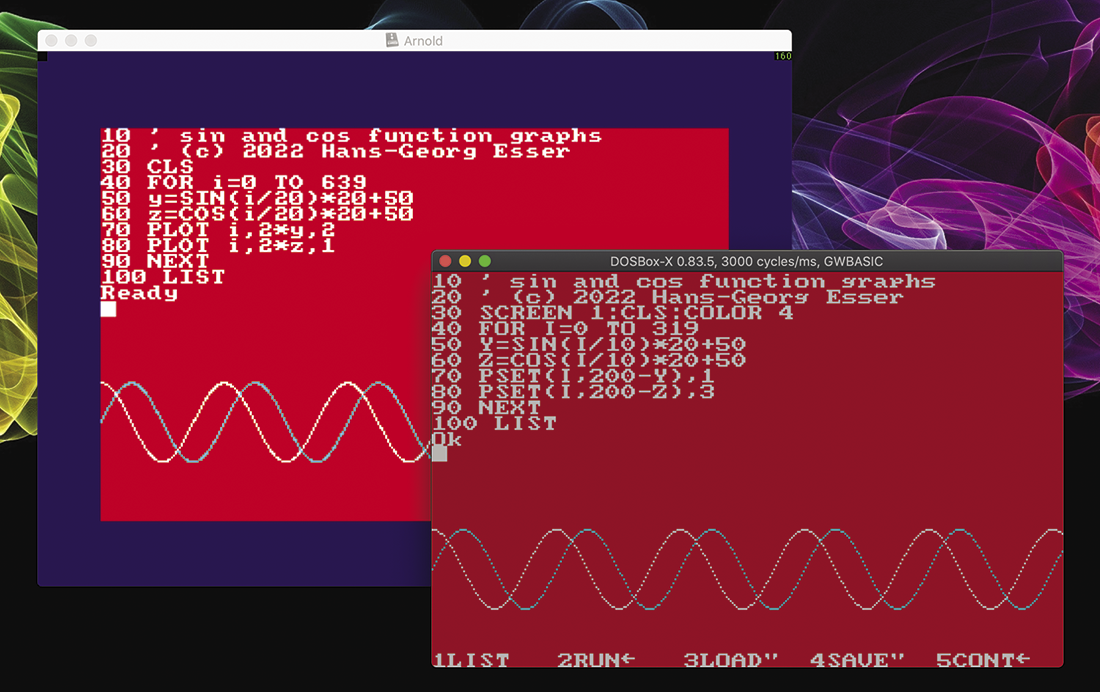
How does this work? The Amstrad CPC lets you address individual pixels on the screen using coordinates (x,y) where x ranges from 0 to 639 (left to right) and y ranges from 0 to 399 (bottom to top). In order to color a dot at (x,y), use the PLOT x,y command. You can also provide a third parameter which will then set the color – in Listing 1, I’ve used that to plot the sin and cos functions in two colors. As a simpler example, you can draw a diagonal line with
FOR i=0 TO 639:PLOT i,i*400/640:NEXT
Amstrad’s BASIC has built-in SIN and COS functions (as well as TAN and ATN for tangent and arc tangent), and these are used in Listing 1. The division, multiplication, and addition in SIN(i/20)*20+50 (and the similar COS expression) are necessary to properly scale and position the graph on the screen.
Listing 2 produces the same function plots but runs in GW-BASIC on an IBM-compatible PC. While the results are very similar (as you can see in the right window in Figure 5), the required calculations and plot commands differ a bit. The MS-DOS graphics mode lets you address 320x200 pixels (instead of the 640x400 on the Amstrad CPC), and while the x coordinates are left to right, the y coordinates start on the top line, not at the bottom. Also, instead of PLOT, GW-BASIC has a PSET command that takes x and y coordinates as function arguments, but the optional third color argument must be added behind the closing bracket:
PSET(x,y),cListing 2: Function Plotter, GW-BASIC
10 ' sin and cos function graphs (GW-BASIC)
20 ' (c) 2022 Hans-Georg Esser
30 SCREEN 1:CLS:COLOR 4
40 FOR I=0 TO 319
50 Y=SIN(I/10)*20+50
60 Z=COS(I/10)*20+50
70 PSET(I,200-Y),1
80 PSET(I,200-Z),3
90 NEXT
If drawing on the screen isn’t your thing, most BASIC versions have commands that let you play music. In some cases, you need to provide frequencies and durations, while other interpreters let you use a string of notes. For example, GW-BASIC will play the first notes of the Beatles’ “Ob-La-Di, Ob-La-Da” refrain when you run the command:
PLAY "ceg4ceg4ceg2a4"Real Machines and Emulators
If you’re sufficiently old or if you’re into retro computing, you may have a home computer from the 1980s sitting on a shelf. In that case, you’re good to go. Assuming that the machine isn’t broken, just plug it in and turn it on. (Then, keep an eye on it: Old and unserviced technology can create all sorts of problems, such as power supplies catching fire, etc.)
Connecting the old computer to a modern TV or computer monitor might require some video and audio adapters. If you haven’t stored the machine with a something-to-HDMI cable attached to it, you might want to run a web search first.
Of course, it is never too late to acquire one of the old original machines. eBay lists enough interesting items every single day. According to The Guardian, the top 10 most popular home computers are:
- IBM PC
- Commodore Amiga
- Commodore C64
- Sinclair ZX Spectrum 48K
- Apple II
- BBC Micro
- Atari 800
- NEC PC-88
- Commodore VIC-20
- Tandy TRS-80
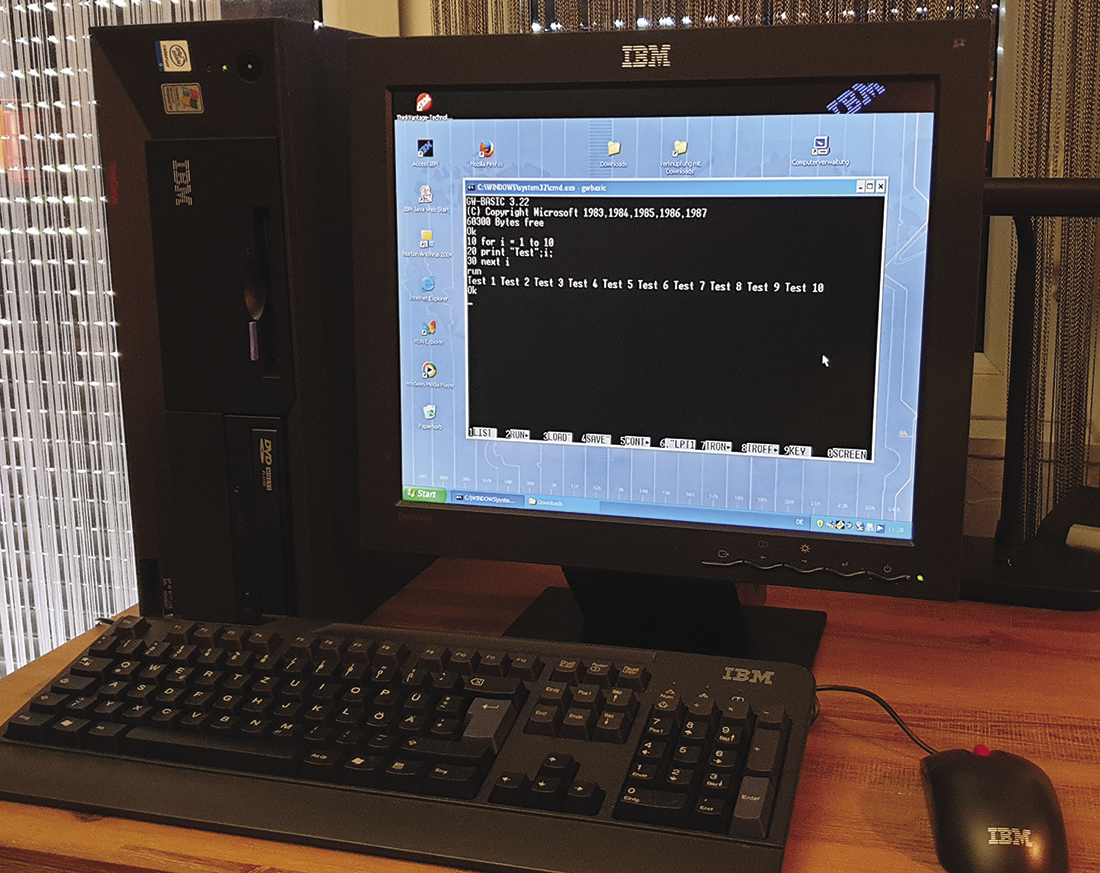
While I don’t like the fact that the computer I used in my youth (an Amstrad CPC 6128) did not make the list (its predecessor, the CPC 464 shows up as number 14), all of these listed computers are options for trying out BASIC. I do not recommend the IBM PC (or one of its PC-XT or PC-AT clones) because it is pretty bulky, and later PCs (running an early version of Windows or OS/2) are a bit too close to the machines used today. I do occasionally use one of the last IBM-branded PCs: My ThinkCentre A50 from 2004 runs Windows XP and can be used to run the old GW-BASIC interpreter (Figure 6) if you install it (see below). But with its 2.66GHz Celeron CPU and 512MB of RAM, it is far more powerful than the first IBM PC.
The Commodore Amiga, which ranked second, is a lovely machine (no matter which model from the Amiga range you use), and Retro Games Ltd. has just released its TheA500 Mini console that looks like a tiny Amiga 500 (delivery of this device has been postponed until April 2022, precluding it from being reviewed in this issue). However, the Amiga is already a bit too advanced and does not boot into a BASIC interpreter – the Amiga is more about gaming.
C64 or “Speccy”
I would suggest trying to get a Commodore C64 or one of the Sinclair ZX Spectrum models: Those are extremely well documented, and you can find tons of games to play on them when you need a break from learning BASIC programming.
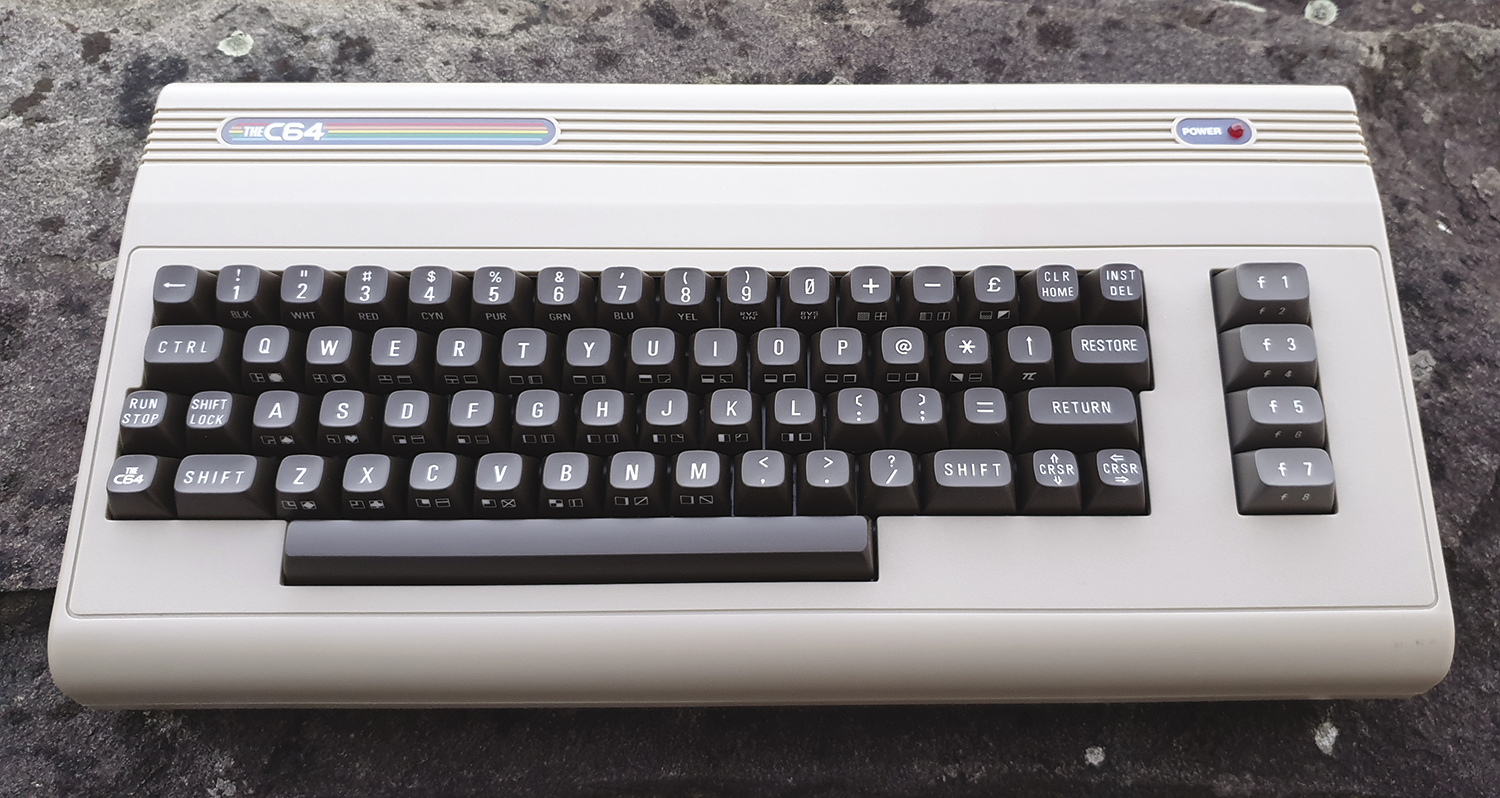
If authenticity isn’t a must, then another product from Retro Games is an interesting alternative: TheC64 is a Commodore C64 clone with a working keyboard (Figure 7) that you can connect to any HDMI-capable screen. It has a few games preinstalled (and you can add your own), but most importantly you can set it to boot to BASIC. That way you get the same usage experience as with the classic machine (but without the hassle of getting old hardware running and talking to a modern monitor).
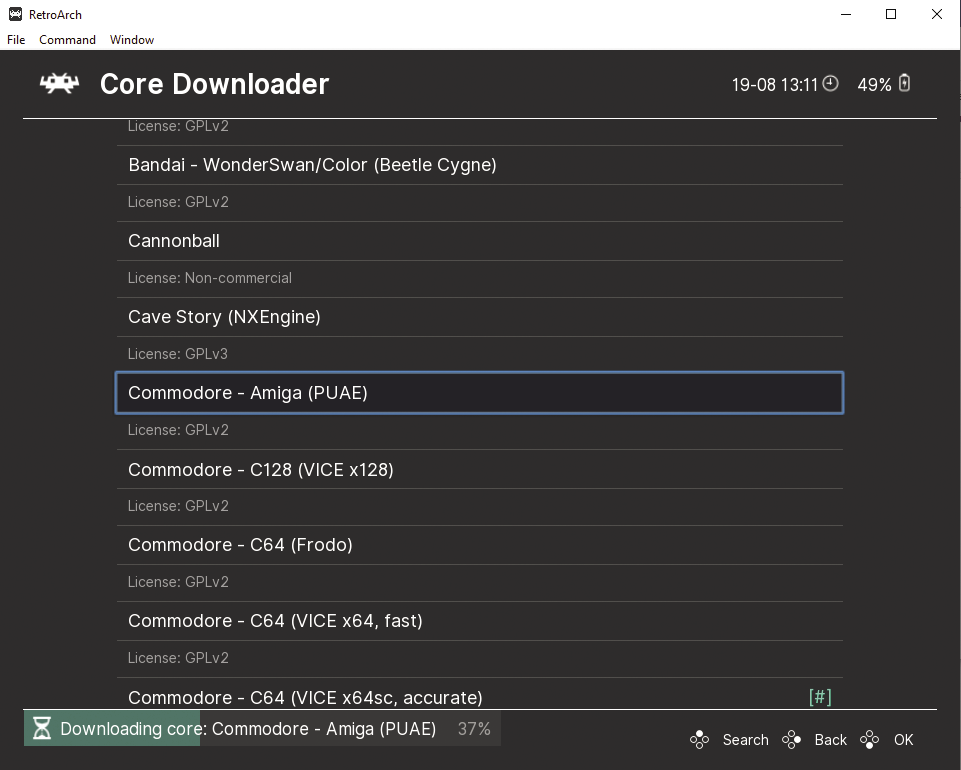
Recreations like these Commodore-based machines, as well as retro versions of game consoles (such as the SEGA Mega Drive Mini or the Nintendo SNES Classic Mini), run emulator software on modern, low-cost, single-board computers that are comparable to a Raspberry Pi. You don’t have to buy those specialized machines if you only want to try out some of the classic games or revive your BASIC programming skills with the old interpreter: Just get a proper emulator for your PC or Raspberry Pi. For example, you can try out RetroArch and its pretty front-end EmulationStation. RetroArch lets you download a selection of “cores,” each of which is an individual emulator for some machine (Figure 8), and then you add “ROMs,” which are game files that the emulator can load.
Storage Options
When you start writing BASIC programs that are longer than just a couple lines, it is important that the machine (or the emulator) gives you a comfortable option for saving those program files. While it is fun to see a tape recorder in action, it takes ages to save and load files that way. If you use real hardware, pick a machine that you can use with a floppy drive. Similarly, when using an emulator, make sure that it also emulates a floppy drive or gives you some other way to store files.
GW-BASIC on DOSBox
I am particularly fond of the combined PC and MS-DOS emulator DOSBox, which runs on Windows, macOS, Linux, and some other operating systems. You can install it quickly and map a folder on your real machine to its virtual C: drive. Store the BASIC interpreter binary and all your BASIC source files in a folder and run DOSBox with that folder as an argument (which is easy to do on macOS and Linux; Windows users can run BASIC from a command-line window and don’t need the emulation layer).
The classic GW-BASIC interpreter used to be part of every MS-DOS installation on early PCs, but that is no longer the case. You need the gwbasic.exe file that you can find inside the GW-BASIC.ZIP archive.
Figure 9 shows how DOSBox, when run on Linux with the command
dosbox .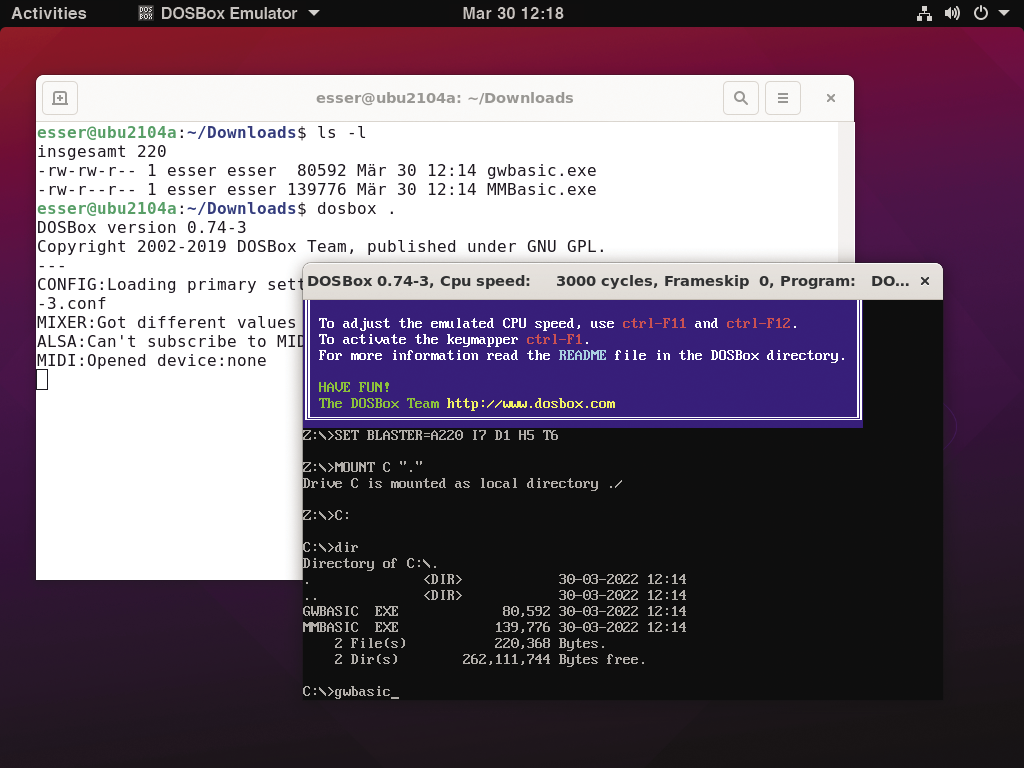
sees all the files in the current folder. Note that the argument is a period (.), which is short for the current folder. You can run it with any path name as an argument to map that folder to C:, or you can provide the path of a binary that will then auto-run instead of the DOS shell.
When running DOSBox on Windows or Linux, press Alt+Return to switch to full-screen text mode: With the rest of the desktop invisible, DOSBox will look like a proper 1980s BASIC setup.
Save your BASIC code using the SAVE command and a filename string parameter; those files will be stored in the folder you started GW-BASIC in. Add an a (ASCII) flag to store the program as a readable text file, so that you can edit or view it on your normal machine:
save "progname", aThis will create progname.bas. GW-BASIC automatically adds the .bas extension, and you cannot use more than eight characters for the name (the MS-DOS filename conventions apply). You can load a file back in via the load "filename" command.
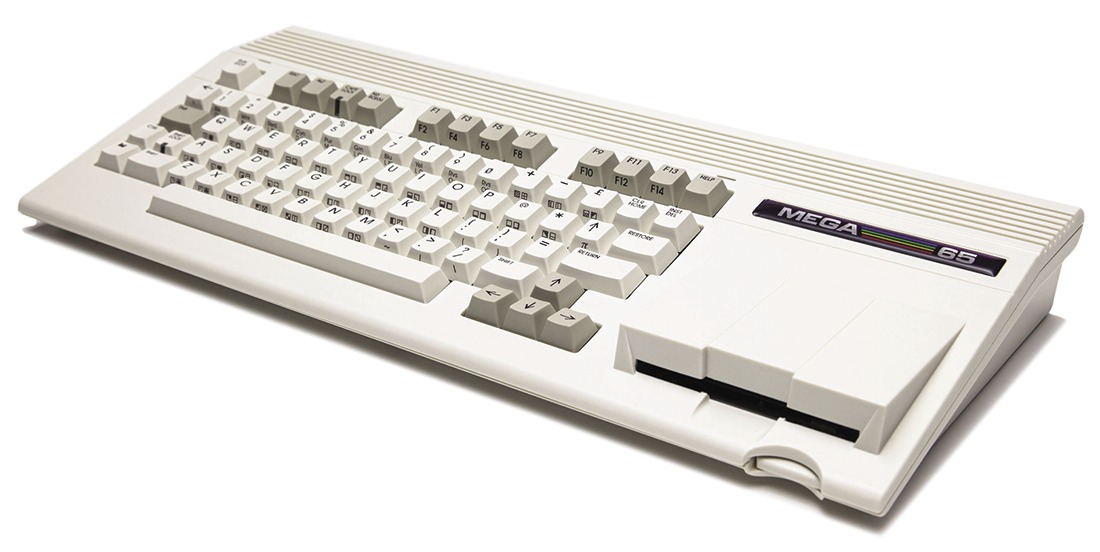
FPGA-Based New Home Computers
In the MakerSpace 01 issue, we discussed the MEGA65 and ZX Spectrum Next projects, both of which are successors to popular home computers of the 1980s. Each comes in a case with a keyboard. They both use field-programmable gate arrays (FPGAs) to perform hardware emulation of old computers and all their components. This differs from software emulation because an FPGA chip can emulate several computer components (such as the processor, the graphics chip, and the sound chip) in parallel. Retro fans who seek a replica with perfect timing prefer FPGA machines over software emulation.
The MEGA65 is an FPGA-based reimplementation of the Commodore C65, which was developed by Commodore as a replacement for the C64, but it never went into production. The MEGA65 aims for high compatibility with the C65 and the C64. A prototype (in a pretty plexiglass case) went out to developers and other interested parties in small quantities (100 pieces) in November 2020. The first batch of final machines has been completely assembled, but delivery has been delayed due to a cardboard shortage (Figure 10). Compared to the C65, there are some extras such as the FPGA-based variant of the C64’s processor that runs at up to 40 times the speed, a network interface, and several current operating systems, including a port of GEOS 64. The machine has a built-in 3.5 inch floppy drive.
The ZX Spectrum Next, a modern successor to the Sinclair ZX Spectrum Plus, boasts an FPGA-implemented Z80 processor that runs at up to 28MHz (instead of the 3.5MHz of the old machine). While a vibrant user community exists (the 3,000 machines manufactured as a result of the 2017 Kickstarter campaign have all been delivered), the current run has been delayed: The Spectrum Next’s central component, the Xilinx Spartan-6 FPGA processor, has not been available in sufficient numbers, which is why the team is currently working on porting the core to a different FPGA with better availability, all the while hoping that Xilinx will restart sales of the Spartan-6 chip (Figure 11).
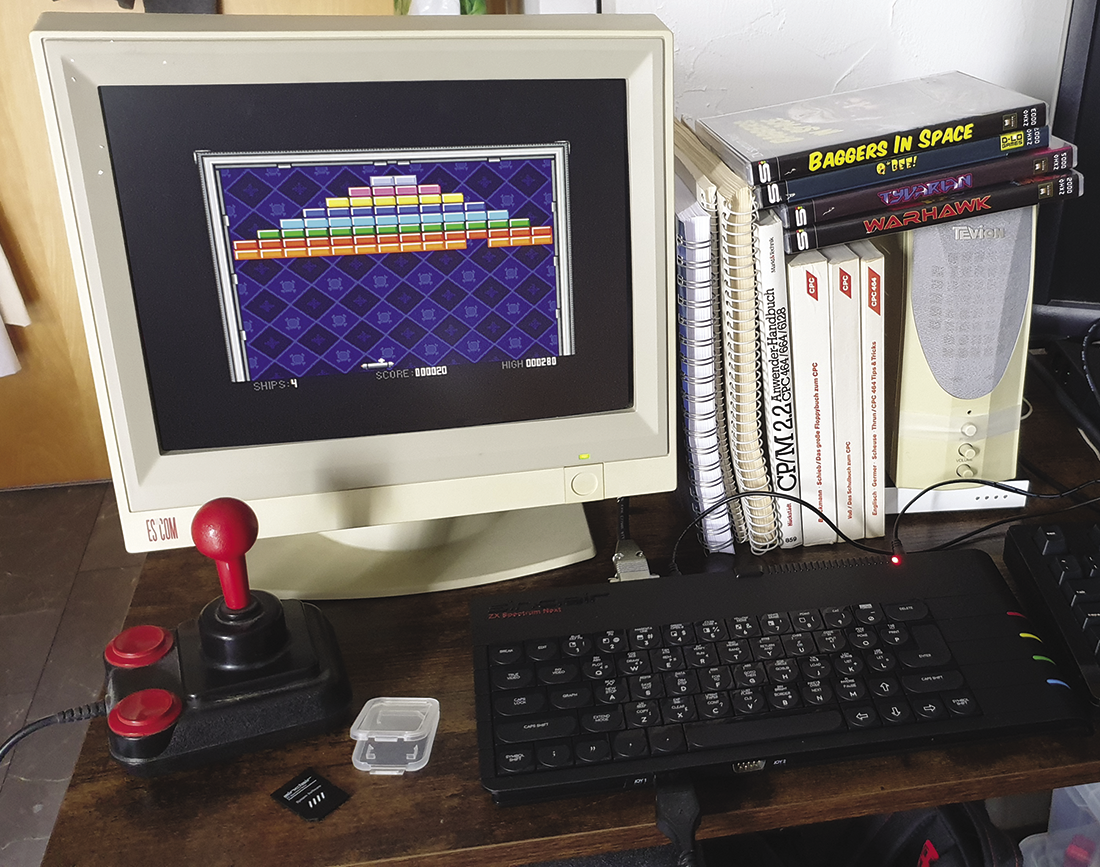
What’s special about both the MEGA65 and the Spectrum Next is that they are obviously successors of the C64 and the ZX Spectrum. Fans of those old machines notice immediately that they look and feel like the home computers from the 1980s, even while they offer much better performance and convenience.
A third popular machine, the MiSTer FPGA, specializes in running a huge number of cores for all sorts of home computers and arcade machines. Besides the machine cores, it runs a simple Linux system that can be used to transfer files to the MiSTer and handle automatic updates of the cores. MiSTer is not a complete system; there are several companies that offer MiSTer kits that you can either assemble yourself or that come pre-built. Currently, it’s hard to find any MiSTer kits because the Terasic DE10-Nano FPGA board that is the foundation of every MiSTer also has become hard to find. Overall, the FPGA scene is suffering from availability issues. This has become a general problem – try getting a PlayStation 5.
Peeks and Pokes
On most machines, you can modify a variety of properties, such as the border color, despite the BASIC interpreter having no built-in command to do that. Instead, you write a byte directly to a memory location that you must know (or look up in a table). The command for writing to memory is universally called POKE in BASIC, and it takes two arguments: an address and a (byte) value. For example, the following command changes the border color on a C64 to green:
POKE 53280,5In the same way, writing to just the next address (53281) will change the background color. The memory area from 55296 to 56295 holds (foreground) color information for the characters on the screen: The size of the memory area (1000 bytes) matches the number of characters (25 lines with 40 symbols per line). Figure 12 shows how to change all those colors; in the last lines, a loop is setting the foreground color of 1,000 characters to 3 (cyan).
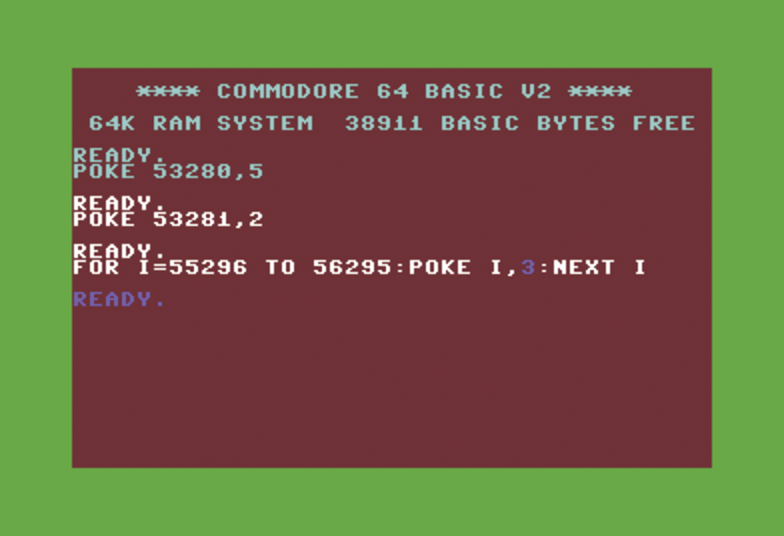
POKE commands to change the border and background colors.It is also possible to read the byte that is stored in a memory address using the PEEK function. For example, PEEK(55296) will return the color of the top-left character on the screen.
Where to Go From Here?
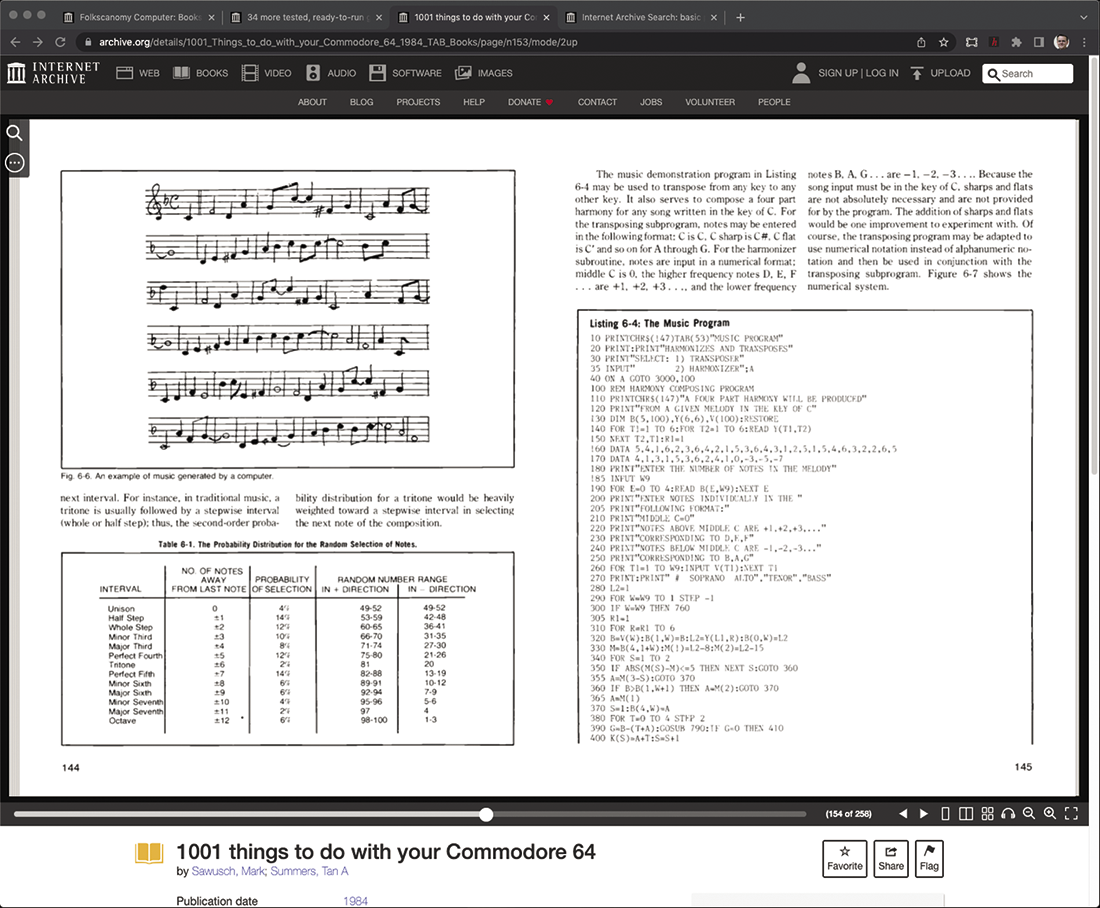
Back in the day, a lot of BASIC programming books were written and sold. Some books were platform-independent, but many targeted the BASIC dialect for a specific machine. If you visit the Internet Archive and search for “BASIC programming language,” you will find hundreds of books. Make sure to set some filters for the results (for example, select BASIC (Computer program language) from Topics and Subjects, and also select English and any other languages you can read in the Language filter).
Many of these books feature long, type-in BASIC programs with explanations of how the programmers solved some of the problems. Figure 13 shows an excerpt from 1001 Things to do with your Commodore 64.
Diving into the details of programming a home computer (or perhaps several) in BASIC can fill years of your spare time. It’s different from programming in a modern environment. While you may miss features from a powerful IDE, working in this very reduced setup is an interesting and fun experience.