DIY Scoreboard
We look at a broadcast video system network that uses Python code to control a video router and check out another program that creates a scoreboard.
Each year my church hosts a basketball league, and several years ago we wanted to upgrade to digital scoreboards because our existing classic board was showing its age. The first version of this new scoreboard software was written in Python and used the GTK toolkit to create the public display. A web page designed for an iPad allowed courtside control.
The gym is a shared space that also hosts a meeting room, party hall, and general-purpose room. To support these roles, two NUC small-form-factor computers drive the displays (100-inch LCD TVs). Windows was necessary to support all of the display software so that PowerPoint and ProPresenter would run natively.
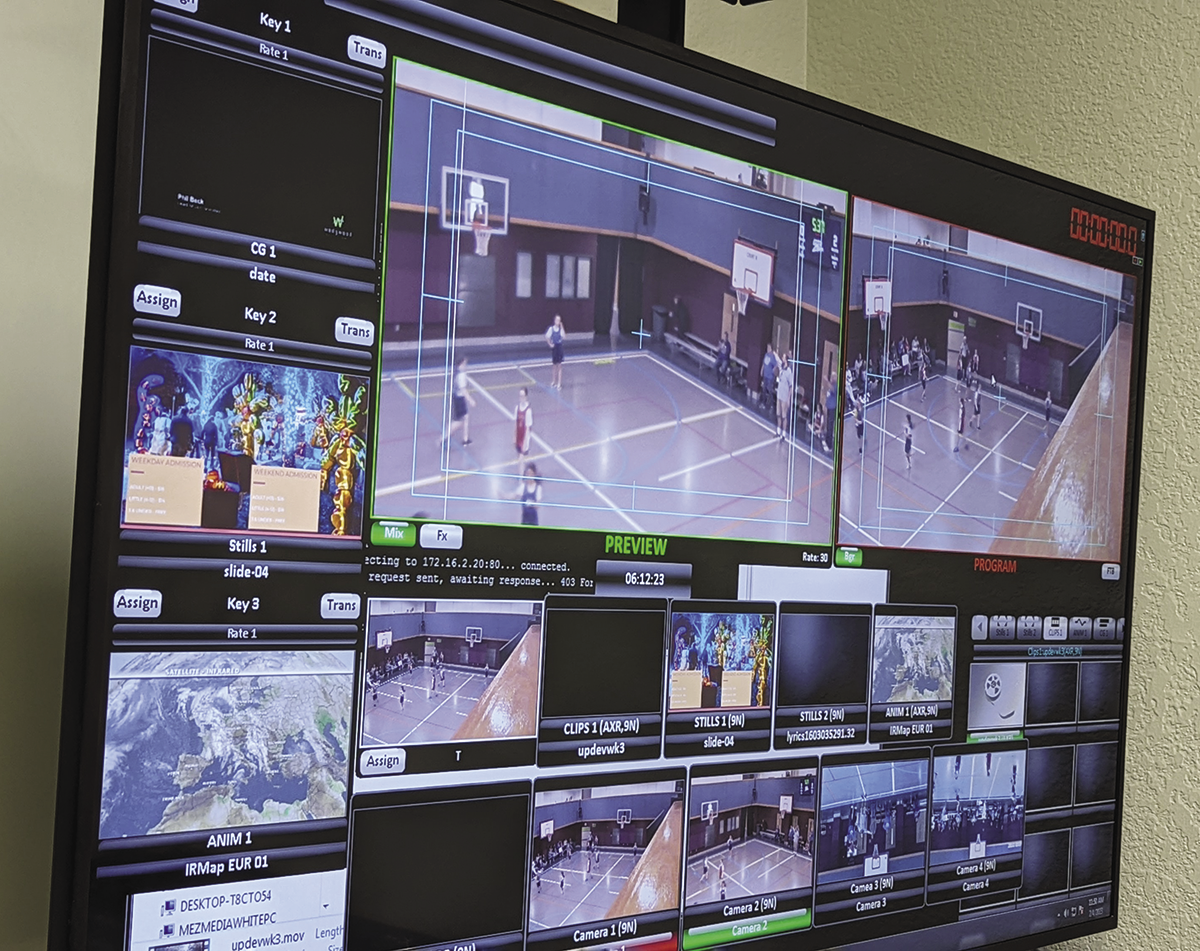
In general, a video system has a hub-and-spoke-style network wherein each device has a dedicated home that runs to a video switcher (Figure 1). The video switcher, as its name implies, accepts all of the video inputs and allows the operator to pick which one should be displayed, overlaid, or otherwise presented to the final output (Figure 2).

Displays are slightly more complicated because they need to select the switched video program from the video switcher or the scoreboards at any given time, which is accomplished by a matrix router. See the “Matrix Routers” box for more details.
In the video world, a router is a really helpful device. It accepts some number of video signals in and can send them to any of its destinations. This example uses a small four-input by four-output version, but other versions are available with up to thousands of I/O points.
Think of the router as a grid with sources (video signals – see the “Video Signals and Conversions” box) coming in on the left and going out along the bottom. Each column (an output or destination) is allowed one connection. Inputs can connect to as many outputs as needed. To say it another way, all of the outputs can display a single input, but each output can only display one thing at a time. When a selection is made, the selected input and output are connected as if they were wired together directly. These connections are easily changed throughout the day as the needs of the basketball game dictate.
Many different video formats can carry live video down a wire. You’re probably familiar with HDMI because it has been widely adopted since its introduction. The video system discussed here primarily uses a serial digital interface (SDI), which is a digital standard for broadcast video. Hardware converters between these formats also exist, so changing between them is as easy as connecting a cable of each type. The cost for this conversion is a slight delay in the video signal that is normally not noticeable; however, if you have stacked several conversions, the delays can start to add up and become visible. This scenario generally presents itself as audio out of sync with its associated video.
The Scoreboard
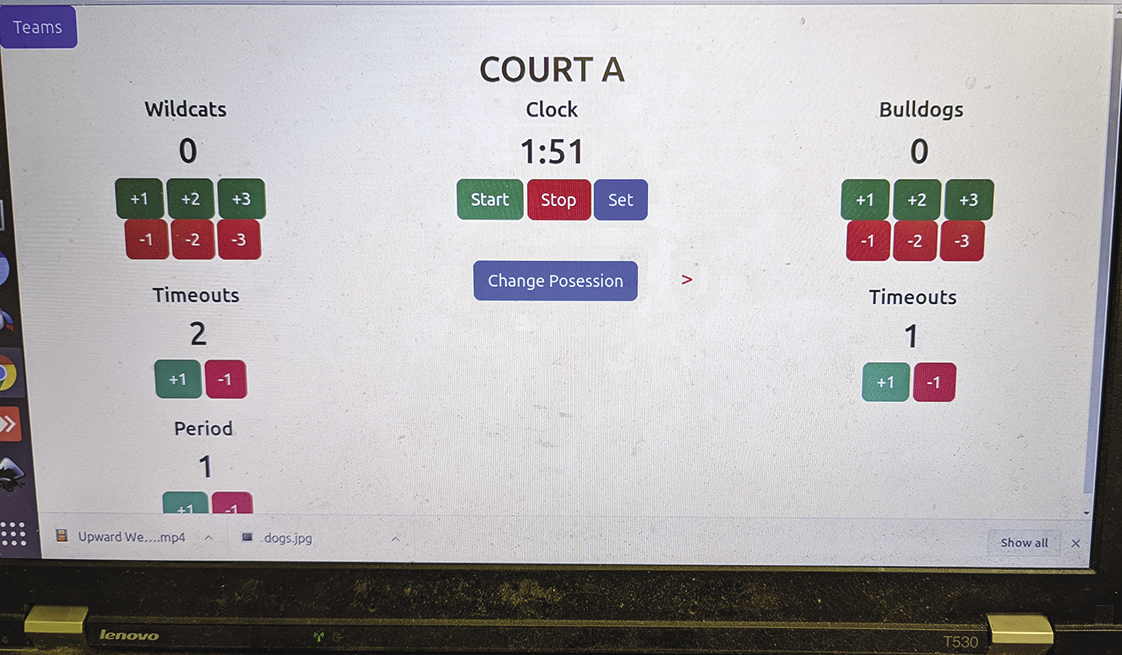
In addition to team points, a scoreboard also offers other game information, such as time remaining, period of play, time outs, or player numbers. Figure 3 shows the general flow of the program. At program startup, the graphics initialize and the initial state of the scoreboard renders. Concurrently, the web server starts and the operator brings this page up on a courtside computer (Figure 4).
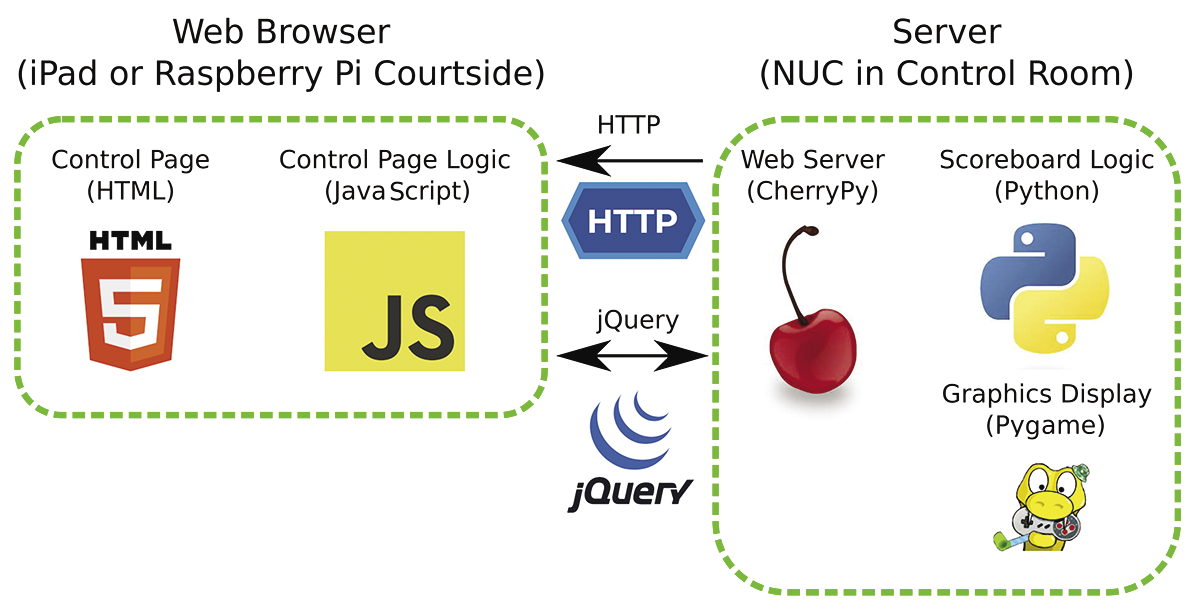
As the basketball game progresses, the operator uses the web interface to update the game score and other statistics. Each action on the web interface starts as a JavaScript function that runs in the browser, communicating with the CherryPy server through background Ajax calls. When CherryPy receives these commands, it updates the graphics screen to reflect the change on the scoreboard itself and then sends the updated values back to the browser so that the operator’s interface is also updated.
Listing 1 shows some of the code behind the scoreboard. (You can download the complete code online.) To begin, you must import the external libraries the program needs: The pygame, graphics library draws the scoreboard; _thread allows multiple branches of the program to run at the same time, so you can run the scoreboard display and the web control interface at the same time; pymysql is the MySQL database library for Python; and cherrypy sets up the CherryPy framework.
Listing 1: scoreboard.py
001 import pygame
002 import _thread
003 import cherrypy
004 import pymysql
005
006 class web:
007 def __init__ ( self , scoreboard ):
008 self.scoreboard = scoreboard
009 self.reconnect()
010 self.dbGameID = None
011
012 def reconnect ( self ):
013 self.db = pymysql.connect(
014 host='DB_HOSTNAME',
015 user='DB_USER',
016 password = "DB_PASSWORD",
017 db='DB_NAME',
018 )
019
020 def gameEvent ( self , event , value ):
021 if self.dbGameID == None: return
022
023 self.db.ping ( True )
024 period = self.scoreboard.period.value
025 time = self.scoreboard.clk.seconds
026
027 sql = "INSERT INTO `updates` ( `gameID` , `period` , `gameTime` , `event` , `value` ) VALUES ( " + str ( self.dbGameID ) + " , " + str ( period ) + " , " + str ( time ) + " , '" + event + "' , " + str ( value ) + " );"
028
029 cursor = self.db.cursor ( pymysql.cursors.DictCursor )
030 cursor.execute ( sql )
031 self.db.commit()
032
033 @cherrypy.expose
034 def index ( self ):
035 html = """
...
240 """.format (
241 self.scoreboard.court.value + " " + self.scoreboard.court.label,
242 self.scoreboard.scoreA.label,
243 self.scoreboard.scoreB.label,
244 self.scoreboard.scoreA.value,
245 self.scoreboard.scoreB.value,
246 self.scoreboard.clk.clockString,
247 self.scoreboard.timeoutA.value,
248 self.scoreboard.timeoutB.value,
249 self.scoreboard.posession.leftString,
250 self.scoreboard.posession.rightString,
251 self.scoreboard.period.value
252 )
253
254 return html
255
256 @cherrypy.expose
257 def teams ( self ):
258 cursor = self.db.cursor ( pymysql.cursors.DictCursor )
259 sql = "SELECT t1.teamName AS t1name , t2.teamName AS t2name , games.* FROM `games` LEFT JOIN `teams` t1 ON t1.ID=games.team1 LEFT JOIN `teams` t2 ON t2.ID=games.team2";
260 cursor.execute ( sql )
261
262 html = ""
266
267 return html
268
269 @cherrypy.expose
270 def processGameSelect ( self , gameID ):
271 cursor = self.db.cursor ( pymysql.cursors.DictCursor )
272 sql = "SELECT t1.teamName AS t1name , t2.teamName AS t2name , games.* FROM `games` LEFT JOIN `teams` t1 ON t1.ID=games.team1 LEFT JOIN `teams` t2 ON t2.ID=games.team2 WHERE games.ID = " + str ( gameID );
273 cursor.execute ( sql )
274 game = cursor.fetchone()
275
276 self.dbGameID = gameID
277
278 self.teamName ( "1" , game [ "t1name" ] )
279 self.teamName ( "2" , game [ "t2name" ] )
280
281 @cherrypy.expose
282 def teamName ( self , team , name ):
283 if team == "1": self.scoreboard.scoreA.label = name
284 if team == "2": self.scoreboard.scoreB.label = name
285
286 @cherrypy.expose
287 def score ( self , team1 , team2 ):
288 self.scoreboard.scoreA.value += int ( team1 )
289 self.scoreboard.scoreB.value += int ( team2 )
290
291 if team1 != "0": self.gameEvent ( "T1SCORE" , team1 )
292 if team2 != "0": self.gameEvent ( "T2SCORE" , team2 )
293
294 self.scoreboard.render()
295 return str ( self.scoreboard.scoreA.value ) + ":" + str ( self.scoreboard.scoreB.value );
296
297 @cherrypy.expose
298 def timeouts ( self , team1 , team2 ):
299 self.scoreboard.timeoutA.value += int ( team1 )
300 self.scoreboard.timeoutB.value += int ( team2 )
301
302 if team1 != "0": self.gameEvent ( "T1TIMEOUT" , team1 )
303 if team2 != "0": self.gameEvent ( "T2TIMEOUT" , team2 )
304
305 return str ( self.scoreboard.timeoutA.value ) + ":" + str ( self.scoreboard.timeoutB.value )
306
307 @cherrypy.expose
308 def period ( self , period ):
309 self.gameEvent ( "PERIOD" , period )
310
311 self.scoreboard.period.value += int ( period )
312 return str ( self.scoreboard.period.value )
313
314 @cherrypy.expose
315 def getClock ( self ):
316 return self.scoreboard.clk.clockString
317
318 @cherrypy.expose
319 def clockRun ( self ):
320 self.scoreboard.clk.running = True
321
322 @cherrypy.expose
323 def clockStop ( self ):
324 self.scoreboard.clk.running = False
325 self.gameEvent ( "CLOCKSTOP" , 0 )
326
327 @cherrypy.expose
328 def clockSet ( self , seconds ):
329 self.scoreboard.clk.seconds = int ( seconds ) + 1
330 self.scoreboard.clk.tick ( manual = True )
331 return self.scoreboard.clk.clockString
332
333 @cherrypy.expose
334 def posession ( self ):
335 self.scoreboard.posession.toggle()
336 if self.scoreboard.posession.leftString == "<": self.gameEvent ( "POSESSION" , 1 )
337 if self.scoreboard.posession.rightString == ">": self.gameEvent ( "POSESSION" , 2 )
338
339 return self.scoreboard.posession.leftString + ":" + self.scoreboard.posession.rightString
340
341 class clock:
342 def __init__ ( self , screen ):
343 self.screen = screen
344 self.width = self.screen.get_width()
345 self.height = 250
346 self.seconds = 6 * 60
347 self.clockSurf = pygame.surface.Surface ( ( self.width , self.height ) )
348 self.clockFont = pygame.font.Font ( "open24.ttf" , self.height )
349 self.running = False
350
351 mins = int ( float ( self.seconds ) / 60.0 )
352 secs = self.seconds % 60
353
354 self.clockString = "{0}:{1:02d}".format ( mins , secs )
355
356 def tick ( self , manual = False ):
357 if self.seconds > 0 and ( self.running == True or manual == True ):
358 self.seconds ‑= 1
359
360 mins = int ( float ( self.seconds ) / 60.0 )
361 secs = self.seconds % 60
362
363 self.clockString = "{0}:{1:02d}".format ( mins , secs )
364
365 def render ( self ):
366 timeSurf = self.clockFont.render ( self.clockString , True , ( 0 , 255 , 0 ) )
367
368 x = self.width / 2 ‑ int ( timeSurf.get_width() / 2 )
369 self.clockSurf.fill ( ( 0 , 0 , 0 ) )
370 self.clockSurf.blit ( timeSurf , ( x , ‑25 ) )
371 return self.clockSurf
372
373 class posession:
374 def __init__ ( self ):
375 self.width = 300
376 self.height = 100
377 self.font = None
378 self.direction = "<"
379 self.posSurf = pygame.surface.Surface ( ( self.width , self.height ) )
380 self.leftString = ""
381 self.rightString = ""
382 self.makeSurfaces()
383
384 def makeSurfaces ( self ):
385 self.leftSurf = self.font.render ( "<" , True , ( 255 , 0 , 0 ) )
386 self.rightSurf = self.font.render ( ">" , True , ( 255 , 0 , 0 ) )
387
388 def toggle ( self ):
389 if self.direction == "<":
390 self.direction = ">"
391 self.leftString = ""
392 self.rightString = ">"
393 else:
394 self.direction = "<"
395 self.leftString = "<"
396 self.rightString = ""
397
398 def render ( self ):
399 self.posSurf.fill ( ( 0 , 0 , 0 ) )
400 label = self.font.render ( "POSESSION" , True , ( 255 , 0 , 0 ) )
401 x = self.width / 2 ‑ int ( label.get_width() / 2 )
402 self.posSurf.blit ( label , ( x , 0 ) )
403
404 if self.direction == "<": self.posSurf.blit ( self.leftSurf , ( 0 , 0 ) )
405 else: self.posSurf.blit ( self.rightSurf , ( self.width ‑ self.rightSurf.get_width() , 0 ) )
406 return self.posSurf
407
408 class label:
409 def __init__ ( self ):
410 self.width = 250
411 self.height = 350
412 self.label = ""
413 self.value = ""
414 self.labelFont = None
415 self.valueFont = None
416 self.labelColor = ( 200 , 200 , 200 )
417 self.valueColor = ( 200 , 200 , 200 )
418 self.countSurf = pygame.surface.Surface ( ( self.width , self.height ) )
419
420 def render ( self ):
421 self.countSurf.fill ( ( 0 , 0 , 0 ) )
422 valSurf = self.valueFont.render ( str ( self.value ) , True , self.valueColor )
423 x = self.width / 2 ‑ int ( valSurf.get_width() / 2 )
424 self.countSurf.blit ( valSurf , ( x , 0 ) )
425
426 labelSurf = self.labelFont.render ( str ( self.label ) , True , self.labelColor )
427 x = self.width / 2 ‑ int ( labelSurf.get_width() / 2 )
428 self.countSurf.blit ( labelSurf , ( x , valSurf.get_height() ‑ 10 ) )
429
430 return self.countSurf
431
432 class counter:
433 def __init__ ( self ):
434 self.width = 250
435 self.height = 350
436 self.label = ""
437 self.value = 0
438 self.labelFont = None
439 self.valueFont = None
440 self.labelColor = ( 200 , 200 , 200 )
441 self.valueColor = ( 200 , 200 , 200 )
442 self.countSurf = pygame.surface.Surface ( ( self.width , self.height ) )
443
444 def render ( self ):
445 self.countSurf.fill ( ( 0 , 0 , 0 ) )
446 valSurf = self.valueFont.render ( str ( self.value ) , True , self.valueColor )
447 x = self.width / 2 ‑ int ( valSurf.get_width() / 2 )
448 self.countSurf.blit ( valSurf , ( x , 0 ) )
449
450 labelSurf = self.labelFont.render ( str ( self.label ) , True , self.labelColor )
451 x = self.width / 2 ‑ int ( labelSurf.get_width() / 2 )
452 self.countSurf.blit ( labelSurf , ( x , valSurf.get_height() ‑ 10 ) )
453
454 return self.countSurf
455
456 class board:
457 def __init__ ( self ):
458 pygame.display.init()
459 self.screen = pygame.display.set_mode ( ( 1280 , 720 ) , display = 1 , flags = pygame.FULLSCREEN )
460 pygame.font.init()
461 self.scoreFont = pygame.font.Font ( "font.ttf" , 200 )
462 self.labelFont = pygame.font.Font ( "font.ttf" , 50 )
463 self.timeoutFont = pygame.font.Font ( "font.ttf" , 50 )
464 self.posFont = pygame.font.Font ( "font2.otf" , 50 )
465
466 self.logo = pygame.image.load ( "upwardBlack.jpg" ).convert()
467
468 self.clk = clock ( self.screen )
469
...The Web Class
The web class (lines 6-339) connects to a MySQL database that will be used to retrieve team names, determine which team plays which, and record game history. When the class is instantiated, the __init__ function is called automatically to set up a few things needed later. Line 8 creates a class variable self.scoreboard and saves the reference to the scoreboard class that’s passed in as an argument.
The reconnect function is really only one call split up across multiple lines for easier readability (lines 12-18). pymysql.connect creates self.db, the local reference to the database. Each line supplies the appropriate credential.
The gameEvent function (lines 20-31) logs any change to the scoreboard. In a future version, this function will allow for recovering the scoreboard after a crash and exporting a game report. To begin, the code checks whether self.dbGameID (which was initialized to None in line 10) is set. If not, then you don’t have a database ID, so you just return.
The self.db.ping convenience function, with an argument of True, checks whether the database connection is live and, if not, reconnects automatically in the next line. The two lines that follow get the game period and time in seconds. These two values pinpoint a unique time within the game.
Line 27 builds a SQL statement. The INSERT INTO command names the table followed by a list of columns separated by commas. The VALUES keyword assigns the values for each column, provided in the same order. Line 29 creates a database cursor that interacts with an SQL statement. In this case (line 30), it just executes the SQL line created in line 27, but it has many more capabilities, especially when retrieving records. Line 31 calls commit to confirm that you want to write the data.
The cherrypy decorator (lines 33-339) creates a small web server for controlling the scoreboard. Each Python function becomes a web address that returns its designated content to the browser that has called it.
The index function acts just like index.html in a traditional web server. In the absence of another address, it is the default item returned. Most of this function is a very large multiline string (not shown here, grab the full code online) enclosed by triple quotes (""") that instructs Python to ignore any newlines or other special characters until it encounters another triple quote. The enclosed string is the HTML5 and JavaScript of the control web page. After the massive text string, the Python format command inserts all of the current variables into the web page (lines 240-251).
The @cherrypy.expose decorator tells CherryPy that it should allow this function to be reachable through its web server. Without this decorator the function remains private from anyone on the web, which allows the program to be structured with additional functions as needed, with only those specifically designed to be web-accessible published. You’ll see this decorator before each function in the web class, so it’s only described once here.
The teams function (lines 257-267) is somewhat of a misnomer in that it generates a game selector. For the purposes of this database, a game is a pair of teams at a specific date and time on a specific court. This function retrieves all of the games and returns an HTML select widget.
The function begins by creating an SQL cursor and statement and then executing it (as in lines 29-31). However, now it’s retrieving records, so the cursor has the results of the query, which is data instead of just a message that the query succeeded.
After starting the HTML select widget on line 262, the program loops over the SQL results. As the name implies, cursor.fetchall gives all of the results as an iterator. game will contain one row from the database for each time through the loop. Each pass creates an HTML option and lists the game date, time, and teams.
The processGameSelect function (lines 270-279) is called when the scoreboard operator selects a game from the drop-down just generated. It receives the gameID argument and uses that to get the game details from the database. Line 272 is an almost identical SQL statement to line 259, but with a WHERE clause added to the end with the gameID.
After doing the SQL dance one more time, line 274 calls cursor.fetchone. The last time, all of the records were retrieved, but this time only one is needed, which is saved into game. gameID is saved into a class variable, and self.teamName sets the names retrieved from the database.
The teamName function (lines 281-284) accepts a team number and name as arguments. Each of two if statements determines which team is being named and then saves the new name to a variable in the scoreboard class.
Housekeeping
The score, timeouts, and period functions (lines 286-312) accept the team1 and team2 arguments (period only accepts a period number) which are the amounts to change each value. Negative values are allowed so that values can be corrected or reset for the next game or period. Note also that the variables are preceded with int. All arguments from CherryPy come in as strings, so they have to be converted to integers before they can be used algebraically.
Finally, the two newly adjusted values are returned, separated by a colon, to go back to the JavaScript function and be split into the two scores so that the control screen is updated properly.
The JavaScript versions of these functions are generated in the index function (not included in the listing). The score function, for example, creates a JavaScript object and adds obj.team1 and obj.team2:
function score ( team1 , team2 )
{{
   obj = new Object();
   obj.team1 = team1
   obj.team2 = team2
These are the score deltas (amounts to change) for each team. jQuery (represented by the $) then posts the object to the address score (the Python CherryPy function described above):
$.post ( "score" , obj , function ( data ) {{
    scoreParts = data.split ( ":" );
    $ ( "#team1score" ).html ( scoreParts [ 0 ] );
    $ ( "#team2score" ).html ( scoreParts [ 1 ] );
}} );
obj has the values to send that were set up earlier. When post finishes and receives a response, function ( data ) is called, where data is the returned string with the newly updated scores (or timeouts or period). First, the data is split into its two parts with data.split, and then the score on the control page is updated with jQuery.
Time and Possession
The clock is a unique case because it is the only game variable that updates independently. Everything else is a response to something that happens on the court.
In the clock function (lines 314-331), getClock returns a string that represents the current game time, called by a recurring interval in a JavaScript function on the operator’s web page to update the operator’s clock. A timer event in the graphics thread both updates the internal clock variable and redraws the clock on the scoreboard display.
updateClock is only found in the JavaScript and does the job of keeping the control page clock up to date. It calls getClock by jQuery to get the current clock time then updates the HTML div with the current value:
function updateClock()
{{
   $.post ( "getClock" , function ( data ) {{
      $ ( "#clock" ).html ( data );
   }} );
}}
Both the clockRun and clockStop functions change the state of self.scoreboard.clk.running. If that variable is True, the clock is updated. If it’s False, the clock is not updated or is, for all practical applications, paused. clockStop also calls self.gameEvent to add an entry that the clock was stopped. Because the clock is not team-specific, the second argument is 0. The JavaScript version of these functions (lines 80-92) are not shown. Once the Python function is called by jQuery, a JavaScript interval is either set or cleared to update the control page.
For the clockSet function, the variable self.scoreboard.clk.seconds keeps track of the game time remaining in seconds, which is set to one second more than requested. Next, self.scoreboard.clk.tick automatically subtracts one second. Passing manual = True forces a redraw of the clock even though it is not running. Finally, self.scoreboard.clk.clockString, which is a text representation of the time remaining in minutes and seconds, returns.
The JavaScript version can be found on lines 101-116 (not shown). It asks the operator what the clock should be set to and will contain either the requested time or null if the dialog box was canceled.
If the value is valid, the request is split into minutes and seconds and then converted to seconds. After a new object is created and a seconds parameter added, it is posted by jQuery back to the Python function. The control screen then updates with the new clock value and the update interval clears so clock requests are not made until it starts running again.
The posession [sic] function (333-339) calls the toggle method of self.scoreboard.posession, which flips which team currently has the ball (indicated by the < and > symbols as arrows).
Lines 336 and 337 check to see which team has possession and add a gameEvent to reflect the change. Finally, two strings are returned separated by a colon; each string is either a space or one of the < or > symbols. The JavaScript version is on lines 71-78 (not shown). After posting a possession change by jQuery the return string is split into two parts, and the left and right divs are updated on the control screen.
The Clock Class
The clock class (lines 341-371) manages the game clock for the main graphics (scoreboard) display. The __init__ function sets up a few things: self.screen is a reference to the screen object passed when creating the class; self.width stores the screen width by calling get_width() on the screen surface; self.height is set explicitly to define how tall you want the clock to be displayed; and self.seconds is the time on the clock, initialized to 6 * 60 seconds to reflect six-minute periods. Line 347 creates a Pygame surface onto which the clock is drawn, and line 348 sets up the font. Finally self.running tracks whether the clock is running or paused.
Lines 351-354 calculate the clock values and convert to int; seconds is the mod (remainder) of self.seconds / 60. Finally, self.clockString is assembled from the calculated values.
The main loop calls the tick function (lines 356-363) once a second. If time is left on the clock and either self.running or manual is set to True, self.seconds decrements by one, and the same calculations as before are repeated to update self.clockString. The manual parameter used when setting the clock forces the clock to be regenerated immediately rather than waiting for the next automatic call to tick.
The render function (lines 365-371) draws the clock. self.clockFont.render takes self.clockString and a color tuple as arguments. The True argument says to anti-alias the text as it is drawn. The result is timeSurf, a Pygame surface with the current game time drawn onto it.
After the center point of timeSurf is calculated, self.clockSurf is cleared by filling it with black and blitting (copying) timeSurf onto it. Then the surface is returned. This copying might seem like an extra step, but here’s what’s happening: When self.clockFont.render generates the text, the surface is the exact size of the text it generated. For it to fill the space at the dimensions specified in __init__, you have to copy it onto the larger surface.
The Posession Class
The posession class (lines 373-406) indicates who has the ball at any given time. __init__ ( self ) sets up the graphical display, with the initial state specified by self.direction (who currently has the ball). A surface is created and initialized with self.leftString and self.rightString.
The convenience function makeSurfaces creates self.leftSurf and self.rightSurf possession arrows rendered with < and > symbols.
When the toggle function (lines 388-396) is called, possession has changed from one team to the other. The if checks to see which team currently has possession and then updates all of the variables to their opposite states. Note that self.leftString and self.rightString either have an arrow or an empty string.
When everything is ready to be drawn in the render function, self.posSurf is cleared by filling it with black (line 399) before generating the label text, calculating the center point, and blitting it onto the final surface.
Lines 404 and 405 make sure the arrow is blitted on the appropriate side of the surface. If self.direction is <, the arrow is drawn on the left side of the surface; otherwise, it’s drawn on the right before the final surface is returned.
Labels and Counters
The label class (lines 408-430) represents an arbitrarily labeled value on the scoreboard. The label and its value can have separate fonts and colors. The Pygame surface is created on line 418.
The render function starts by clearing the surface (fill) with black then rendering the value, calculating its center point, and drawing it. Lines 426-428 do the same thing for the label text before returning on line 430.
Lines 432-454 describe the counter class. Counters are identical to labels, except their self.value is expected to be an integer.
The Board Class
Everything comes together in the board class (lines 456-538). All of the modules that have been defined to this point are initialized here, starting with pygame.display.init, which starts the Pygame engine. The pygame.display.set_mode creates the drawing surface, setting the window size. display = 1 makes the Pygame window default to the second monitor, and flags = pygame.FULLSCREEN is self-descriptive.
Because this program uses Pygame’s font capabilities, these are initialized on line 460, after which all of the fonts are loaded. In Pygame a font is the face itself and an associated size, so the same font file may be loaded multiple times with different sizes.
Line 466 loads self.logo, which is the logo displayed along the bottom of the scoreboard. The convert at the end of the line makes the image’s internal format match Pygame’s initialized display format so the logo blit onto the screen is faster.
Line 468 creates an instance of the clock class, with a reference to self.screen passed in so that it can draw the updated clock directly.
The final lines of the program (not shown) initialize five different instances of the counter class for the home and visitor’s scores, number of timeouts for each team, and the game period. In each case, valueFont and labelFont are set to one of the font/size pairs initialized earlier. A label indicates which court each scoreboard is tracking.
A Typical Game Day
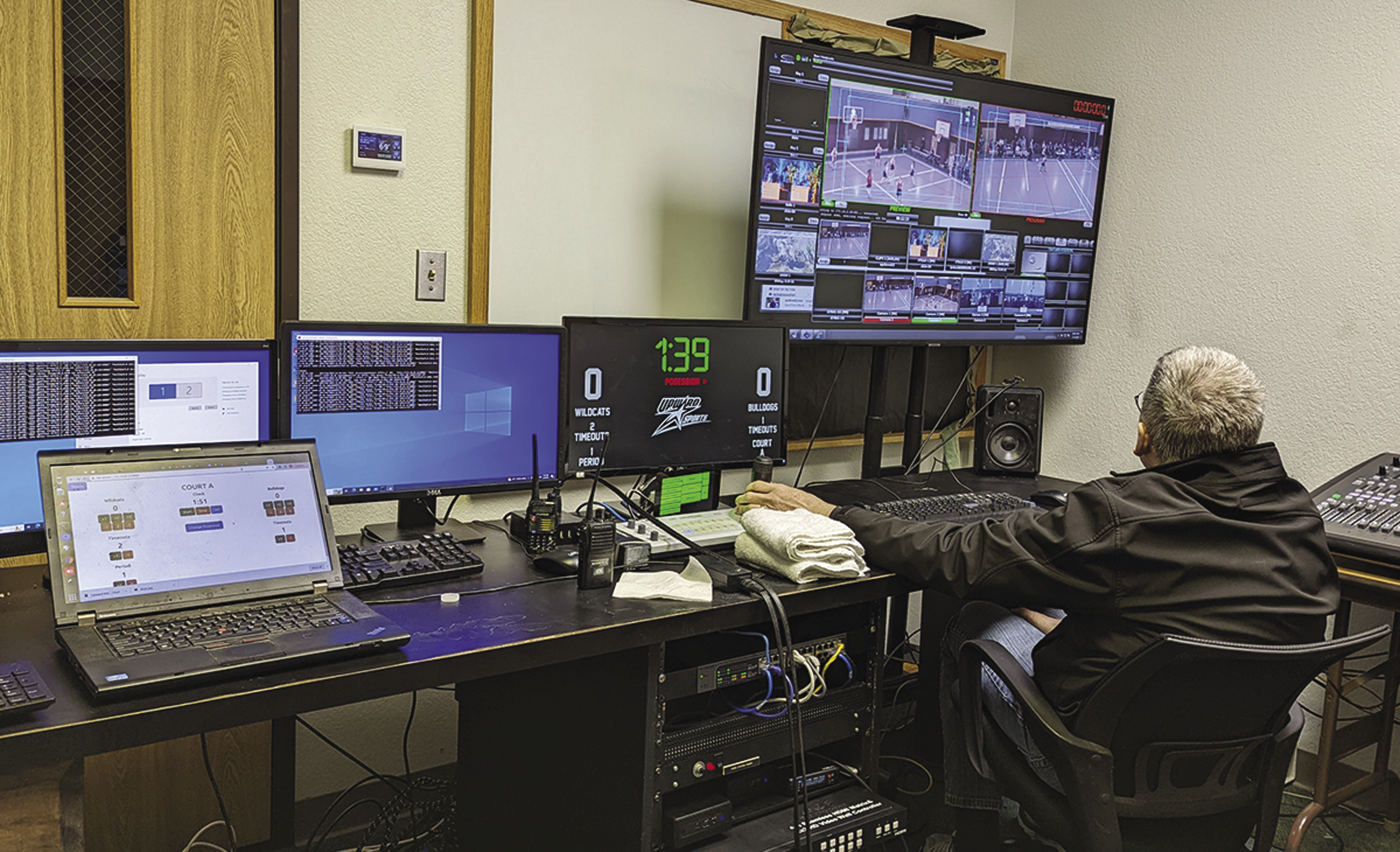
When the crew arrives on game day, the first task is to set up the scoreboard operator’s console (two Raspberry Pis, one per scoreboard). Once that’s done, robotically controlled cameras are placed around the court and everything is tested. The youngest teams play first in a half-court model. Halfway through the day, play switches to full-court games (Figure 5).
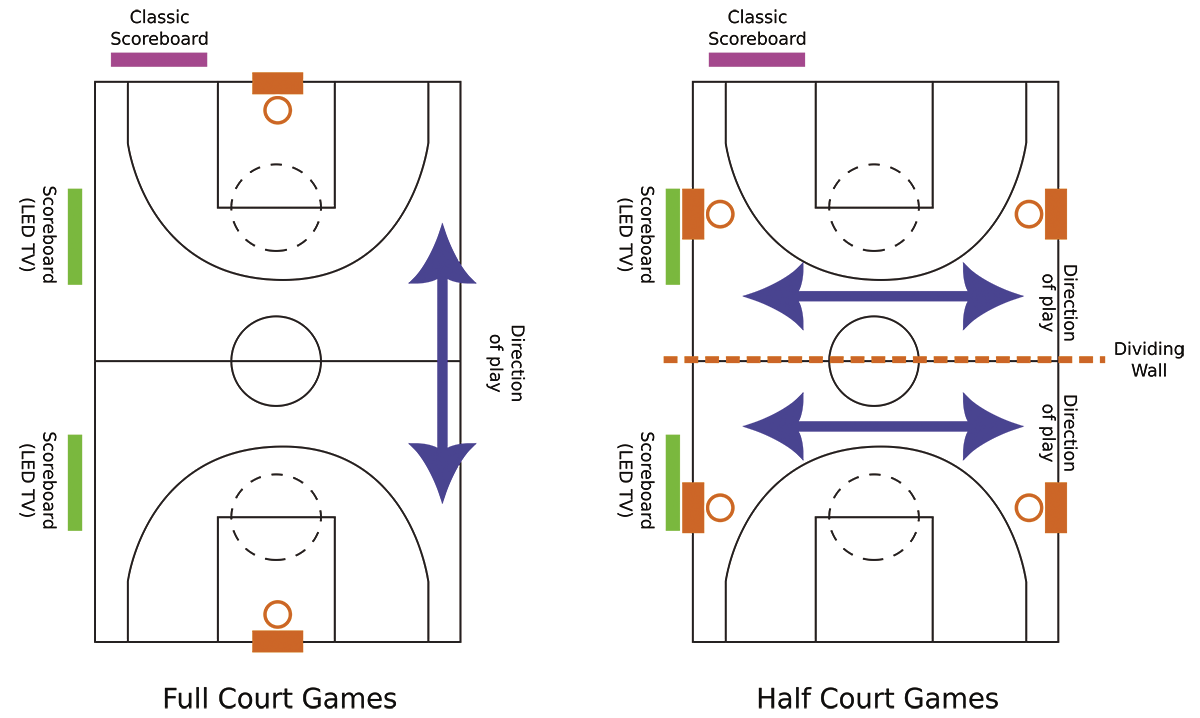
At halftime of each game, video messages play onto the screens, and the scoreboard returns to normal operation (Figure 6). At the halfway point of the day one scoreboard system is routed to both score displays because a single court is now in use. This switching is accomplished with a matrix video router.

Controlling a Video Matrix
Although the basic operation of a matrix router is fairly simple to understand, it’s always easier to have meaningful names and labels attached instead of remembering sets of numbers. Adding some shortcuts to common configurations makes things even easier, which is the purpose of the matrix control program (not shown, but available online).
The Raspberry Pi communicates with the matrix over a USB serial connection set up in Python:
class matrixSerial:
  def __init__ ( self ):
    self.port = serial.Serial ( "/dev/ttyUSB0" , 9600 )

  def send ( self , cmd ):
    self.port.write ( cmd )
The __init__ line creates self.port, which is an instance of the Serial object with the name of the serial device and the requested baud rate. The defaults are fine for everything else. The send function takes in cmd and transmits it with a call to self.port.write, thus sending data to the matrix.
The Button Class
The main function of the program is to present easy options to the user on a touchscreen; a button class sets up the actions to button presses. When the class is instantiated, it receives screen, which is a reference to the Pygame screen object, and font, which is a Pygame font object to be used to label the buttons. Each of these is stored in class properties for use by other methods.
When the create function is called, it receives a number of variables to get started, including the x and y screen coordinates where the button should be drawn, the width and height of the button, and the label text displayed on the button. self.rect stores the Pygame rect object, which has functions to check whether coordinates are within its bounds, along with several other useful utilities, and self.matrixCommands and self.osCommands are the actions taken when the button is pressed.
The addOsCommand function takes its associated string argument and passes it to the operating system when the button is pressed:
def addOsCommand ( self , cmd ):
  self.osCommands.append ( cmd )
The addMatrixCommand function is the same, except it transmits to the matrix.
The render function is responsible for drawing the button on the screen. As you have seen before, it creates a surface and fills it – with green in this case. If its label is not empty, the program renders the text, calculates how to center the text, and adds the text to the button blit. The surface is then drawn to the screen with a reference saved to its Pygame rect.
The Matrix Class
The matrix class draws and manages the interface on the touchscreen. As usual, an __init__ function initializes the different components of the interface, but this example has a lot of them. The graphics system starts and creates a window to draw on. Although the window has a caption, it is generally not visible because the window is in fullscreen mode.
As usual, the fonts and serial communications are initialized, although pygame.font.SysFont has an empty string as its first argument, thus asking Pygame for the default font:
buttonFont = pygame.font.SysFont ( "" , 32 )
self.matrixPort = matrixSerial()
The next line creates self.buttons as a list, which is where each of the buttons added to the interface are stored. Most of the rest of the init function creates each of the buttons and defines their functionality. They all follow the general format:
btn = button (self.screen, buttonFont)
btn.create ( <x> , <y> , <width> , <height , "<label" )
btn.addMatrixCommand ( chr ( 0x05 ) + chr ( 0x55 ) + chr ( 0x19 ) + chr ( 0x00 ) )
btn.addMatrixCommand ( chr ( 0x05 ) + chr ( 0x55 ) + chr ( 0x19 ) + chr ( 0x11 ) )
self.buttons.append ( btn )
The first line creates a button and passes in self.screen and buttonFont. The create makes the button, and addMatrixCommand adds commands for the video matrix. The command string comes from the matrix documentation; it tells you to send the first three hex values to start the command. The last byte contains the routing as 0 indexed addresses. The high-order digit defines the output or destination, and the low-order digit defines the input or source. Here, 0x00 says “connect the first output to the first input.” The next line connects the second output to the second input. Table 1 shows the configuration for each button.
|
Line Nos. |
Button |
Action |
|
57-61 |
Separate Scoreboards |
Each display shows its own scoreboard computer. |
|
63-67 |
Single Scoreboard |
Both screens display the first scoreboard computer. |
|
69-73 |
Both Program |
Both screens display the video switcher program output. |
|
75-78 |
Court A Program |
Switch only the court A screen to the video switcher output. |
|
80-83 |
Court B Program |
Switch only the court B screen to the video switcher output. |
|
85-88 |
Court A Scoreboard A |
Switch only the court A screen to its scoreboard computer. |
|
90-93 |
Court B Scoreboard B |
Switch only the court B screen to its scoreboard computer. |
|
95-98 |
CR Gym 1 Action |
View Scoreboard (NUC) 1 on the control room monitor. |
|
100-103 |
CR Gym 2 Action |
View Scoreboard (NUC) 2 on the control room monitor. |
|
105-108 |
CR Program Action |
View the video switcher program output on the control room monitor. |
|
110-113 |
Record |
Start recording onto an SD card or flash drive. |
|
115-118 |
Stop |
Stop recording. |
One output of the matrix is connected to a monitor in the control room so that the sources can be easily monitored. The three CR buttons allow any of the matrix sources to be viewed on the control room monitor (Figure 7).
All of the buttons except the last two use addMatrixCommand. The Record and Stop buttons use addOsCommand instead and then use wget to trick the digital recorder into thinking the buttons on its web GUI are being pressed to start and stop the recording onto an SD card or flash drive (Listing 2).
Listing 2: wget Trick
btn.addOsCommand ( r'wget ‑‑header="Accept:*/*" ‑‑header="Accept‑Encoding: gzip, deflate" ‑‑header="Accept‑Language: en‑US,en;q=0.9" ‑‑header="Connection: keep‑alive" ‑‑header="Cookie: serenity‑session=72952074" ‑‑user‑agent="Mozilla/5.0 (X11; Linux x86_64; rv:60.0) Gecko/20100101 Firefox/60.0" "http://172.16.2.20/cgi‑bin/system.cgi?command=recording&action=start"' )The render function iterates over self.buttons, calling each render method and creating all of the buttons onscreen, as well as all the Pygame rect objects to see whether they’ve been clicked. Once everything has been drawn to the buffer, the function calls pygame.display.flip to make it visible in the drawing window.
The loop function makes everything interactive by watching for buttons presses, sending commands when they are, and keeping up with everything that’s happening.
The looping value is first set to True, before the function enters the while loop with looping as its argument. If looping is set at any point to False, the loop exits.
The function then waits for Pygame events and checks to see if the event is a button click. To see if any of the buttons have been pressed, the function loops over self.buttons again and gets the coordinates of the mouse click:
for btn in self.buttons:
  if btn.rect.collidepoint ( event.pos ) == True:
    for cmd in btn.matrixCommands:
      self.matrixPort.send ( cmd + chr ( 0x77 ) )
If True, a button has been pressed. To make the button do its thing, the program loops over btn.matrixCommands and sends each string to the matrix. To give the matrix time to process each command, the function waits half a second before moving on.
The lines that follow do the same thing for any operating system commands (btn.osCommands) but pass them to os.system instead. The call to matrix on the last line of the program sets everything in motion.
Conclusion
I hope this article has given you some insight into a different type of network. When you think about the idea that similar control rooms like this exist all over the world and they each feed their own set of displays or a broadcast video system network, you can see the similarities and differences between the Internet and IP routing. You’ve also seen how these scoreboards are generated and controlled to support a local basketball league. Now that all the games and the season are done, it’s time to hit the showers.