You’ve Been Notified
If you use sensors with a Raspberry Pi or Arduino in your home network, you may want to get desktop notifications on your Linux PC whenever some interesting event is detected. You can send messages via SSH or through simple TCP connections and display them with notify-send.
There are some great libraries and techniques that let you pass sensor data from microcontrollers to centralized data servers and IoT dashboards. If you spend a lot of time on your laptop or behind a Linux desktop PCs, there are also some simple options that you can use to push notifications from Raspberry Pis or Arduino modules to the Linux desktop. Two techniques that I like to use are
- Running a remote command via an SSH login
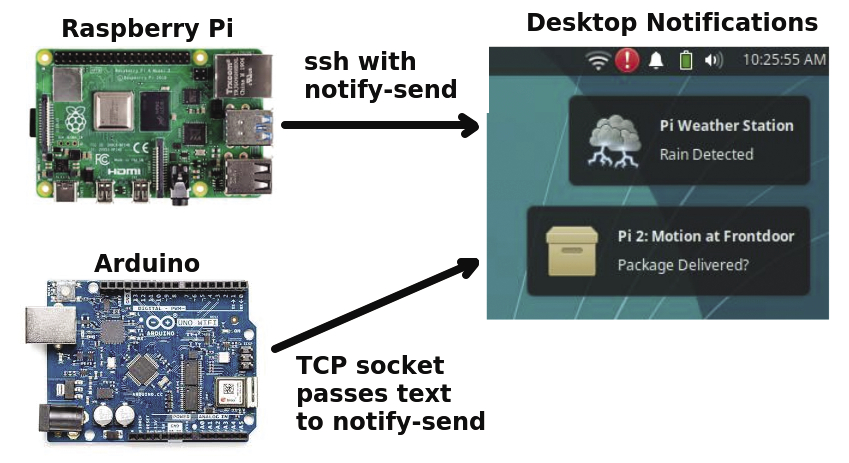
- Sending a message to a small TCP socket server script on my laptop (Figure 1)

Both of these approaches have their pros and cons. For a Raspberry Pi or a similar machine running a full Linux system, it’s a simple task to log in to your desktop via ssh and execute some notification command. Unfortunately, however, most Arduino modules don’t support SSH. Also, depending on what you’re doing on your local machine, you may not want to let external devices log in via SSH.
The TCP socket server method offers more security, but it requires a small, four-line Bash script that you will need to run on your desktop. TCP client libraries exist for both Python and C/C++, so all wireless Arduino modules and, of course, all Raspberry Pi models support this approach.
notify-send and Zenity
The first step in getting remote notifications working is to install a notification application. Two commonly used command-line notification programs are Notify-send (a tool in the Libnotify package) and Zenity. Zenity is a great general-purpose dialog creator, whereas notify-send just does desktop notification messages.
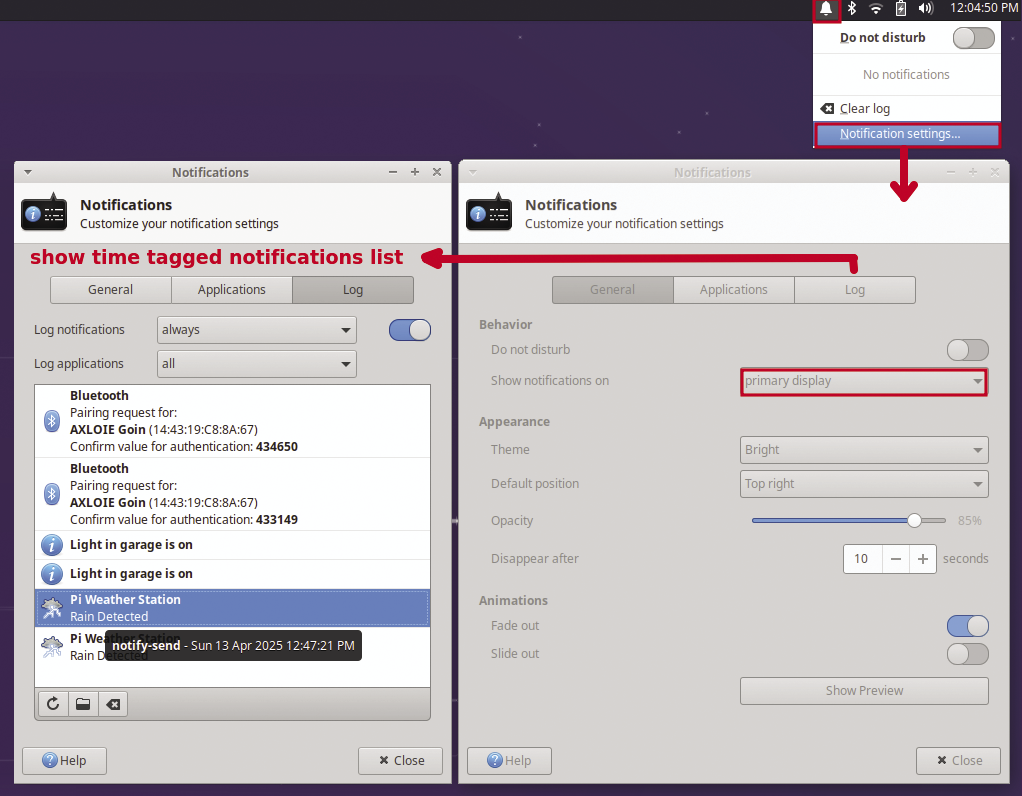
For my examples I’ll use the simpler notify-send utility. You can install it with sudo apt install libnotify-bin and then adjust how the notifications are stored and how they appear on your computer’s desktop. If you’re using the Xfce desktop, click on the bell icon that appears on your desktop toolbar and then click on Notification settings. On the Log tab of the settings dialog you need to enable Log notifications (they may be completely disabled) and then pick the always option. The white area will then contain a time-tagged listing of notification messages (Figure 2).

To create a notify-send notification message, you run the notify-send command like this:
notify-send [OPTIONS] {summary} [body]Figure 3 shows an example of a notification message with an expire time (-t option) set to 0 and an icon file (-i option). The desktop notify bell icon can be used to show existing and past notification messages. If the -i does not add an icon for you, try using the absolute path of an icon file, for example,
-i /usr/share/icons/Tango/24x24/status/weather-severe-alert.pngwhich worked well on an Ubuntu 24.04 system.

notify-send to display a notification message.Using SSH with a Login Command
There are a few methods for running a command or script when an ssh user logs in. One approach is use the sshpass utility. Sshpass is a non-interactive SSH password provider that can be used in Bash scripts. You can use it with this syntax:
sshpass -p password ssh user@ip-address -t commandUnlike with a regular SSH session, sshpass sends the user’s password, so the remote system will not issue a password prompt. The -t option of ssh will run the supplied command on the remote host and then close the connection and exit.
The next lines show an example that runs notify-send with several options on the host 192.168.0.122, logging in as pete with the provided password (mypassword). Note the usage of single and double quotes:
# Send a notification message via sshpass
sshpass -p mypassword ssh pete@192.168.0.122 \
  -t "notify-send 'Pi Weather Station' \
  'Rain Detected' \
  -t 0 -i gnome-weather"
A useful example of using sshpass with a remote Pi node is motion detection: We have skunks in our neighbourhood, so when I get a motion alarm, I check the webcam before stepping out for a walk in the evening.
TCP Server-Client Notifications
The TCP/UDP network utility nc (or netcat) can be used as both a TCP socket server and a TCP client. You can create a single access TCP server on the desktop machine with a single command:
# Bash TCP server with nc
echo "ok" | nc -l -k -p 4444 -q 1
This statement sends an “ok” message to a TCP client that connects to this machine on port 4444. The -k and -q 1 options keep the connection open for one second. -p sets the port, 4444 in this example.
This one-liner will terminate after a connection is made, but you can turn it into a multi-connection TCP server by placing it in a while loop. Below is a simple four-line script that passes the TCP client message to a Bash variable msg. Then it runs notify-send and displays the message.
# TCP socket server to manage
# notification msgs
while true; do
  msg="$(echo "ok" | nc -l -k -p 4444 -q 1)"
  # send notification with info icon
  # and no timeout
  notify-send "$msg" -t 0 -i info
done
On a Raspberry Pi, you can configure a Bash TCP client using the nc statement with the TCP server’s IP address and port number. Below is an example that writes a message to a TCP server on port 4444:
# Send a message to TCP server
echo "Light in garage is on" | nc 192.168.0.114 4444
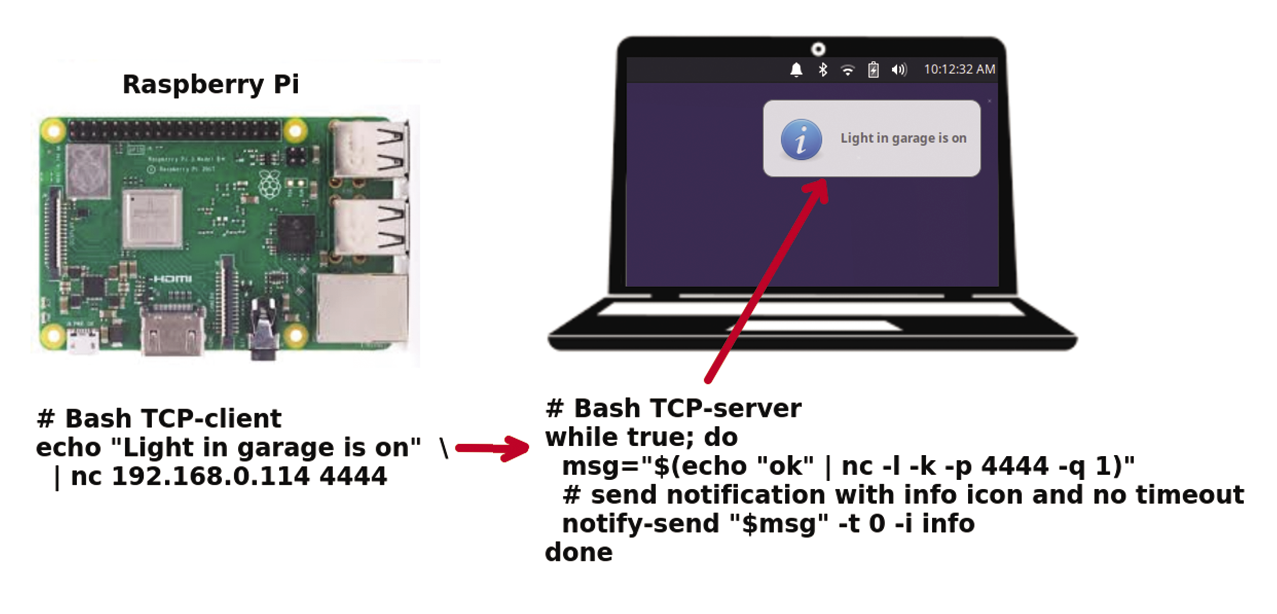
Figure 4 shows a Raspberry Pi and a laptop with the Bash scripts that they run in order to act as client and server, respectively. I have simplified the TCP server code so that it always uses an info icon. For a more flexible solution, you can enhance the TCP server script and make it pass a heading and icon definition (see Listing 1).

Listing 1: Enhanced TCP Server Script
01 #!/bin/bash
02 # tcp_2_notify.sh ‑ TCP socket server
03 #   to manage notifications msgs
04 #   Use a notify string of: "heading|message|icon"
05
06 while true; do
07   msg="$(echo "ok" | nc ‑l ‑k ‑p 4444 ‑q 1)"
08   # send notification with info icon and no timeout
09   echo "The msg: $msg"
10   heading=$(echo $msg | awk ‑F "|" '{print $1}')
11   msgbody=$(echo $msg | awk ‑F "|" '{print $2}')
12   # use info icon if nothing is defined
13   icon=$(echo $msg | awk ‑F "|" '{if (length($3) == 0) print "info"; else print $3} ')
14   notify‑send "$heading" "$msgbody" ‑t 0 ‑i "$icon"
15 done
TCP Client on Arduino
As mentioned earlier, running SSH on Arduino modules is a challenging task, but TCP client connections are well supported and documented for both C/C++ and Python. Listing 2 shows an Arduino C/C++ code snippet that connects to a TCP server and sends a message when the module is first powered up. The key section in this code chunk is found within lines 36-42:
// connect to TCP socket server and send a message
if (TCP_client.connect(TCP_SERVER_ADDR, TCP_SERVER_PORT)) {
  TCP_client.write("Arduino UNO R4 Restarted.");
  TCP_client.flush();
  TCP_client.stop();
}
Listing 2: Arduino C/C++ Code Snippet (TCP Connection)
01 // Arduino code snippet to send a message to a TCP socket server
02 //
03
04 #include
05
06 const char* WIFI_SSID = "mywifiserver";         // CHANGE TO YOUR WIFI SSID
07 const char* WIFI_PASSWORD = "somepassword";     // CHANGE TO YOUR WIFI PASSWORD
08 const char* TCP_SERVER_ADDR = "192.168.0.114";  // CHANGE TO TCP SERVER'S IP ADDRESS
09 const int TCP_SERVER_PORT = 4444;
10
11 WiFiClient TCP_client;
12
13 void setup() {
14   Serial.begin(9600);
15
16   Serial.println("Arduino: TCP Socket Client starting");
17
18   // check for the WiFi module:
19   if (WiFi.status() == WL_NO_MODULE) {
20     Serial.println("Communication with WiFi module failed!");
21     // don't continue
22     while (true)
23       ;
24   }
25
26   Serial.print("Attempting to connect to SSID: ");
27   Serial.println(WIFI_SSID);
28   // attempt to connect to WiFi network:
29   while (WiFi.begin(WIFI_SSID, WIFI_PASSWORD) != WL_CONNECTED) {
30     delay(10000);  // wait 10 seconds for connection:
31   }
32
33   Serial.print("Connected to WiFi ");
34   Serial.println(WIFI_SSID);
35
36   // connect to TCP socket server and send a message
37   if (TCP_client.connect(TCP_SERVER_ADDR, TCP_SERVER_PORT)) {
38     Serial.println("Connected to TCP server");
39     TCP_client.write("Arduino UNO R4 Restarted.");  // send to TCP Server
40     TCP_client.flush();
41     TCP_client.stop();
42   } else {
43     Serial.println("Failed to connect to TCP server");
44   }
45 }
With TCP_client.connect() the script tries to connect to the server. If the attempt is successful, it sends the message to the server with write. This is followed by a flush() of the message buffer, and a stop() command that closes the connection. You can use these four lines in your Arduino programs in conjunction with motion sensors, rain gauges, and a wide variety of other hardware components to create a useful home monitoring/alarm system.
Conclusion
Notification messages are a great way to keep up to date on critical changes. However, it’s important not to overuse this feature, because you could easily flood your desktop with alarms.


