Create an information center with the Raspberry Pi Pico W and Python
You don’t need much to create a smart home information center – just a Raspberry Pi Pico, an ePaper panel, a battery, and some Python.
People want a variety of information presented in the same place. On the road, a smartphone plays a central role for most. At home, you might have legacy displays for heating control, an alarm system, a weather station, and so on. A common display is useful for grouping data from different sources without the need to call up different apps or read the data in different places. A Raspberry Pi Pico W lets you build your own model.
A home automation solution already collects many useful values. For this sample project, I added news and a weather forecast through a connection to the Internet. To make the device compact and mobile, it has a battery. The display and controller need to be frugal in terms of power consumption, which is where the Pico W comes in handy. It connects to the WiFi network, collects the information, and displays it on a small screen (Figure 1).
I deliberately kept the controls as simple as possible. Three screens show the news, weather, and home temperatures; where needed, screens branch out into submenus. I did not want to switch the various actuators of the home automation system – simply display their status.
I specifically prioritized minimal power consumption, which is why I chose the Waveshare 2.9-inch CapTouch ePaper display module for the Raspberry Pi Pico. It has a slot for the Pico at the back, which in turn supports touch operation, and as with the Pico, you can switch the miniscreen to sleep mode. The complete circuit can be disconnected from the battery during extended periods of disuse. So I wouldn’t need to change the battery, I used a lithium-ion polymer (LiPo) battery and charging electronics, which meant I was able to charge the device with a power supply unit over USB when required.
Pico W
The basis of the project is the Raspberry Pi Pico W and its Python firmware. Unlike the single-board computers (SBCs) in the Raspberry Pi family, the microcontroller requires very little preparation. To program the microcontroller unit (MCU), you just need to connect it to a computer over USB. In the development phase, the controller can be fed external commands in an integrated development environment (IDE) such as Thonny. You only transfer the finished code to the module at the end.
One advantage of microcontrollers over computers is their robustness. You don’t run the risk of damaging a storage medium by turning it off abruptly; this feature is useful for the current project.
Layout
The Pico W slots in at the back of the ePaper panel. The protruding front of the touch variant of the 2.9-inch panel (Figure 2) proves to be useful for the construction, removing the need for an additional covering frame. Slotted into a recess in the case, everything looks neat from the front. During the installation, you need to work quite precisely to use the narrow adhesive border: Take care not to damage the delicate connections from the printed circuit board (PCB) to the display panel.
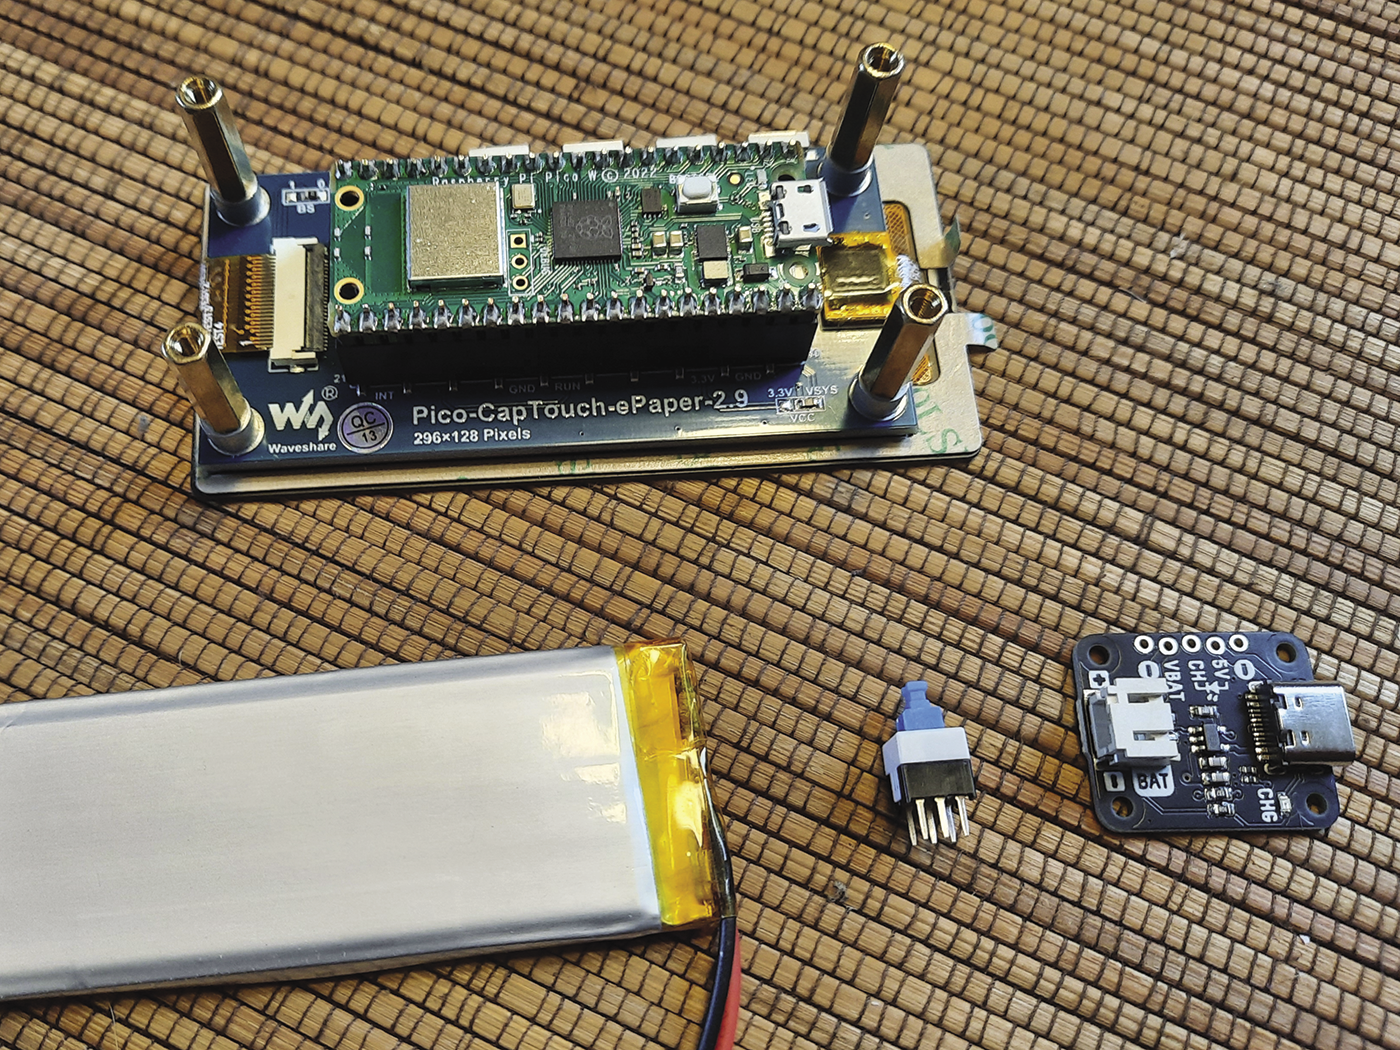
The goal of the build was to keep the case as flat as possible, so it can be used as a tabletop variant and as a wall unit. The Pi Pico’s slot at the back of the ePaper doesn’t prove to be conducive to a low build height; therefore, it makes sense to position the LiPo battery at the side. You can choose flatter batteries that involve some sacrifices in terms of capacity, but they are still powerful enough for a few days of runtime. LiPo batteries are compact and lightweight and will survive many hundreds of charge cycles – ideal for this small device.
The number of components is manageable (see the “Parts List” box). You also need to assign some space for the charging electronics, which incidentally also act as a DC/DC converter for converting the LiPo battery’s 3.7V to 5V operating voltage. I also integrated a separate on-off switch. I did not want to use the buttons on the ePaper module; instead, the device is controlled by touch input only during operation. In the end, I only had to provide an opening for the USB charging port.
• Raspberry Pi Pico W
• ePaper panel (Waveshare Pico CapTouch ePaper 2.9)
• LiPo battery (1000mAh)
• Pimoroni LiPo shim for Pico charging electronics
• Alternative 5V power supply
• Case
• Push-button switch
• Wiring, installation material
Control
The circuitry is controlled by a script on the Pico. As usual, before applying the supply voltage, pressing the BOOTSEL button of the Pico opens a window in the file manager where you place your program text. This operation works smoothly in both Linux and Windows environments. The Python firmware expects a file named main.py, which in this case already contains all the libraries needed.
If you do not want to switch manually between mass storage and programming mode every time, you will appreciate a development environment such as Thonny (Figure 3). At first glance it seems relatively simple, but turns out to be extremely convenient when integrating various Python interpreters. On the Pico, it is absolutely my favorite tool.
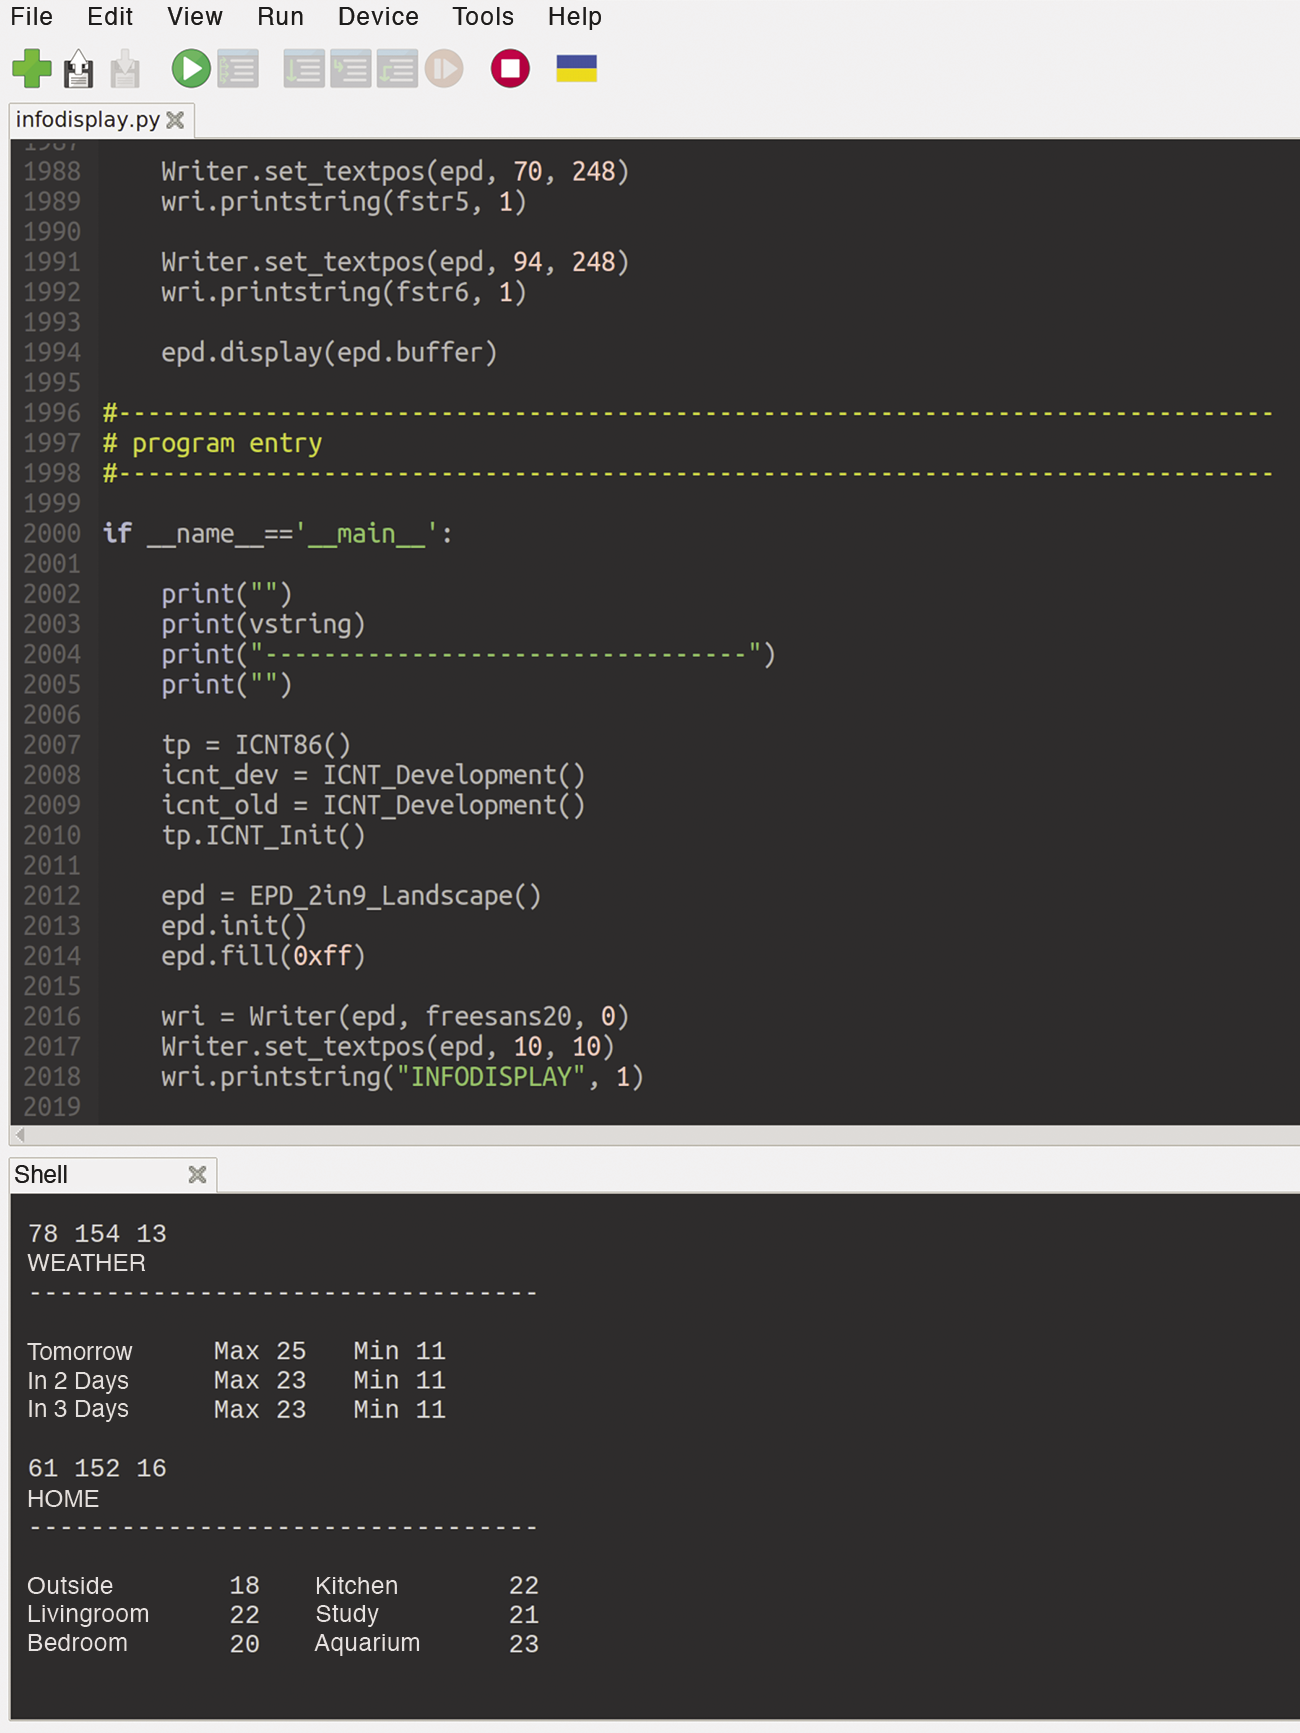
The project requires Internet access for the display. After the first start-up, registering the display (or the Pico) as a supported device on the WiFi network in the settings of the home router and assigning it a permanent local IP address and unique name is recommended. In the test phase, a USB connection from the PC to the Pico is sufficient and supplies the attached display with power, as well.
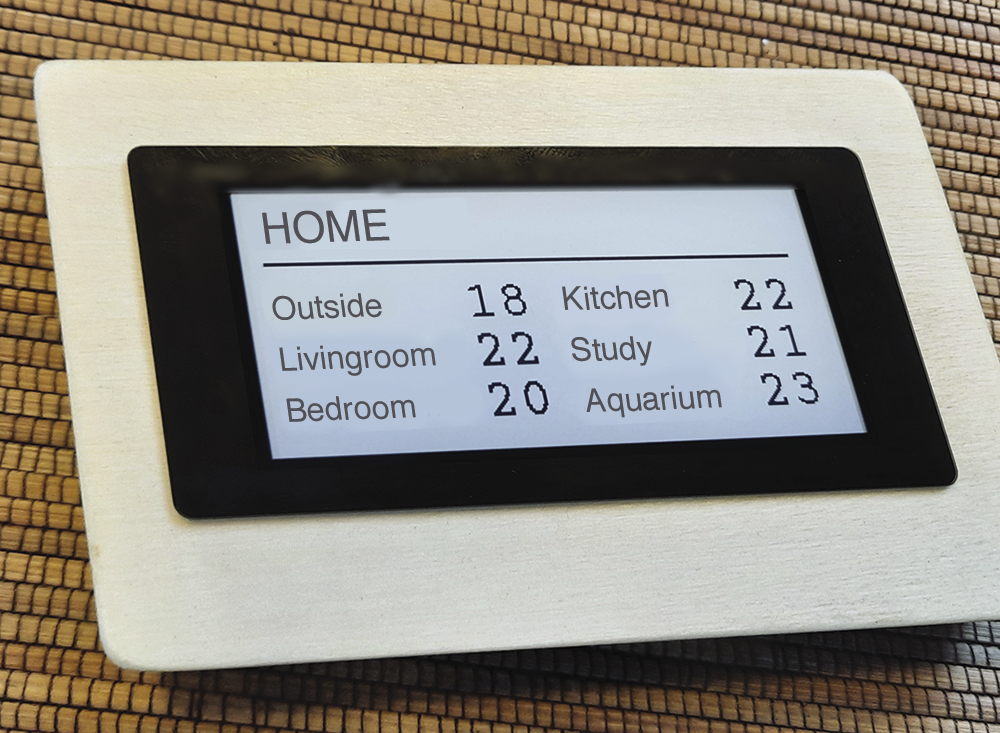
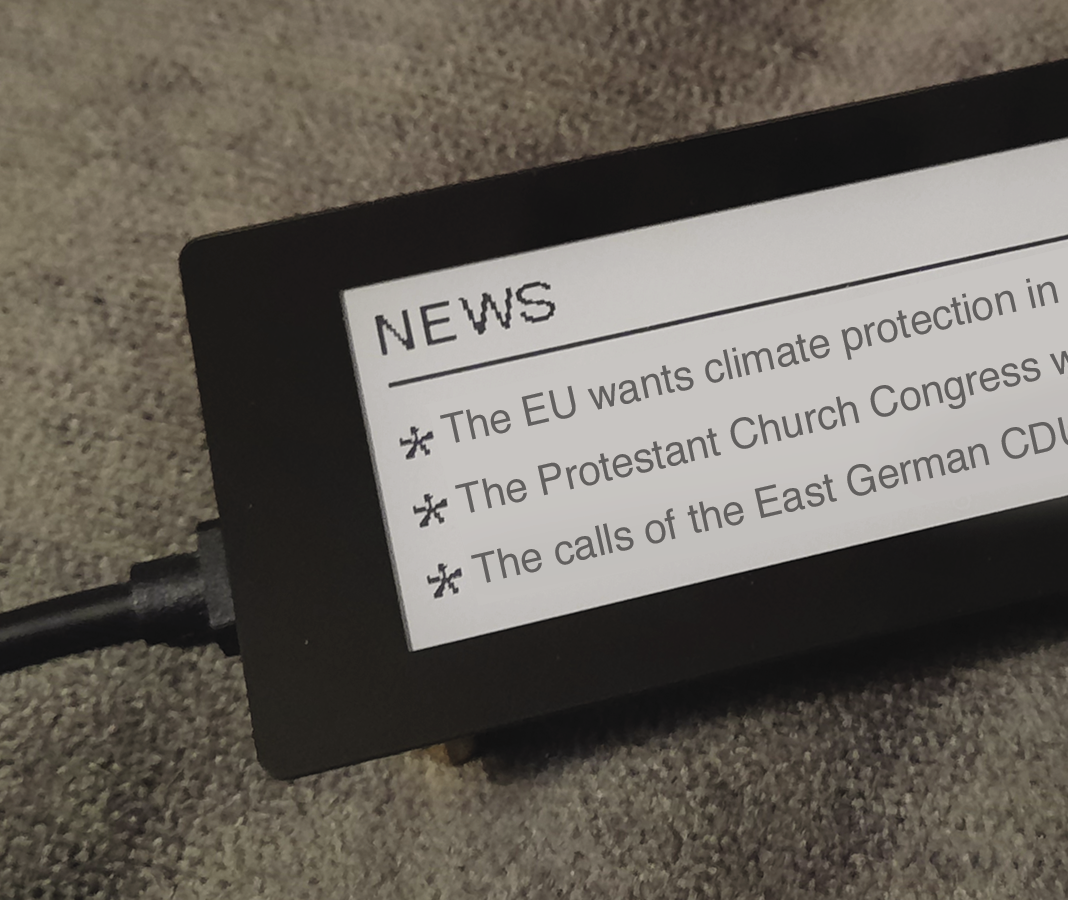
The script shows three screens from different sources. NEWS lists headlines from national news providers, WEATHER uses weather data from the weather service. HOME presents values from the home server.
For further processing, you need to import data in XML and JSON formats for the news and the weather forecast. In the Python script, you can do this easily without having to include additional classes with elaborate import filters. Of course, if the provider changes, this means making adjustments to match.
For the values around the house (e.g., the temperatures of the individual rooms, the outdoor area, or the aquarium), my home automation solution provides its data as files that have been prepared on my own server for the sake of simplicity. I just need to read the files.
ePaper Programming
ePaper does not just mean the electronic edition of a printed magazine. In electronics, ePaper or eInk displays work on the basis of electrophoretic “ink.” Because they are not self-luminous, they are best read when ambient light is sufficient.
A key technical feature of such displays is that they only require energy when changes occur. In idle mode, the control consumes an almost negligible amount of power, which predestines ePaper displays for mobile and battery-powered solutions. The catch is that you have a long wait when deleting and updating content, especially on large displays; also, some flicker can occur. Only a few models can handle partial updating, which eliminates such problems somewhat.
ePaper and eInk displays are particularly suitable for displaying content that changes infrequently (Figure 4), which is not a problem in this project because you don’t have to check the news, weather, or temperatures every minute. Also, the display does not need a constant time display. The monochrome display also has a partial refresh function, which is a useful prerequisite for convenient reading.
Like other modules with different technologies (OLED, LCD), the ePaper display requires an appropriate driver in MicroPython to provide simple methods for control, such as outputting text and graphics, which is the Python EPD_2in9_Landscape class in the code. Because the display does not have any built-in fonts in the hardware and the Pico does not address external memory, all font definitions are integrated into the source code.
One special feature of the panel is its touch input. More detailed instructions can be found in the sample code on Waveshare and its GitHub site. Controlled by interrupt requests (IRQs), you field the necessary coordinates and then use them for further processing to follow different branches in the program sequence.
Operations
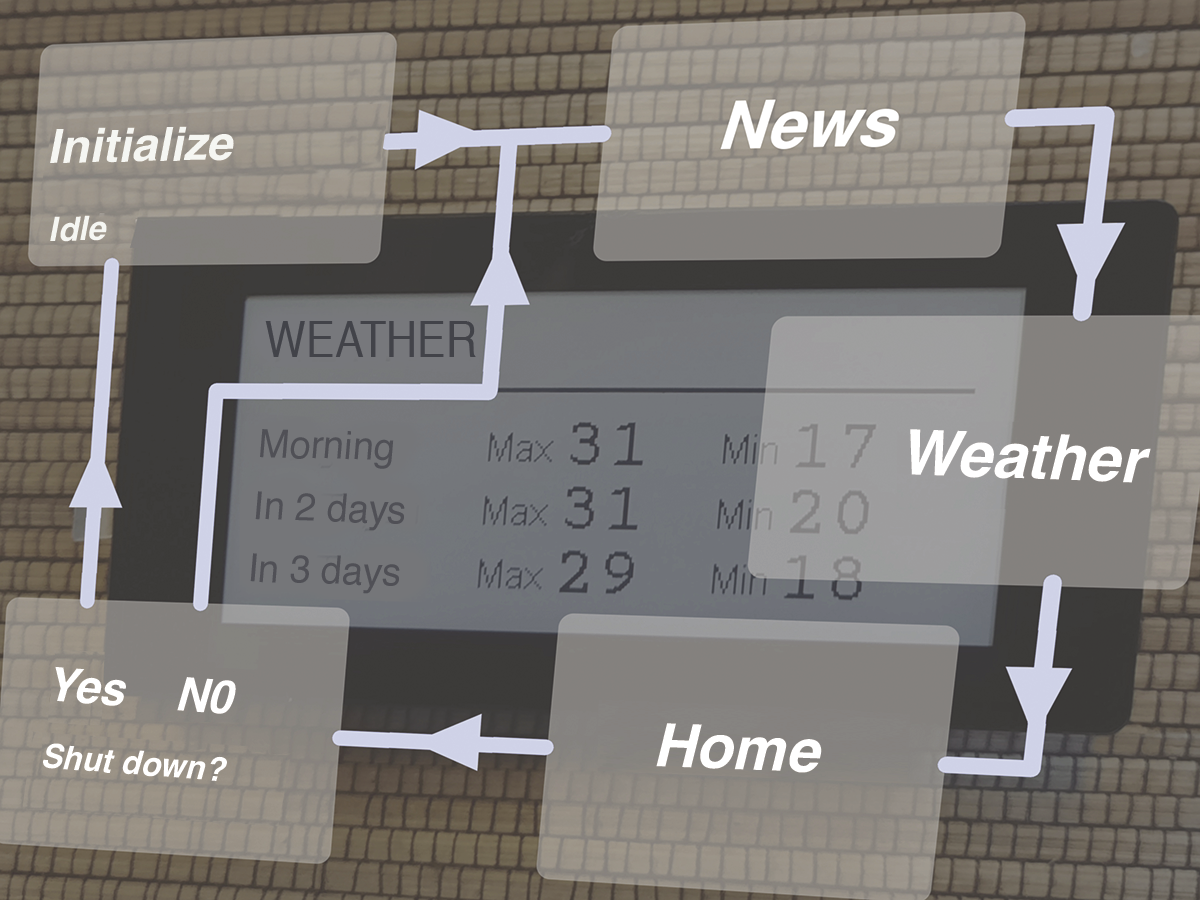
I wanted to keep the operation of the informational display as simple as possible. After switching on, the display tells you about the successful connection to the Internet and services before displaying the first screen.
A single tap takes you to the next screen in each case (Figure 5). Once you have browsed all three screens, the device will ask on the – now split – screen if you want to turn it off. At this point, you can either scroll forward from the beginning or switch the display and the Pi Pico to sleep mode. The device transitions to this mode if there is no input for a long period of time. After switching off and back on with the outer switch, processing starts again.
Conclusions
The information display sits on my desk because I want to have it conveniently in sight in a place where I often spend time. It’s been in operation for a few days and has already proven its value; I find myself taking a quick look at it every now and then.
As is so often the case, you have some scope for improvement. I would like to add more sources around the house and web and integrate an icon bar to make everything more interesting and more convenient to use. My GitHub site has the current state of the software and provides more detailed information on the project.