Use simulation to reduce risks in electronic design
Designing a power supply can be an interesting yet dangerous engineering task. You can reduce some of the inherent risk by building a model and running simulations with SPICE in KiCad.
I was recently tasked with designing a small mains power supply with an output of 5V at 1A. As the design would eventually have to pass stringent safety and compliance approvals, an off-the-shelf supply was not an option. Instead, I set out to discover how to do this design with as many standard components and with as few design iterations as possible.
Classic low output voltage power supplies use a transformer to reduce the AC mains voltage to a much lower AC voltage that is then rectified, smoothed, and regulated to produce usable DC output. However, such transformers that operate at a main frequency of 50/60Hz are bulky and inefficient, and they often generate stray magnetic fields that can be troublesome to nearby sensitive circuitry.
Switched Mode
Almost all current power supplies and voltage converters are switched mode power supplies (SMPS). This term covers all manner of power conversion devices, but what they have in common is converting a DC voltage into a pulsed signal that is then fed to some type of inductor that is in turn used to convert those pulses into pulses at a different voltage for subsequent conversion back to DC.
In the case of a mains supply (sometimes referred to rather confusingly as an “off-line” supply), the incoming mains is first rectified to produce high-voltage DC. For a universal input of 85-264VAC (RMS), this will range from 120 to 380VDC. This DC voltage is switched with a high voltage metal-oxide-semiconductor field-effect transistor (MOSFET) or bipolar junction transistor (BJT) at a frequency generally between 50kHz and 10MHz, and this waveform is fed to a transformer whose output is rectified and smoothed to provide a low voltage DC output. The transformer is much smaller and lighter due to its much higher operating frequency, and provides isolation between the potentially lethal high-voltage input and the low-voltage output. The quality of this isolation is crucial for safe use of a power supply, and it depends on the design and construction of the transformer. Sadly, many of the low cost phone chargers and other wall warts in daily use contain transformers with woefully inadequate insulation and scant regard for safety. A quick search of the Internet will confirm this; one article in particular goes into some detail, and there are several channels devoted to tear-downs of these substandard devices.
For a practical SMPS, the mains input may vary between the figures mentioned above. Because the load on the output may also vary, some sort of regulation is usually necessary. The output voltage is directly affected by the pulse width used to turn the MOSFET or BJT on and off, and many integrated circuits exist to control this pulse width based on some form of feedback from the output. As this feedback must also be isolated between the “high” and “low” sides, an optocoupler is generally required. Alternatively, the transformer may be equipped with an auxiliary winding whose output will vary depending on input and output conditions and that can thus be used to provide feedback. In some instances, this is a preferable route as it reduces component count and eliminates in particular the optocoupler, whose parameters can vary over time and lead to poor long-term regulation or even total failure. Finally, for low output power supplies the integrated circuit may also integrate the power switch (the MOSFET or BJT).
Selecting Parts
Most of the major semiconductor manufacturers have SMPS chip offerings, and there are a number of specialist power IC manufacturers, too. On their websites you will find component selection tools that let you enter the input and output requirements to select a suitable device. Most also have online design tools that will produce a schematic and even a bill of materials.
Great, so my work is done! Unfortunately, while these tools go a step further than circuit suggestions in a data sheet or application note, they usually specify components that would need to be custom-built, particularly when it comes to the transformer and other magnetics. Ideally, I’d like to use an off-the-shelf part with relevant safety documentation in place. I can certainly use the output of these tools to help in that selection, and some transformer manufacturers declare their products as “designed to work with” a particular manufacturer’s range of devices.
So, I have a schematic, a list of suitable components, and I have selected a transformer that corresponds closely to the recommended construction. Now, do I build a prototype? In may situations, this would seem the obvious next step, but, particularly in the case of these high voltage designs, it can be expensive and time consuming, as well as potentially hazardous. The more reassurance I can have that I have selected the right component(s), the more confidence I can have to proceed to a PCB layout that can be safely powered up and tested. (See the “Safety Warning” box).
Simulation provides a safe way to examine the inner workings of a power supply. However, in the real world, AC mains and rectified DC mains are potentially lethal, so unless you are confident and experienced in dealing with high voltages, please don’t attempt to build, modify or take measurements from any such supply. No part of the “high” side of these circuits is at ground potential, so it’s not possible to connect an oscilloscope that is referenced to ground. For this and for general safety, testing of power supplies such as this must be performed with an isolation transformer. In this way, the AC input is isolated from the mains and you are free to establish a ground connection and take measurements. The voltages remain dangerous, however, and extreme caution is advised. Capacitors hold their charge even when power is removed, so be warned!
Adding Some SPICE
Let’s simulate the interaction between the power switch and the transformer to ensure that the output is maintained at all combinations of input voltage and output load (and, ideally, over a temperature range). Fortunately, there is a long-established simulation program for circuit analysis called Simulation Program with Integrated Circuit Emphasis (SPICE), which has its roots in a university research project from the 1980s. This is an open-source tool, and there are other implementations of circuit analysis based on it. Several manufacturers have produced closed-source simulators based on SPICE, notably LTspice (which requires Wine to run on Linux).
In the open-source world, ngspice is available on Linux and can be used standalone by providing text-based inputs. This version of SPICE is also integrated into the popular open-source EDA tool KiCad that, of course, runs on Linux. So if you are familiar with KiCad’s schematic capture, you are halfway to being able to simulate (parts of) your designs. This simulation should greatly help to increase confidence in the design before making a physical prototype.
Explanations of the inner working of SPICE are beyond the scope of this article, but SPICE relies on models of the components in the schematic to be analyzed. These may be ideal models that mimic ideal behaviors of a component, or real-world models, often supplied by component vendors, which closely model the real devices they represent. Clearly, the better the model, the more accurate the simulation.
SPICE offers several types of simulation, including transient analysis, AC and DC sweep and noise. I’ll be using transient analysis to help predict the behavior of a critical part of a design: the interaction between the power switch (MOSFET), the transformer, and the output rectifier in a SMPS power supply.
The Schematic
KiCad’s component library includes a selection of simulation components, which include ideal models. These are a good starting point to get your simulation running. Once that’s done, you can add real-world models for critical components and also add other parts to represent parasitic effects such as stray capacitance and leakage inductance.
In order for the simulation to proceed, voltage sources and input signal sources must be provided, and again, these are available as components in the simulation library for direct addition to the schematic. Figure 1 shows the schematic I created.
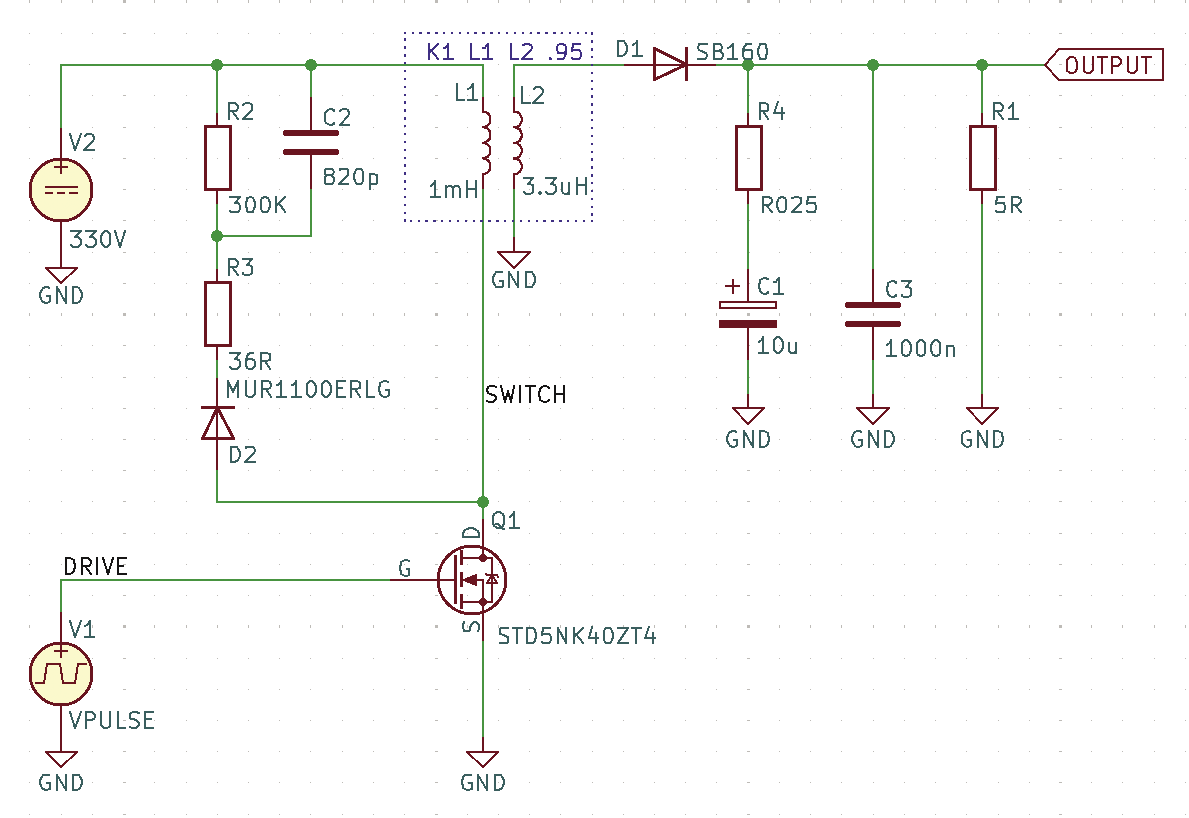
Components are selected, placed, and connected as if you were drawing a schematic for a PCB design. In fact, with care it’s possible to retain the simulated schematic and use it to proceed to PCB design. The passive components are all left as ideal devices, although I have modelled the equivalent series resistance (ESR) of the output smoothing capacitor C1 with a small series resistor R4. The value of this resistor, 25 milliohms, was arrived at by looking at the data sheet for a number of real-world capacitors. The value of this ESR directly impacts the high-frequency ripple at the output, something you can observe from the simulation.
Voltages V1 and V2 are SPICE models that represent the pulse-width modulated switch drive and the rectified, smoothed mains input, respectively. Again, you can run the simulation with different supply voltages and different pulse widths and observe the effect on the output. Wider drive pulses at a fixed repetition frequency should increase the output, but the switch will be on for longer, so the power dissipation will increase.
The model of the transformer deserves a detailed description. SPICE does not model transformers directly, but instead considers each winding on the transformer a separate inductor with a coupling factor based on their mutual inductance. Deducing the correct parameters for a transformer can be challenging: Data sheets are often incomplete or confusing, and you may have to resort to taking measurements of a sample. The transformer I selected for the design is a Myrra 74089. Its data sheet states only primary inductance of 1mH, so the secondary inductance must be calculated. Some helpful tips on modelling transformers can be found online. For my example, I calculated Np/Ns = SQRT(Lp/Ls), where the suffixes p and s are primary and secondary, N is turns, and L is inductance. This calculation gives 3.3uH for the secondary.
To make L1 and L2 operate as a transformer, you must tell SPICE how they are coupled with a SPICE directive. This is simply added to the schematic as text of the form K1 L1 L2 .95. I chose to add a dotted rectangle enclosing the inductors and the directive for clarity, but this has no effect on the simulation. The 0.95 specifies the coupling of the two inductors. This figure can’t be found in the data sheet, so we have to take an educated guess. The transformer in question is wound on a closed ferrite core so leakage inductance should be low. From previous designs and data sheets such as the LPR6235 series, I think this is a realistic factor.
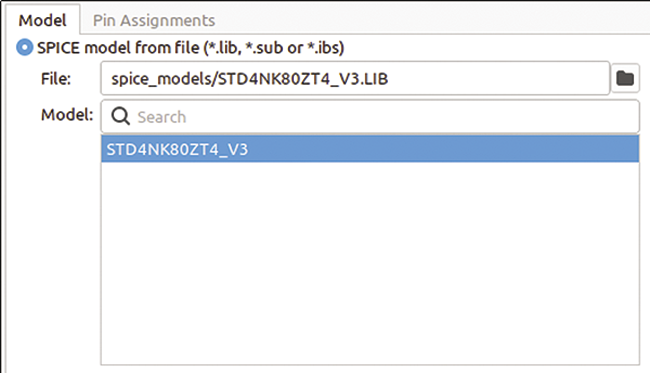
For the MOSFET switch, I’ve chosen a representative device that has a SPICE model available, which I believe to be similar to the MOSFET embedded in the SMPS chip I intend to use. I downloaded the SPICE model from ST’s site and referenced this file from the MOSFETs simulation properties (Figure 2): Open the properties of the MOSFET from the context menu in the schematic and click on simulation model. Take care to also check the Pin Assignments tab to ensure the models’ pins line up with the pins on the schematic, gate to gate, source to source, drain to drain.
The output is loaded with a 10 ohm resistor that will draw 0.5 amps if the output attains 5V. This is another value you can change to investigate the effects of varying loads. I’ve labelled the main nodes of interest in the schematic (Figure 1) as DRIVE, SWITCH, and OUTPUT.
Setting Up the Simulation
I am interested in seeing how this circuit responds over time, so I will need a transient (or time domain) analysis. I must first set up the pulse source V1. As above, open the properties of the source from the context menu in the schematic and click on simulation model.
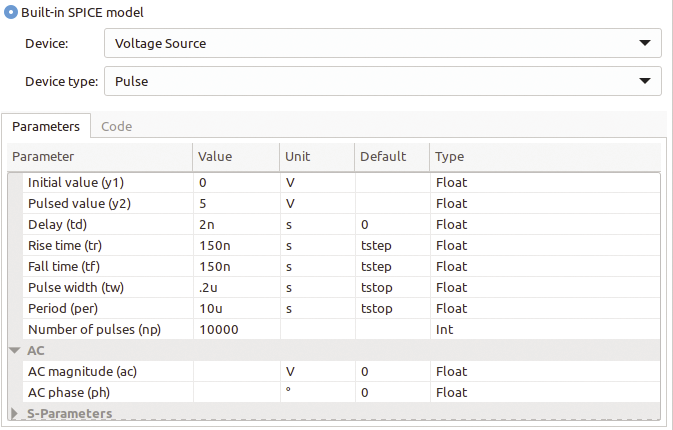
I am using the built-in SPICE model for the pulse source (Figure 3). The data sheet for the chosen SMPS chip specifies an operating frequency of 100kHz, so the pulse period is set to 10us. The pulse width is initially set to 0.2us, giving a duty cycle of two percent. The rise and fall times are set to realistic values to help the simulation. Very fast changes in values can cause the simulation to fail to converge. The pulse height (y2) is set to a value to exceed the MOSFET’s gate threshold voltage (typically 3.75V) to ensure it turns on.
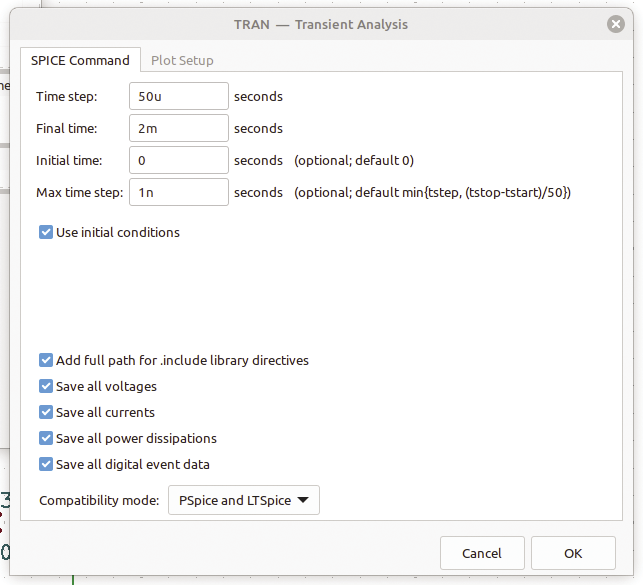
To start the simulation, choose Inspect/Simulator from the main menu. From there (Figure 4), select the Simulation/New analysis tab. Select an analysis type of TRAN – Transient Analysis. The values entered in the dialog that appears (Figure 5) will generate the response of the circuit over 2ms. Close this window and run the simulation with Simulation/Run.
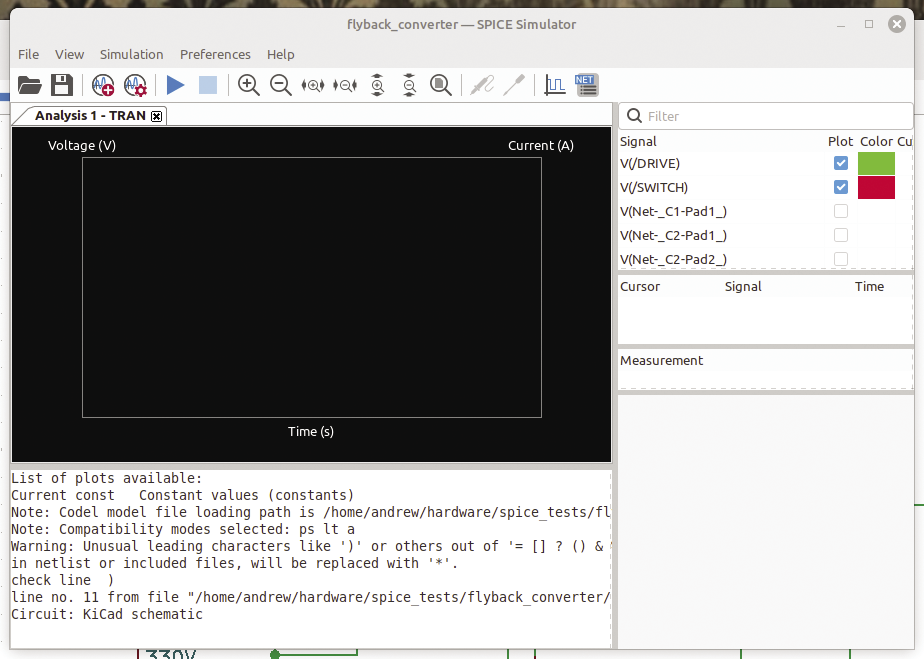
On my machine, this takes a few minutes to run, but it is apparent that on the primary side, at least, the circuit settles within a tenth of that time. You can stop the analysis before it finishes and use the mouse to zoom in on the waveforms of interest.
Checking the Results
Choose the signals you want to look at using the filter to the right of the simulation window (Figure 6) or by probing on the schematic using the probe tool in the toolbar:
- Select DRIVE (the green trace) initially and zoom in until you can see the separate pulses.
- Now select SWITCH. You should see a repetitive waveform that jumps up to 1kV (the red trace in Figure 6), as the switch turns off. This is the back EMF or “flyback” generated when the magnetic field generated during the on period collapses.
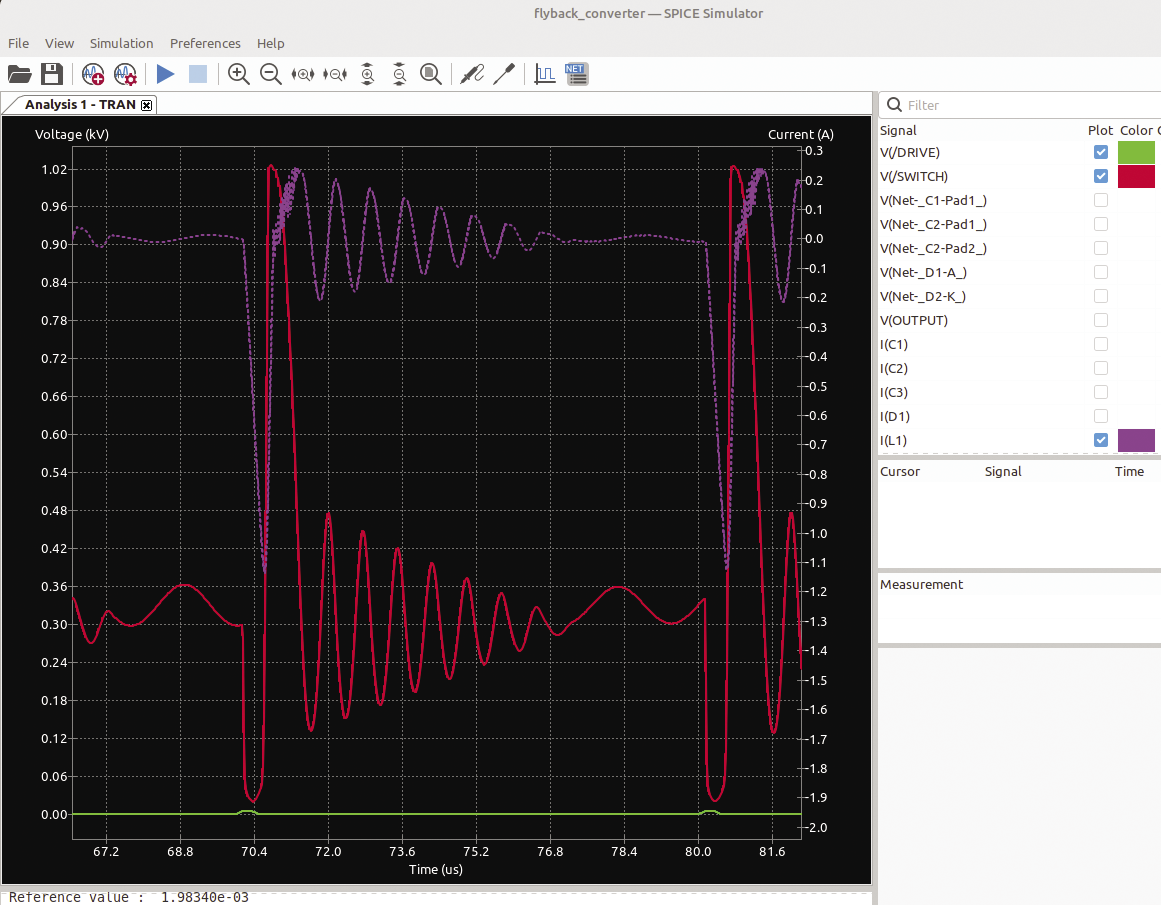
- Select I(L1) (the purple trace), which is the current in the primary inductor; you should see it ramp (downwards because it is negative with respect to the voltage) rapidly during the switch on time.
This indicates the inductor is charging, just as a capacitor does. This energy is released when the switch turns off, and it is transferred to the secondary winding and on to the load. During the off time, the primary winding rings at its self-resonant frequency, giving rise to the decaying sine wave you can observe between the on pulses.
If you now deselect these waveforms, select OUTPUT, and zoom out fully, you will see the output rising until it (almost) reaches a steady state at around 7.4V (Figure 7). This shows that the output capacitor was not fully charged in the 2ms allowed for the simulation to run.
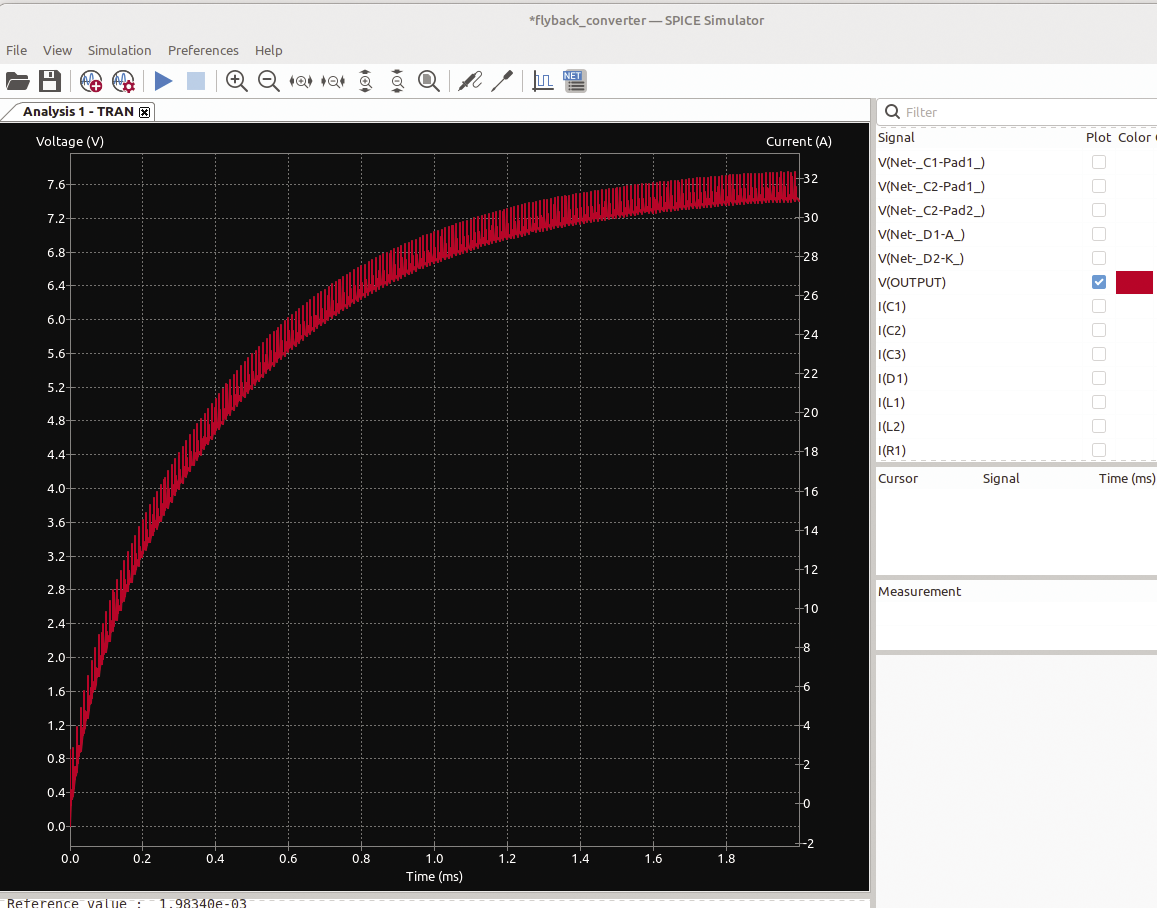
You may notice ripple on the output at the frequency of the pulse source. If you change the value of R4 to emulate a different capacitor (C1) with a different ESR, you will see a change in the amplitude. This indicates the importance of low-ESR capacitors in power supply design. You can set the ESR value to zero, but you may find the simulator will fail with a “time step too small” message. This message may appear quite often when setting up a simulation and is in general an indication that your circuit is unrealistic. You could also set the capacitance C1 to a smaller value to speed up the secondary voltage reaching steady state.
If you return to the schematic and set the V1 source pulse width to 4 percent, when you re-run the simulation, the output voltage will settle at a higher level of around 9.5V, thus establishing a relationship between pulse width and output voltage. If you double the output load resistance, the output will settle at around 12.4V.
The acid test is reducing the input voltage to the minimum of 120V with the load reduced to 5 ohms (that is, maximum power out and minimum input voltage). With the duty cycle at 2 percent, the output reaches about 3.8V. At 50 percent duty cycle, which is close to the maximum the SMPS chip is specified to achieve, the output reaches just under 6V. At 25 percent duty cycle, the output is still above 5V, showing there is sufficient margin. So I have shown that the control IC should be able to maintain the desired output by varying the pulse width in response to changing input and output conditions. It does this by comparing a fraction of the feedback voltage against its internal reference voltage to decide whether to increase or decrease the drive. The chip that I used in the final design has an auxiliary winding on the transformer for feedback, and this is described in some detail in its data sheet.
The simulation also suggests that without any load and at minimum practicable duty cycles, the output voltage may rise above the specification. So a minimum load resistor may be required, and indeed on construction of a prototype, a 470 ohm resistor was required to keep the output voltage at the specified level.
Wrap Up
You can use SPICE from within KiCad to simulate some aspects of the performance of a sub-circuit. I’ve only covered transient analysis, and the other types, particularly AC small signal analysis are useful for evaluating the performance of filters and the like. There’s a lot more to SPICE analysis in general, but I hope this article has given you a taste for the possibilities that SPICE offers the engineer.
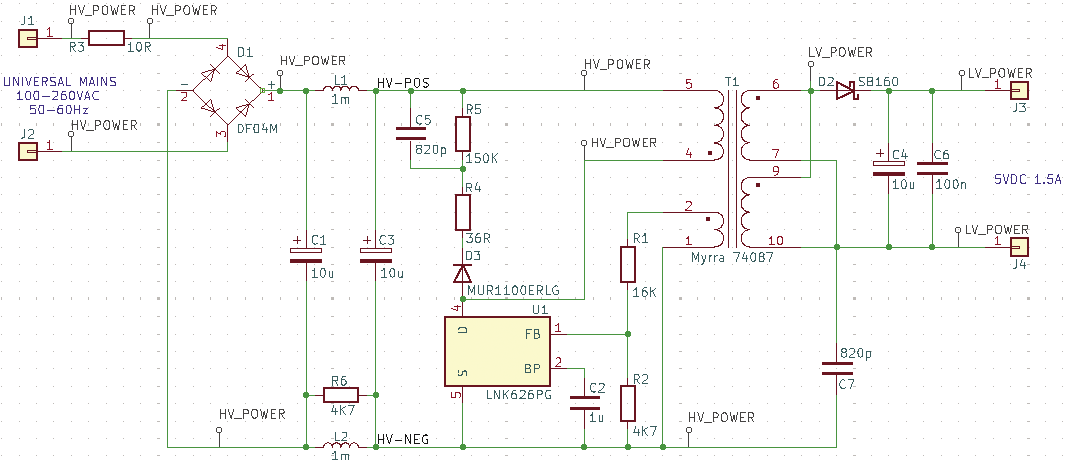
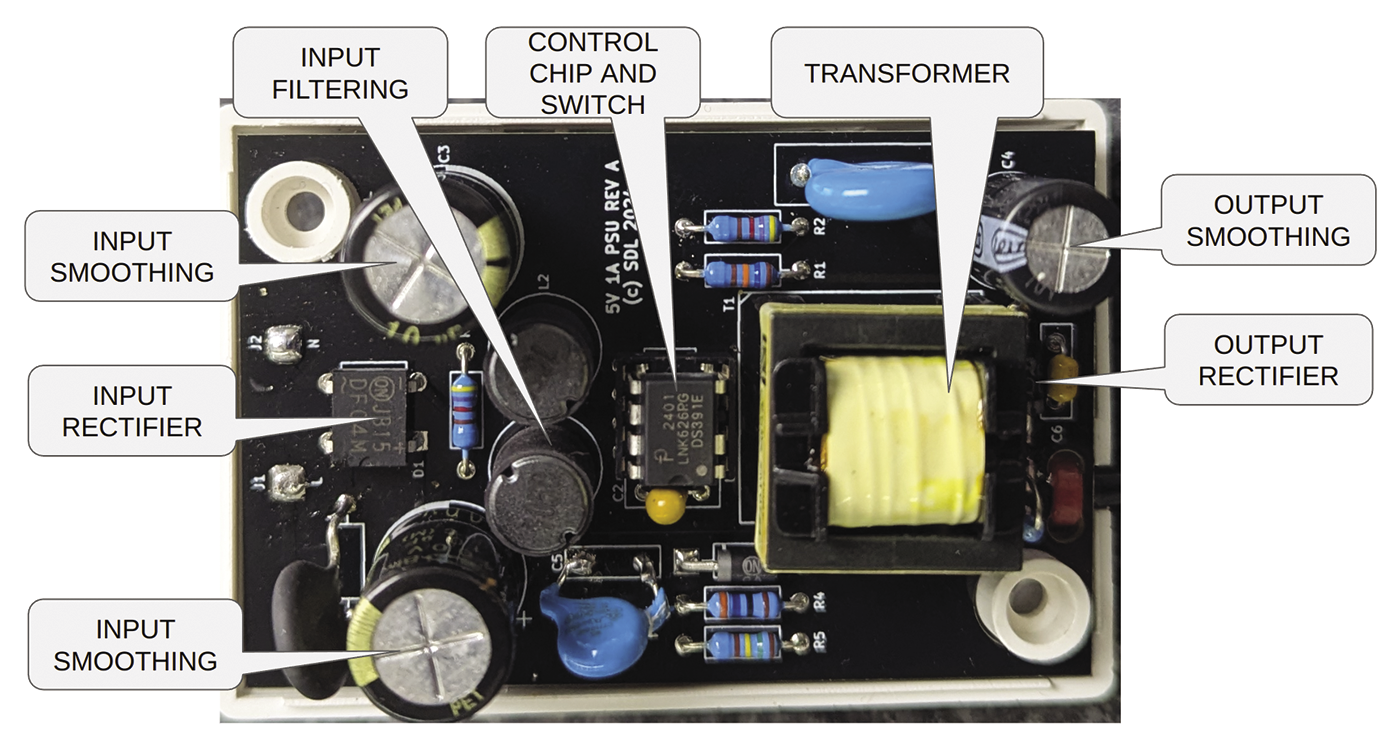
In Figure 8 you will find a schematic and in Figure 9 an annotated picture of the completed supply, which – I’m glad to say – worked first time. Of course, there are components in this picture not included in the simulation I have described, but I believe the simulation covers the high-risk aspect of the design.
