Raspberry Desktop
Not just for PCs, Ubuntu 24.04 supports the Raspberry Pi, bringing a fully-fledged Gnome system to the single-board computer. You can even run x86 apps in an emulator on the Pi 5.
Today’s single-board computers, such as the Raspberry Pi, are so powerful that they can be used for both special applications and – in many cases – to replace a desktop PC. The processor’s compute power is the least of the problems; instead, the actual issue is whether this small but mighty computer is compatible with your software.
Linux users who are used to working with free and open source software can build the applications they need from the source code if in doubt, but it makes life so much easier if you have access to ported versions of complete Linux distributions. Several fully-fledged distributions are available for the popular Raspberry Pi. You can choose between the official Raspberry Pi OS (which is based on Debian), Manjaro Linux, Arch Linux, and openSUSE Leap – this list is not exhaustive. But there is only one classic PC Linux distribution that has found its way into the official Raspberry Pi installer, and that’s Ubuntu (Figure 1).
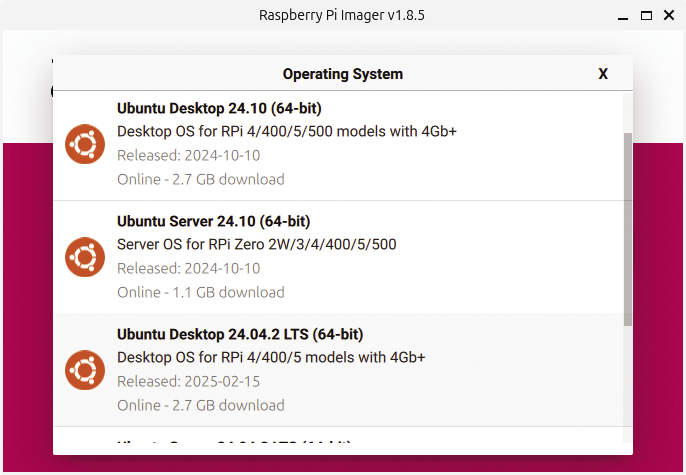
In this article, I put Ubuntu 24.04 through its paces on a Raspberry Pi 5 and test a useful feature that lets you run x86 and x86_64 applications on the ARM-based Pi 5, thus increasing the range of available applications.
Installation
Many users have reported problems booting from the SD card, but in my tests I did not run into any problems while testing on a Raspberry Pi 5. I did however use the latest update (version 24.04.2 from February 2025), and the problems were reported when Ubuntu 24.04 was initially released in April 2024. If you do find that you cannot use the official image, have a look at the “Troubleshooting” box.
On the Raspberry Pi forum, the Ubuntu bug tracker and in other places on the web, people have reported various issues trying to start up the preconfigured (original) Ubuntu 24.04 image. For example, installing on an NVMe SSD or a USB disk instead of an SD card may cause trouble.
Dave Jones (@waveform80), who works at Canonical on the Raspberry Pi port of Ubuntu, among other things, has provided an alternative image in the Ubuntu bug tracker thread, and you can use this instead of the official file; I tried out the installation with the alternative image. Note that this image is based on the original version 24.04, not 24.04.2.
Other troubleshooting suggestions can be found in the same thread, but they refer to the use of NVMe SSDs or USB disks. They involve modifying entries in the
config.txt configuration file on the FAT partition of the disk, and all relate to the official image. If you want to try out these suggestions, unplug the SD card after writing the image and plug it in again immediately. The FAT partition (system-boot) then appears, and you open the config.txt file in an editor. Search for the line that reads:dtoverlay=vc4-kms-v3dThen append
,cma-128 to the end, as indtoverlay=vc4-kms-v3d,cma-128Then unmount the medium and remove the SD card.
Another option is to write the official Ubuntu server image to the SD card instead of the Ubuntu desktop image and then install the missing desktop components with
sudo apt install ubuntu-desktopFirst download the Ubuntu image for the Raspberry Pi from the download page. The downloaded file, ubuntu-24.04.2-preinstalled-desktop-arm64+raspi.img.xz, weighs in at 2.7GB and is xz compressed. However, you do not actually need to unpack it. If you use the official Raspberry Pi Imager to write the image to an SD card, the tool automatically detects that the image is packed. If you prefer to write directly to the device file of the SD card by hand with dd, you can use this command instead:
xzcat ubuntu-24.04.2-preinstalled-desktop-arm64+raspi.img.xz | sudo dd bs=1M of=/dev/sdXYou need to replace sdX at the end with the actual name of the SD card. As usual, you have to be very careful when using dd, because the tool writes to the specified storage device without prompting you, (i.e., it will happily delete your hard disk if the information you provide is incorrect). If you are not sure how to identify the correct device file, use the Raspberry Pi Imager, balenaEtcher, or a similar tool. You can use the Disk Image Writer on Ubuntu, for example, which you will find in the file manager context menu. After completing the write operation, remove the SD card, insert it into the Raspberry Pi’s SD slot, and boot the Pi by plugging in the power cable.
Linux installations on a Raspberry Pi look a little different to what you are used to from PCs and laptops. This is because the downloaded image already contains an installed system, which simply expands the filesystem to cover the space available on the SD card on first boot before proceeding to prompt you for some configuration decisions, relating to the language, the keyboard layout, your location, and your username. In the final step, you need to create a local account, assign a password, and enable automatic login, if so desired.
After about six minutes, the customization steps complete and the usual first launch wizard pops up. You can skip the Ubuntu Pro setup, decide whether you want to disclose details of your system to Ubuntu (enabled by default), and start the App Center if required.
Updating
The next few steps assume that the Raspberry Pi is online; make sure you connect an Ethernet cable up front or log into your WiFi network. Open a terminal window and type the following:
sudo apt update
sudo apt upgrade
to update the installed packages. (If you wait long enough, a Software Updater window will appear and suggest you do that by clicking Install Now. However, in testing, the first attempt with the graphical tool failed.)
The first time you run a command preceded by sudo, you need to enter your password to run the command with admin rights. In our tests, APT downloaded a newer kernel version and asked for a reboot when it was done with unpacking and configuring packages.
Desktop Operation
The graphical interface looks the same as you are used to from the x86 version (Figure 2); by default, Ubuntu uses the modern Wayland compositor instead of the older X.Org, but you can also start an X.Org session in the login dialog. If you need to, typing
echo $XDG_SESSION_TYPE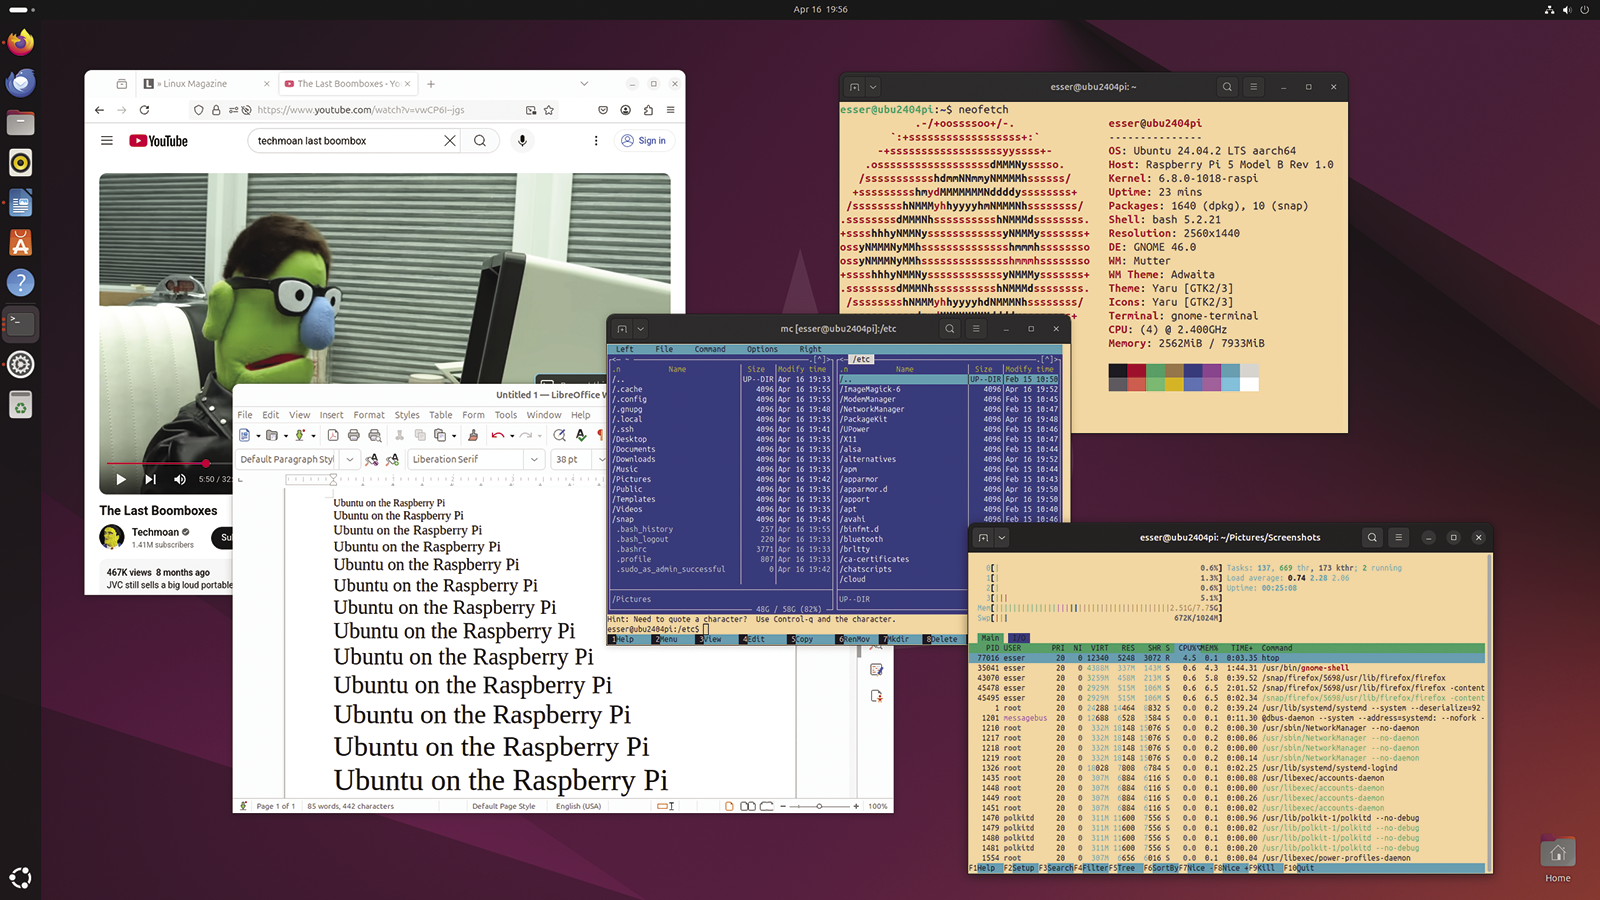
lets you check at any time which technology the system is currently using: The possible answers are wayland and x11.
Standard programs such as LibreOffice and Firefox work in the usual way, and even Gimp – installed as a Snap package – ran at an acceptable speed. However, YouTube video playback in Firefox is pretty jerky if you use high resolution (Figure 3). Tests in full-screen mode on a monitor with 2560x1440 pixels were too much for the Raspberry Pi 5. In general, browsing the web with Firefox is not much fun, but switching to the alternative Chromium browser helped here. You can pick it up from the Snap Store in the chromium package. (The APT package manager also finds a chromium-browser package, but it only installs the Snap. The Ubuntu team is sticking to its approach of only offering browsers via the Snap store.) After switching to HDTV resolution (1920x1080), YouTube videos looked really good in Chromium.

All told, though, the interface is very responsive and programs launch relatively quickly, despite the fact that the operating system is loading them from a slow SD card. If you upgrade the Raspberry Pi to use an NVMe SSD, you can look forward to significant speed gains. You can even let the computer handle several tasks at the same time without any worries, as the Pi 5 has plenty of power in reserve with its four CPU cores.
Advanced
If required, you can install additional applications in the usual way via the Application Center: This will tend to show you programs from the Snap Store or also APT packages, if you change the default settings. But this does not stop you from searching for and installing Debian packages in the good old-fashioned way using apt at the command line. Flatpak also worked in my tests, and this gives you an additional package source. For all three installation variants, note that although many familiar applications from your x86 Ubuntu are available for the ARM CPU and behave in the same way, some program packages are simply missing because they have not yet been ported to the aarch64 64-bit ARM platform.
Ubuntu 24.04 is a 64-bit operating system: The Raspberry Pis have been using 64-bit processors since model 3 (i.e., since 2016) and can run both 64- and 32-bit operating systems and applications. Like with PCs, there was initially a change in hardware from 32-bit to 64-bit CPUs and, with a slight delay, a matching change to the operating systems. The 64-bit Ubuntu on the Raspberry Pi can also run older 32-bit applications, if you add support for them like this:
sudo dpkg --add-architecture armhf
sudo apt update
sudo apt install libc6:armhf
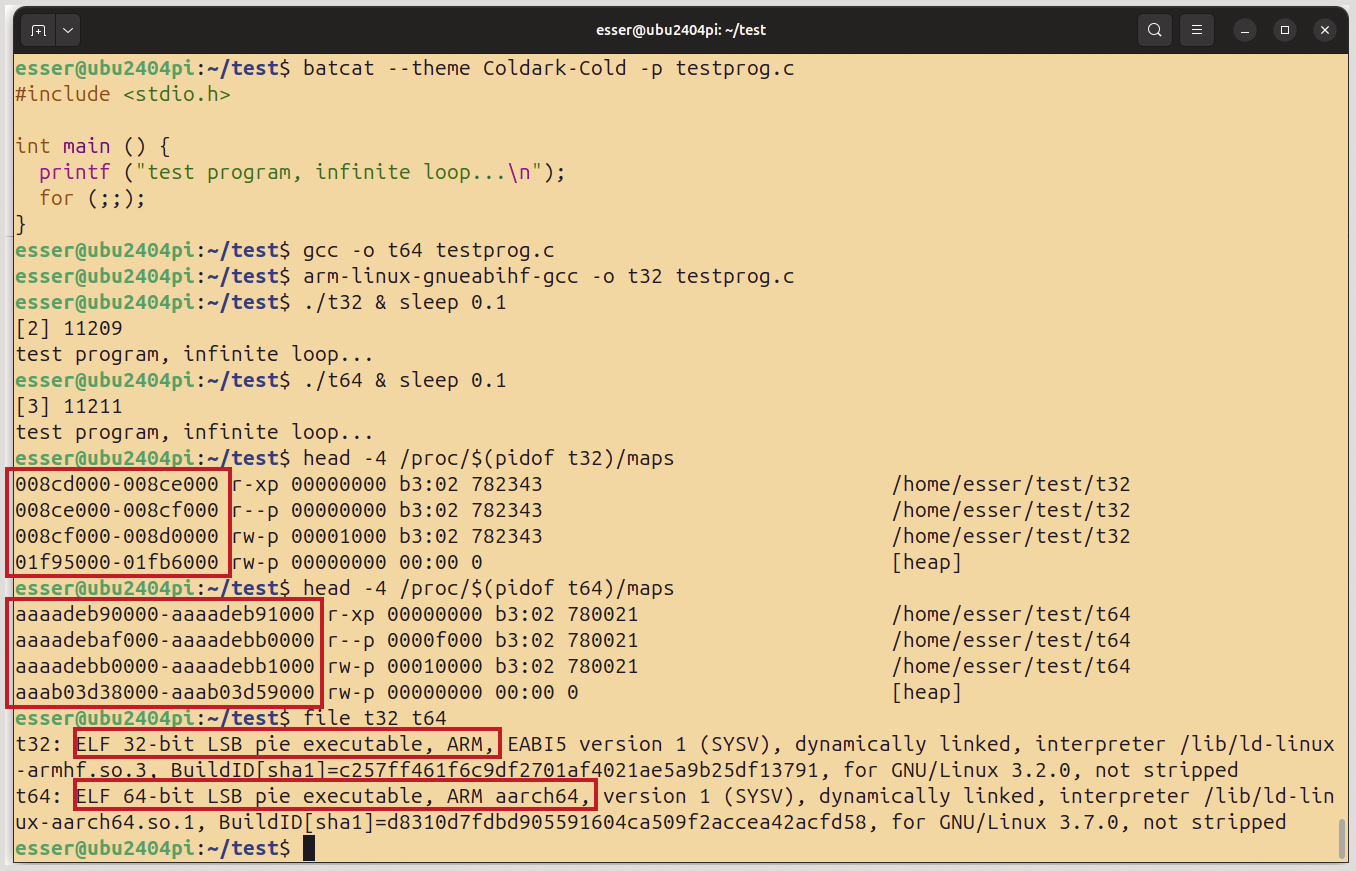
Figure 4 shows a test program that was compiled and executed with the native Gcc and a cross-compiler version (arm-linux-gnueabihf-gcc, available after installing the gcc-arm-linux-gnueabihf package) in 64- and 32-bit versions. From the output of the memory maps, you can see that the 32-bit application is running in a 32-bit address space, while the 64-bit process is using wider 48-bit addresses.
If you like working with Linux containers, you can use APT to install the docker.io package (i.e., the same Docker environment that is available on PCs). In the usual way, first install the package and then type the following
sudo usermod -a -G docker $USERto add your own user account to the docker group. Next, close all applications, and then do a “hard” logout by typing
sudo killall -u $USERbefore logging back in again. (Simply logging out and back in does not help because the new group membership does not take effect – Ubuntu has the same problem in the PC version). After logging in again, the docker group should also appear in the output of the id command.
Docker uses the host system’s kernel in the containers, which is why the containers are not x86 or x86_64 containers, but ARM containers (aarch64). This means that you cannot use images created exclusively for the x86 platform at first. But Docker can emulate other platforms; for example, if you want to use the more common x86_64 containers, you can add support for them with the following command:
docker run --rm --privileged U
aptman/qus -s – -p x86_64
This will setup a special binary (qemu-x86_64-static) that will run x86_64 binaries. For example, to start an x86_64 Ubuntu container, enter
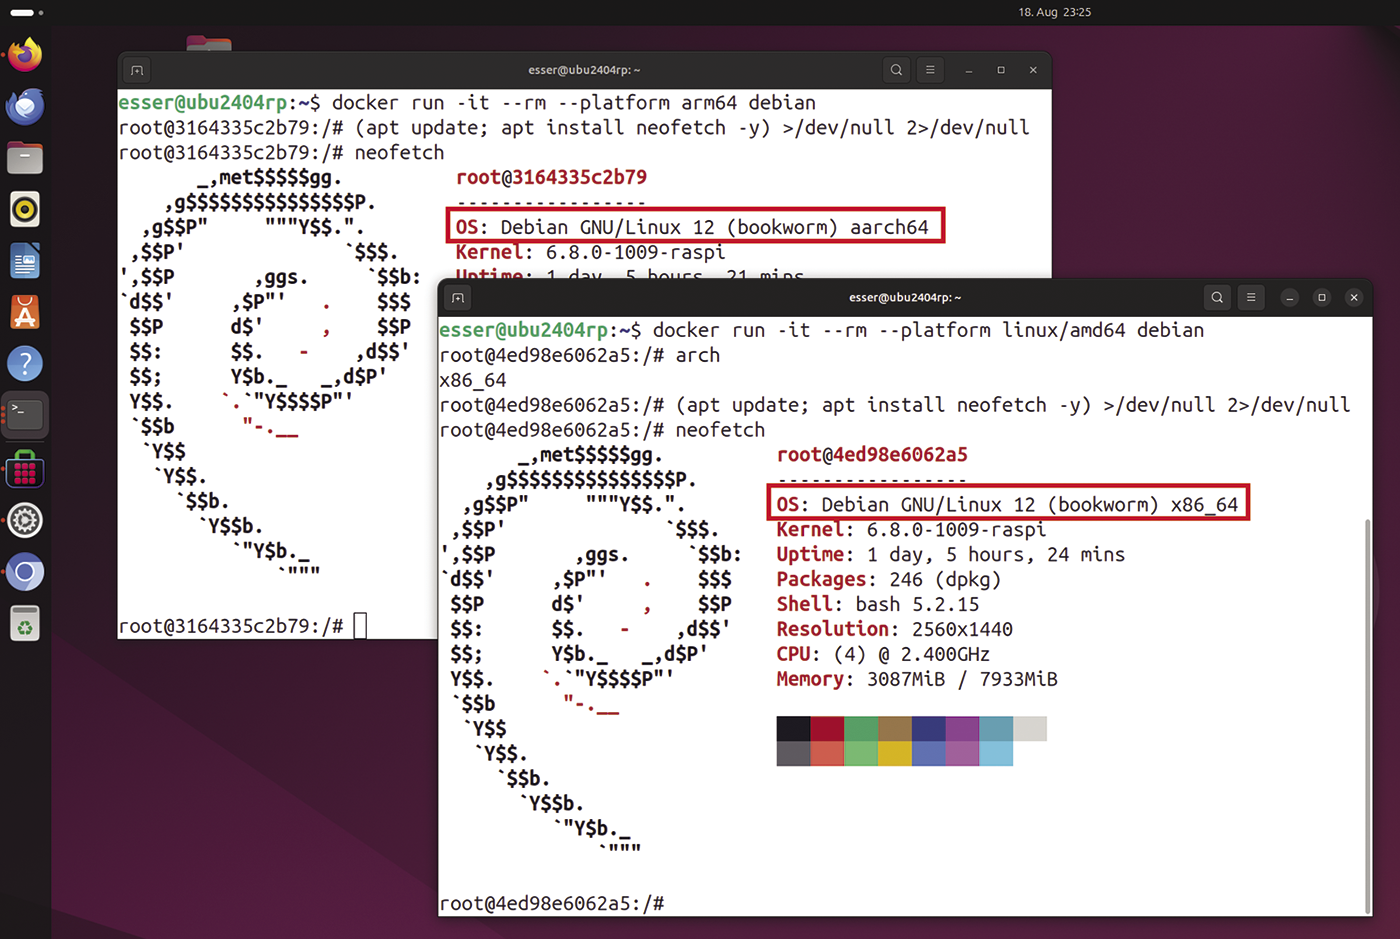
docker run -it --rm --platform amd64 ubuntuThis also works with x86 Docker images of other Linux distributions, such as Debian (Figure 5). It gives you a workaround for using Linux software that has not yet been ported to ARM. Note however that the x86_64 programs run much more slowly than native applications.
x86 Emulation
To do the magic that lets you run x86_64 containers, Docker uses a Qemu emulator component, the Qemu User Space Emulator. You can also install this directly on Ubuntu and use it independently of Docker:
sudo apt install qemu-user-static
sudo systemctl daemon-reload
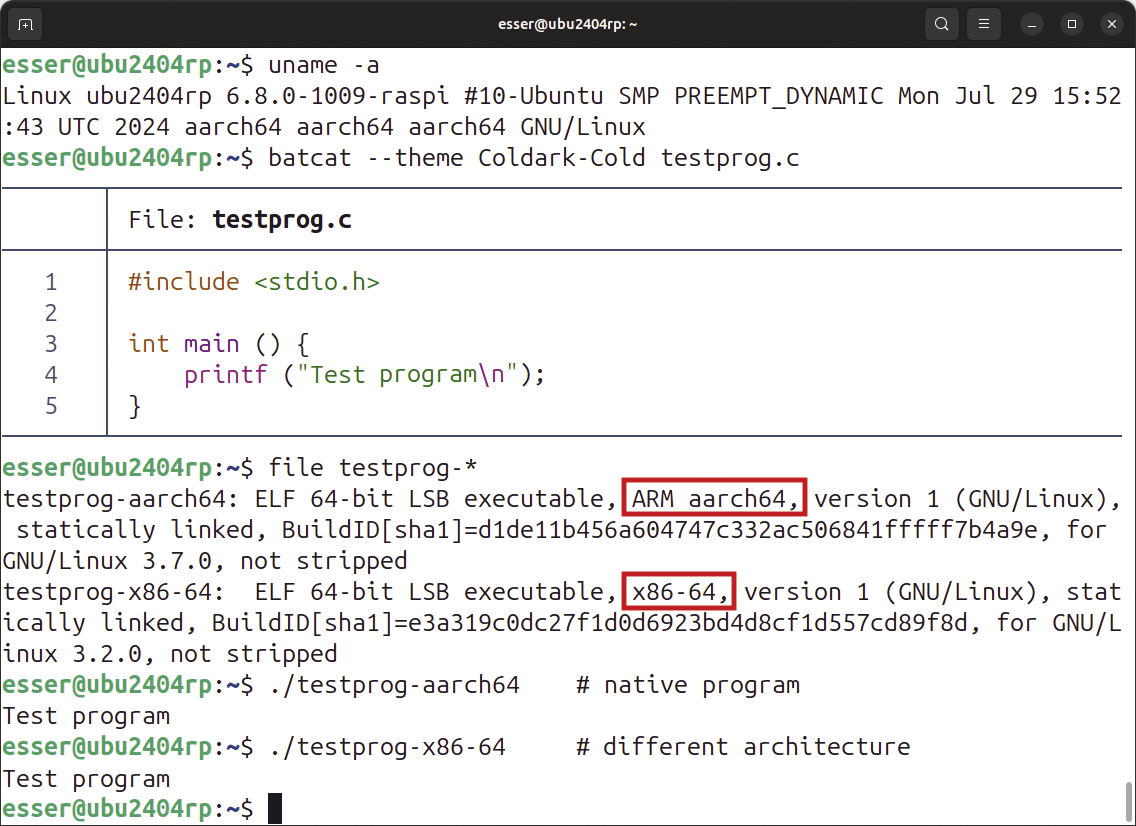
Then, you can simply run binaries from other platforms; Linux detects that the platform does not match and launches the emulator, which processes the program step by step, translating the third-party processor instructions. Whenever a program tries to use an operating system feature, it triggers a system call – and Qemu (with the help of a translation table) simply passes this on to the Ubuntu version running on the Raspberry Pi. However, this only works if a binary is linked statically (i.e., if no libraries are loaded dynamically at program launch time) or if all the required libraries are installed in versions for the third-party platform. The latter is the case with Docker images, which is why the approach works so well.
Figure 6 shows a small test program that I compiled to create a static binary on the Raspberry Pi and a PC using Ubuntu with the GCC --static option. Ubuntu was able to start both binary versions thanks to Qemu. An alternative x86 emulator (ExaGear, see the “x86 emulator ExaGear” box) worked, but there were massive restrictions on Ubuntu 24.04 in my tests.
I fell short when I tried to implement an older how-to describing how to install the alternative x86 emulator ExaGear. If you launch this by typing
sudo exagear, the x86 version of the Bash shell does launch, but it then closes immediately. If you add – /bin/sh to the command, the Dash shell is launched instead. This works, and you can now launch the x86 applications that come with the stripped-down Debian 9 or Ubuntu 18.04 image. However, you cannot use APT to install additional software in this x86 Linux setup because the tool will not run. The ExaGear code was purchased by Huawei in 2020, and more up-to-date versions are also available there, but those do not support the Raspberry Pi; they only work with Huawei products.It is a pity that ExaGear cannot be used, because the approach of providing an image of an x86 Linux distribution is similar to containerization and offers a number of advantages over Qemu’s User Space Emulator solution.
Box86 and Box64
Box86 and Box64 also let you run Linux programs for the 32-bit x86 and 64-bit x86_86 (PC) architecture. The two tools, which are related and come from the same development team, are even smarter than Qemu. The architecture of most applications is multilevel: The actual program calls standard libraries’ functions for many standard tasks, such as working with files or displaying information in graphical windows. To allow this to happen, the program loader side-loads the required libraries into memory alongside the program. The library functions then use system calls to leverage operating system functions. The Qemu solution has to handle two of these three levels (the program and the libraries) in x86 machine code (i.e., it has to use emulation techniques to execute the code). Compared to this, Box86 and Box64 only have one level (the program), because the Box tools simply build on the native ARM versions of the libraries.
While there’s a guide that’s meant to help you get the Intel version of Steam running (based on Box86 and Box64), it doesn’t work on Ubuntu 24.04. It was fine for the previous 23.10 version, but Ubuntu 24.04 has an issue with Steam anyway, even on normal PCs where you can only install Steam via a Snap package from the Snap Store. Despite this, the first few steps of the Steam installation guide are useful because they help you to set up Box86 and Box64. On Ubuntu 24.04, you only need to make one change to the Box86 source code files. Listing 1 shows the commands for this, with line 15 containing the source code modification. If you do not want to run 32-bit x86 programs, you can also install Box64 directly from the standard repository by typing:
sudo apt install box64Listing 1: Installing Box86 and Box64
01 sudo dpkg ‑‑add‑architecture armhf
02 sudo apt‑get update && sudo apt‑get upgrade
03 sudo apt install gcc‑arm‑linux‑gnueabihf ‑y
04 sudo apt install cmake libc6:armhf ‑y
05
06 git clone https://github.com/ptitSeb/box64
07 cd box64
08 mkdir build; cd build; cmake .. ‑D RPI5ARM64=1 ‑D CMAKE_BUILD_TYPE=RelWithDebInfo
09 make ‑j4
10 sudo make install
11
12 cd ~
13 git clone https://github.com/ptitSeb/box86
14 cd box86
15 sed ‑i.bak ‑e 's/ st‑>__st_ino/ st‑>st_ino/' src/libtools/myalign64.c
16 mkdir build; cd build; cmake .. ‑D RPI4ARM64=1 ‑D CMAKE_BUILD_TYPE=RelWithDebInfo
17 make ‑j4
18 sudo make install
If you have already configured qemu-user-static to start x86 and x86_64 binaries as described above, you need to rename the qemu-i386.conf and qemu-x86_64.conf files in the /usr/lib/binfmt.d/ directory to, say, qemu-i386.conf.disabled and qemu-x86_64.conf.disabled:
cd /usr/lib/binfmt.d/
f=qemu-i386.conf; sudo mv $f $f.disabled
f=qemu-x86_64.conf; sudo mv $f $f.disabled
Finally, restart the binfmt service:
sudo systemctl restart systemd-binfmt
You can now run individual x86 and x86_64 programs by prefixing them with box86 or box64. If you use the wrong Box version, it will actually catch your error and forward the request to the correct utility. This even works without an explicit request for x86 emulation, because the binfmt service is now capable of identifying executables from the x86/x86_64 world and launching them automatically with one of the Box programs.
Listing 2 shows how three versions of the uname tool (which outputs the version number and some additional information such as the platform) can simply be run directly. uname here is the native version, uname-x86 is a 32-bit binary from another x86 Linux system and uname-x86_64 is a 64-bit x86_64 Ubuntu binary.
Listing 2: Running Binaries from Multiple Platforms
esser@ubu2404rp:~$ export BOX64_LOG=0
esser@ubu2404rp:~$ uname ‑a
Linux ubu2404rp 6.8.0‑1009‑raspi #10‑Ubuntu SMP PREEMPT_DYNAMIC Mon Jul 29 15:52:43 UTC 2024 aarch64 aarch64 aarch64 GNU/Linux
esser@ubu2404rp:~$ ./uname‑x86 ‑a
Box86 with Dynarec v0.3.7 66a91b85 built on Aug 17 2024 15:48:15
Linux ubu2404rp 6.8.0‑1009‑raspi #10‑Ubuntu SMP PREEMPT_DYNAMIC Mon Jul 29 15:52:43 UTC 2024 x86_64 GNU/Linux
esser@ubu2404rp:~$ ./uname‑x86_64 ‑a
Box64 with Dynarec v0.3.1 c4253b73 built on Aug 17 2024 06:20:54
Linux ubu2404rp 6.8.0‑1009‑raspi #10‑Ubuntu SMP PREEMPT_DYNAMIC Mon Jul 29 15:52:43 UTC 2024 x86_64 x86_64 x86_64 GNU/Linux
You cannot expect to break speed records with the x86 or x86_64 programs executed in Box86 and Box64 (or Qemu), as emulation is always going to be slower than virtualization. As a mini-benchmark, I ran a small loop in the shell and measured the time. The x86_64 version of Bash (on the right in Figure 7) took more than two times longer than the native ARM version of Bash.

Conclusions
The various possibilities of x86 emulation that Ubuntu supports on the Raspberry Pi are exciting, if you need them. But, if you are simply looking to put together a power-saving, simple desktop computer on which you can edit a couple of texts, compose messages and browse the web, then you will hardly notice any differences between Ubuntu 24.04 on the Raspberry Pi 5 and an installation on a normal PC. Out of consideration for lower-powered Pi models, the official Raspberry Pi OS restricts itself to a lean desktop, while Ubuntu 24.04 sets up a fully-fledged Gnome desktop. If you are already used to this from Linux PCs, you can simply get started without a learning curve. The performance that this single-board computer offers is quite remarkable – and the fan only occasionally kicked in during the days I spent testing the setup for this article.


