ChirpStack LoRaWAN
ChirpStack’s LoRaWAN implementation lets you set up long-range wireless traffic for sensors even if you are far from a WiFi access point.
If you have sensors in your house, there are many technologies that you can use to transmit their measurements wirelessly: Bluetooth, Zigbee, Z-Wave, Thread, and even WiFi. However, they all have a limited range. For sensors in your garden, the distance may be just too far. Moreover, for many applications, these technologies are too powerful: They offer much more bandwidth than you need. For monitoring the level of your rainwater tank or the temperature and humidity in your greenhouse, you only need to send a couple of bytes every few minutes.
Networks optimized for these situations are called low-power wide area networks (LPWAN). One such technology is LoRaWAN: It implements wireless communication over longer distances (even exceeding 10km in optimal conditions) with minimal power consumption. The tradeoff is that the data transmission rate is low, limited to a few kilobits per second at most, but that’s good enough for garden sensors. The same applies to measurements in farms, vineyards, and many other large areas. By sending a small packet with sensor values every 10 minutes, a LoRaWAN sensor can operate for up to 10 years on a single battery.
In this article, I’ll show you how to set up long-range communication in your home. But before getting started, I need to define some basic terminology.
LoRa and LoRaWAN
The physical layer of the network, which specifies what the radio signals look like, is called Long Range (LoRa). This standard specifies the frequency bands used (868MHz in Europe, 915MHz in North America and Australia, and 923MHz in Asia) and modulation (the way a message signal is combined with a carrier signal to transmit it). What’s special about LoRa is its resilience to interference. This is crucial because in Europe, for example, Z-Wave and wireless alarm systems operate in the same frequency band.
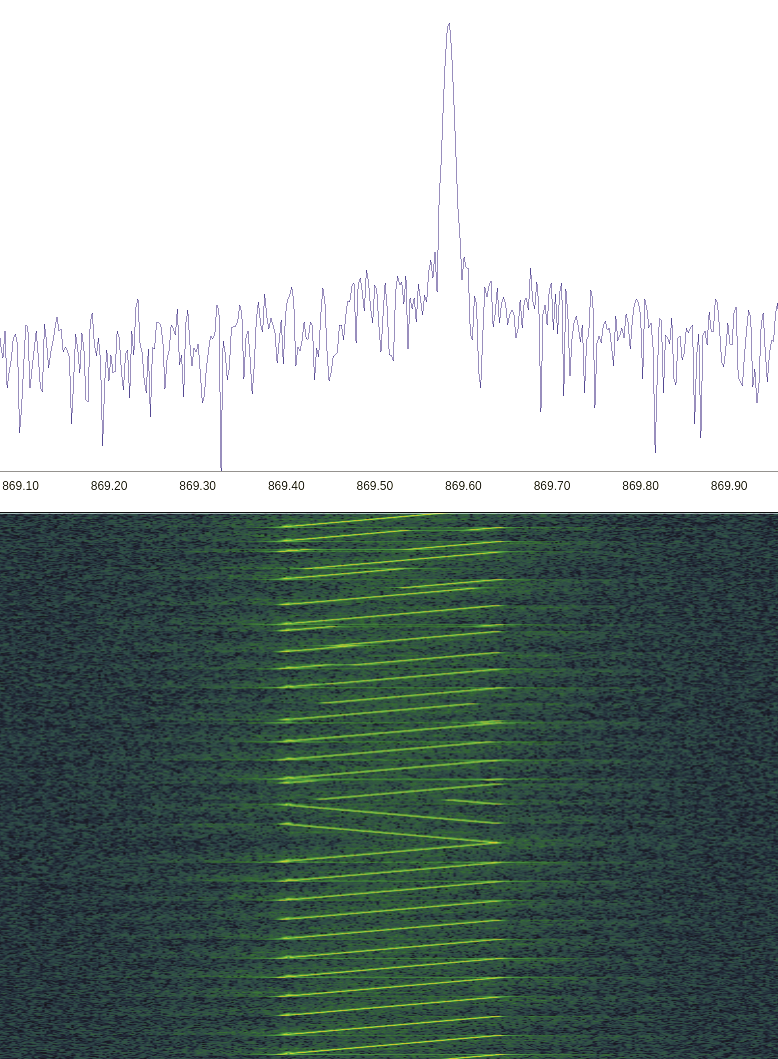
LoRa is a proprietary protocol developed by Semtech, based on Chirp Spread Spectrum (CSS) technology, and implemented in various transceiver chips. This approach encodes information in the form of a “chirp,” a sinusoidal signal whose frequency increases (up-chirp) or decreases (down-chirp) over time (Figure 1). The rate at which the signal’s frequency changes is called the chirp rate. The higher the chirp rate, the more information can be transmitted in the same time, but the more challenging it is to decode the received information. LoRa defines six spreading factors, from SF7 (fast chirp rate) to SF12 (slow chirp rate). The higher the spreading factor, the further the signal can travel and still be decodable.
While LoRa only defines the physical layer of the network, LoRaWAN builds on it to enable communication between end devices (also called nodes) and the Internet. An end device is any device with a LoRa antenna and firmware that implements the LoRaWAN MAC layer. LoRaWAN is an open standard promoted by the LoRa Alliance, and there are various implementations, also in open source projects. (See also the “Other Protocols on Top of LoRa” box.)
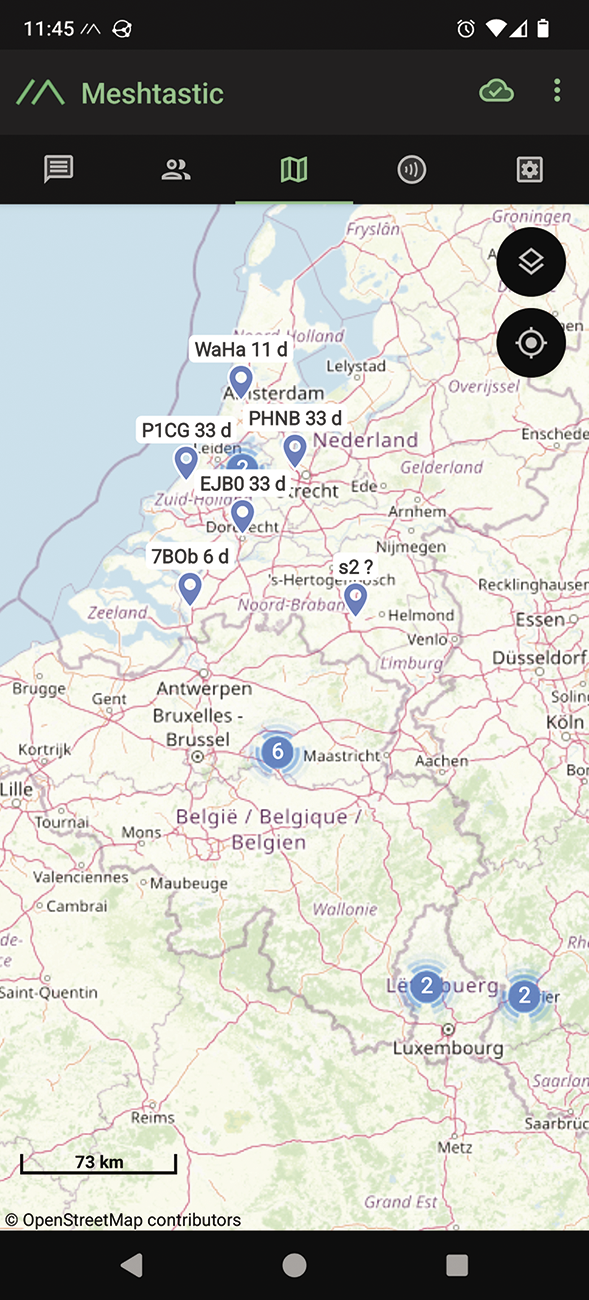
A few other protocols build their own network layers on top of LoRa. For example, there’s Meshtastic, which I’ll cover in a future article. While LoRaWAN nodes only communicate with the gateways, Meshtastic is a mesh network where all nodes can communicate peer-to-peer with each other to relay messages. If one of the nodes is placed in an optimal location, this vastly improves the range (Figure 2). Meshtastic is also more targeted at exchanging text messages between mobile clients. In contrast, LoRaWAN focuses on transmitting sensor data as energy-efficiently as possible. Also worth mentioning is Amazon Sidewalk, a network technology embedded in devices like Amazon’s latest Echo and Ring, which use LoRa for extended range. By using these devices as Sidewalk Bridges, Amazon has created an extensive network to provide connectivity for various types of sensors.
To enable this communication with the Internet, you need a LoRaWAN gateway which has both a LoRa antenna and either a WiFi antenna, Ethernet port, or 4G antenna. The gateway transmits the received LoRaWAN packets to a central network server via the Internet (or, as in our case, directly over a LAN). If multiple gateways receive the same packet from a node, the network server filters out these duplicate packets, and it verifies the authenticity of each node on the network and the integrity of each packet. All LoRaWAN packets between the nodes and the network server are encrypted with a 128-bit AES key.
Requirements
To set up your own long-range sensor network, you need one or more LoRaWAN gateways, a network server, and, of course, LoRaWAN sensor nodes. For the gateway and network server, I use version 4 of the open-source project ChirpStack. The project’s network server is compatible with most LoRaWAN gateways, provided they use the Semtech Packet Forwarder or Semtech Basics Station software. ChirpStack’s documentation provides configuration instructions for various brands of gateways.
Alternatively, you can run ChirpStack Gateway OS on a supported LoRaWAN gateway. This is a Linux distribution based on OpenWrt, pre-installed with ChirpStack’s gateway software and a web interface for configuration. You can install it on a Raspberry Pi with a LoRa HAT or another supported gateway. I installed ChirpStack Gateway OS on a Seeed Studio SenseCap M2, which has a nice form factor and comes with a 3dBi antenna.
Setting Up the Gateway
For the Raspberry Pi, there are two types of Gateway OS images, Base and Full. With Base, you install a fully functional LoRaWAN gateway, whereas Full also installs ChirpStack’s LoRaWAN network server and the low-code programming environment Node-RED on the same device. If you want an all-in-one LoRaWAN solution, choose the Full image. For the rest of this article, I’ll assume you’re running the Base image. Later, I’ll install the network server and Node-RED in Docker containers on a Linux server.
Follow the Gateway OS installation instructions for your brand of gateway. I first upgraded my SenseCap M2 to the latest Seeed Studio firmware. Then, I downloaded the image of ChirpStack Gateway OS 4.7.1 for the SenseCap M2. In the web interface, click on System and then Backup | Flash Firmware. Click Flash image… at the bottom of the page, select the image, and click Upload.
After the gateway boots the newly installed firmware, log in with the username root and an empty password. Set a password, then click ChirpStack on the left, and select Concentratord. In the Global configuration tab, tick the Enabled check box and select the chipset of your LoRa hardware (in my case SX1302/SX1303).
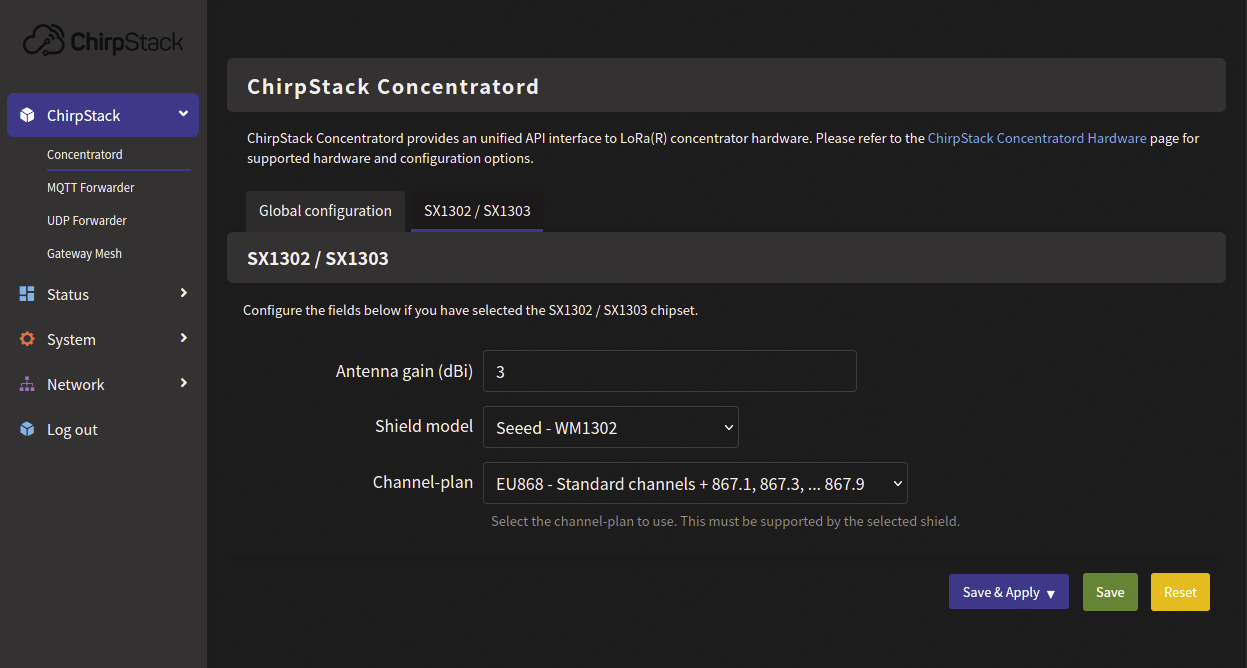
Then go to the tab of your selected chipset and enter the correct details (Figure 3). The Antenna gain (dBi) is set to 2 by default, but my gateway is equipped with a 3dBi antenna, so I modified this accordingly. The Channel-plan is also important: For Europe, choose EU868 so that the gateway operates on the correct frequencies. Click Save & Apply to implement the settings. After a few seconds, the message at the bottom footer should change from Could not read Gateway ID to the ID of your gateway – you might have to refresh the page.
Installing and Starting the Network Server
You now have a LoRaWAN gateway running, but most of the functionality goes into the network server. I’ll show you how to install ChirpStack’s network server on a Linux machine. ChirpStack’s documentation provides installation instructions for Debian/Ubuntu and for Docker Compose. I used the Docker Compose method on a Debian 12 server. Install Docker and Docker Compose with
sudo apt install docker.io docker-composeand give your user access to the Docker daemon with:
sudo usermod -aG docker $USERLog out and back in. Then download the Git repository with ChirpStack’s example Docker Compose file using
git clone https://github.com/chirpstack/chirpstack-docker.gitand navigate to that directory (cd chirpstack-docker). The README.md file contains configuration instructions. Check all files in the configuration directory to see what’s possible. If you already have your own MQTT broker running, remove the one defined in this Docker Compose file and let the environment variable MQTT_BROKER_HOST refer to your broker’s IP address or hostname.
Because ChirpStack Gateway OS supports MQTT communication with the project’s network server, the chirpstack-gateway-bridge and chirpstack-gateway-bridge-basicstation containers aren’t needed, so I removed them from the Docker Compose file. If you use a different LoRaWAN gateway, consult ChirpStack’s documentation to see which container you need to keep to communicate with it. I also removed the chirpstack-rest-api container, as it’s only provided for legacy reasons.
Apart from removing containers you don’t need in your situation, there’s only one setting you really need to change. Create a random secret with:
openssl rand -base64 32The output will be something like L/mLlND0UvIeID0vtB442yKTX29iveNPe9pwjkYzy7U=. Now open the file configuration/chirpstack/chirpstack.toml and replace you-must-replace-this with this secret in the line starting with secret=. Save this file. Then run
docker-compose up -din the repository directory (Listing 1). After all containers are created, you can log into ChirpStack’s web interface at http://IP:8080 (with IP being the IP address of the Linux server) using the username admin and password admin. Click the username at the top right and choose Change password to change this default password.
Listing 1: Running docker-compose up
01 koan@debian:~/chirpstack‑dockers$ docker‑compose up ‑d
02 Creating network "chirpstack‑docker_default" with the default driver
03 Creating chirpstack‑docker_postgres_1  ... done
04 Creating chirpstack‑docker_mosquitto_1 ... done
05 Creating chirpstack‑docker_redis_1     ... done
06 Creating chirpstack‑docker_chirpstack‑gateway‑bridge‑basicstation_1 ... done
07 Creating chirpstack‑docker_chirpstack‑gateway‑bridge_1              ... done
08 Creating chirpstack‑docker_chirpstack_1                             ... done
09 Creating chirpstack‑docker_chirpstack‑rest‑api_1                    ... done
Adding a Gateway
Now you need to connect your gateway to your network server. The example Docker Compose file also installs the MQTT broker Mosquitto. Whether you use this container or an existing MQTT broker for the network server, the gateway needs to connect to the same broker. In the gateway’s web interface, click MQTT Forwarder under ChirpStack. This component is enabled by default. You only need to fill in tcp://IP:1883 for the server in the MQTT configuration tab (with IP being the IP address of the MQTT broker) and, at the bottom, click Save & Apply.
Next, in the network server’s menu on the left, click Tenant | Gateways and then Add gateway. Give your gateway a name and enter the gateway ID displayed by ChirpStack Gateway OS at the bottom right. After clicking Submit your gateway appears under Gateways with the status Online (Figure 4). By clicking the gateway ID, the dashboard shows some statistics, and the Metadata tab of Configuration shows various system data sent by the gateway, such as the region, hardware model, and firmware versions of the Concentratord daemon (which communicates with the Semtech chip) and the MQTT forwarder.

Device Profile
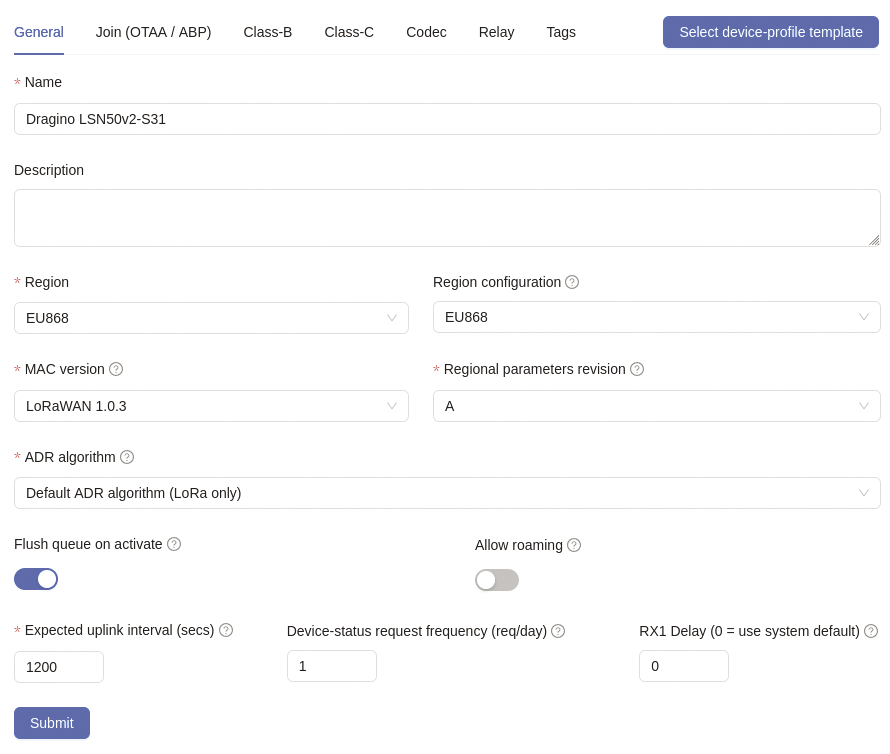
There’s nothing more to do with the gateway: It’s able to communicate with ChirpStack’s network server, and the rest of the configuration occurs in the network server. To add any device type, you first need to create a device profile with some settings. These can be found in the product specifications or user manual. Get those and then click Add device profile at the top right of Device Profiles. I’ll show you how to create a device profile for the Dragino LSN50v2-S31 temperature and humidity sensor.
Name the profile (Figure 5) after the product type. According to the user manual, the device supports LoRaWAN 1.0.3, so choose this as the MAC version. Since the default interval at which this sensor transmits data is 20 minutes, enter 1200 (seconds) for Expected uplink interval. In the Join (OTAA/ABP) tab, Device supports OTAA is enabled by default. Keep it enabled, as the device supports it per its manual. The rest of the default values are fine.
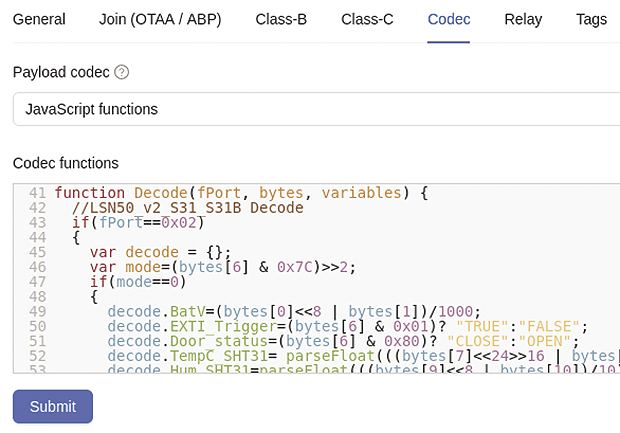
LoRaWAN devices send their data as a sequence of consecutive bytes in a specific format, as explained in the device’s documentation. So, you need a function for each device profile to decode this data sequence and convert it to a readable JSON format. Enter that function in the Codec tab. Choose JavaScript functions for Payload codec here.
In the Codec functions text field you will find templates for two JavaScript functions:
decodeUplinkhandles data sent by the device to the network serverdecodeDownlinkis used for data sent by the network server to the device
You need to implement both functions, but most suppliers of LoRaWAN devices already offer the correct JavaScript functions. Dragino provides these functions for all its devices in a GitHub repository Dragino End Node Decoder . Navigate to the correct directory, open the file whose name ends with Chirpstack v4 decoder.txt, and paste the file content into this text field (Figure 6). Click Submit to save the device profile with the associated decoder.
Adding a Device
LoRaWAN devices are grouped by application. For example, group the temperature sensors under one application and the contact sensors under another. First, create an application under Applications by clicking Add application at the top right, giving the application a name, and creating it with Submit. Now, when you click on this entry under Applications, you can add devices by clicking Add device on the right.
Enter a name for your device, such as Outdoor temperature sensor, and choose the device profile you just created. Then, fill in the Device EUI. The Join EUI isn’t needed if your device is activated via OTAA. Click Submit. In the OTAA keys tab that now appears, enter the Application key. Usually, you’ll find all these hexadecimal strings on a sticker or a small piece of paper in the device’s packaging. Finally, turn on the device and activate it.
Viewing Uplinks and Displaying Measurements
If everything goes well, you’ll see packets from your device on its LoRaWAN frames tab. The first one should be a JoinRequest, followed by a JoinAccept if the device is accepted by your LoRaWAN network. Seeing both messages indicates that it has been activated on your LoRaWAN network.
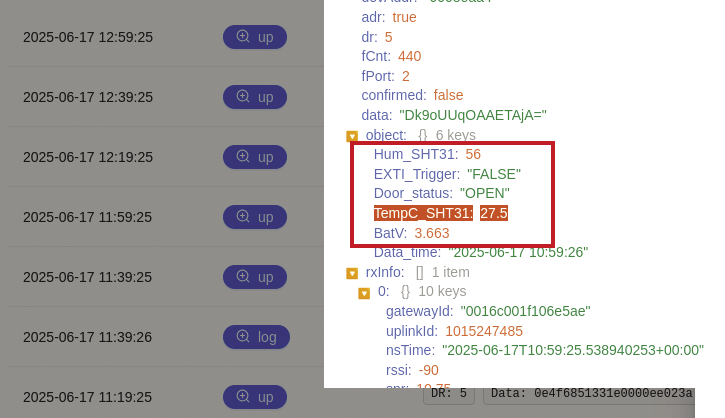
Next, go to the Events tab. Here you’ll see a join event indicating your device joined the network, and you’ll also see an up event as soon as the device sends its first measurement. Click on join or up for a structured view of the data, which is a JSON structure (Figure 7). Look for the object key, which contains the data decoded by the payload decoder, including temperature (TempC_SHT31), humidity (Hum_SHT31), and battery voltage (BatV).
If ChirpStack is able to decode the uplinks from your device (data sent by your device), you can also visualize the data. Go to the sensor’s device profile and open the Measurements tab. You’ll see that ChirpStack has already added the keys from the JSON structure with data as measurement keys. However, the type of measurement is set to Unknown/unset which means that they’re currently ignored.
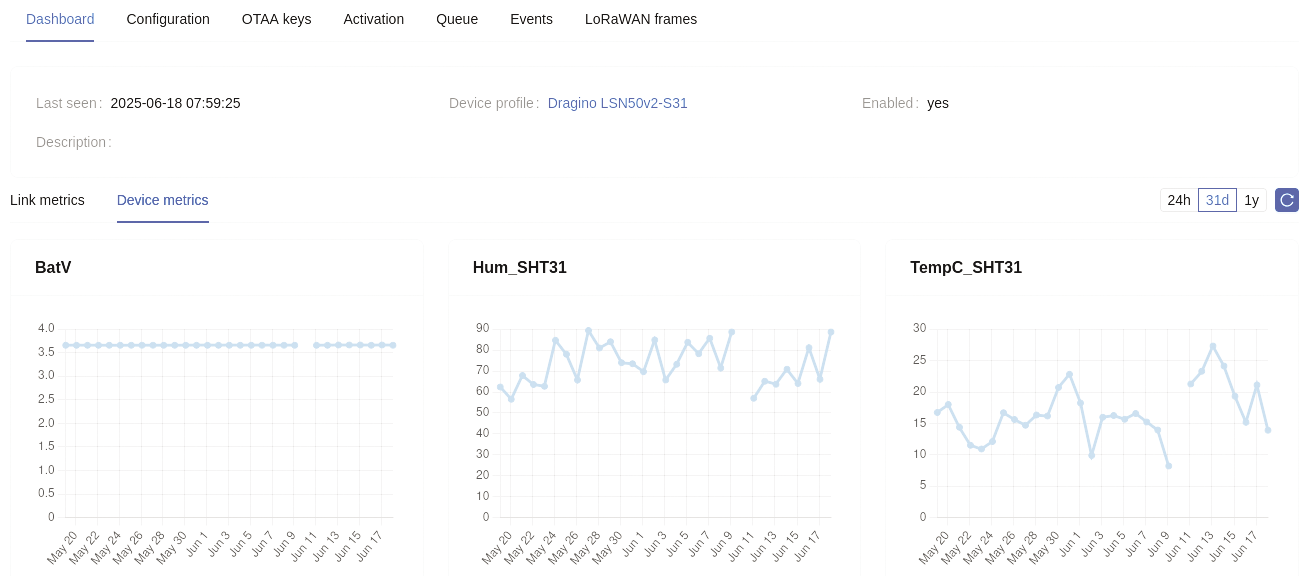
Now assign a type to each measurement key you want to visualize. For battery voltage, temperature, and humidity, choose Gauge; we’re not interested in the other values. Finally, click Submit. If you wait a while for the next uplink, you’ll see graphs of the specified measurements in the Device metrics tab of the device’s Dashboard tab under the appropriate application (Figure 8). Additionally, ChirpStack displays each device’s battery status in a list of the devices within an application.
Troubleshooting Connectivity Problems
ChirpStack also provides a wealth of information for troubleshooting. LoRaWAN communication is never 100 percent reliable, as wireless packets can be lost due to radio interference or physical obstacles. The Link metrics tab of a device provides insights into its radio performance, showing graphs of several important characteristics per day, month, or year (Figure 9).
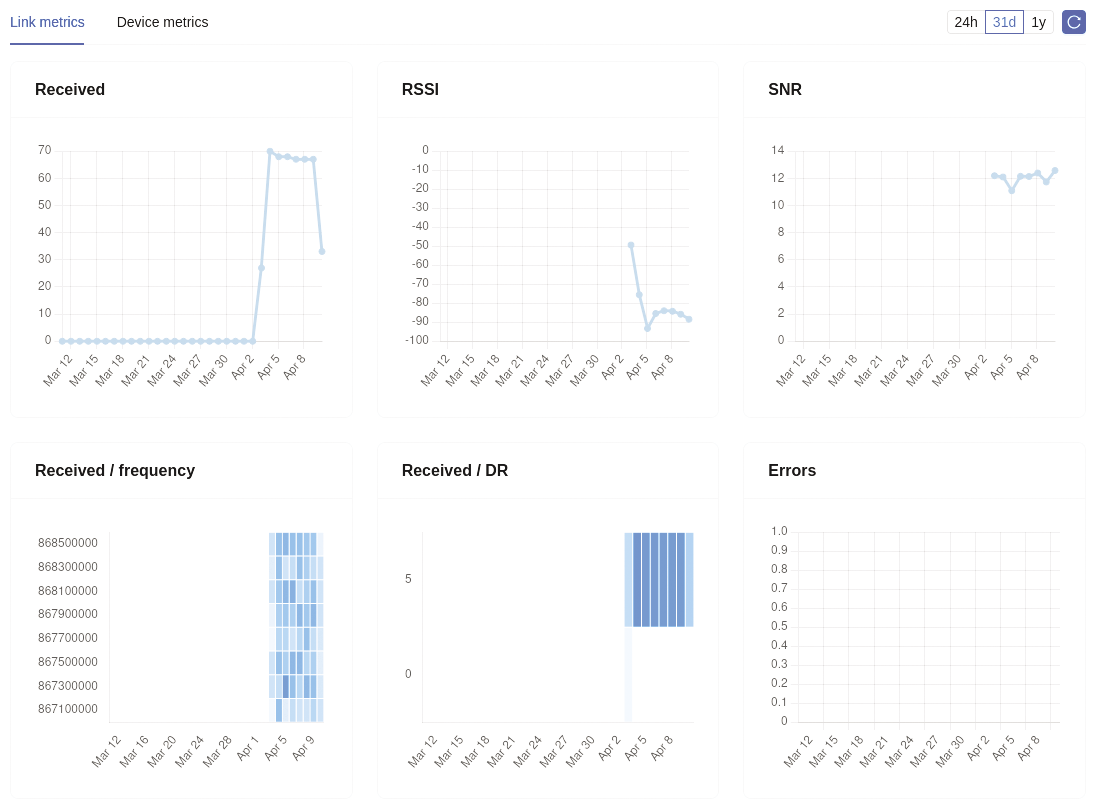
For instance, Received shows the number of uplinks received. With a daily graph, these are the numbers per hour. From a device with an uplink interval of 20 minutes, you’d expect three uplinks per hour. If you see fewer uplinks in an hour, it might indicate an unreliable connection with this specific device located too far from the gateway. However, if all devices show fewer uplinks than expected during a specific period, the link between the gateway and network server might have been down then, possibly due to a WiFi issue.
Another important indicator is the Received Signal Strength Indicator (RSSI), a measure of how strong the received signal is. It’s measured in decibel-milliwatts (dBm) and is a negative number. The closer it is to zero, the stronger the received signal. A sensor 10 meters from the gateway can, for example, be received at -50dBm, while at tens of meters and/or with walls or other obstacles in between, its RSSI can quickly drop to -100dBm.
The antenna gain and the cable and connector loss, both at the gateway and the end node, also affect RSSI. You can experimentally investigate these influences with the RSSI graph to optimize your LoRaWAN network. Below -120dBm, reception becomes unreliable. If your device’s RSSI comes near this value, try moving your gateway or end node or replacing antennas. Always power off the device before changing an antenna: if the device transmits without an antenna connected, this can damage the internal circuitry.
You can also infer much about the wireless connection’s reliability from the Signal-to-Noise Ratio (SNR). This is the ratio between the power of the received signal and the noise power, which consists of all unwanted signal sources interfering with the LoRaWAN signal. The greater the SNR, the better the gateway can distinguish the sensor signal from the noise.
The SNR is measured in dB and usually lies between -20dB and +10dB. A negative SNR means that the noise exceeds the signal. Normally, this makes the signal indistinguishable from the noise. However, LoRa spreads the signal over a broader spectrum than necessary and spreads the noise as well, enabling it to receive signals at an SNR of up to -20dB, depending on the settings. Moreover, LoRaWAN features Adaptive Data Rate (ADR), a mechanism where the network server automatically monitors the SNR and instructs the device, if needed, to spread its signal over a broader spectrum to improve the SNR. Check the “Gateway Placement” box for achieving optimal range.
For optimal range, it’s important for LoRa signals to have a line of sight between the transmitter and receiver antennas. If your LoRaWAN sensors are outside, it’s best to place the gateway outside too. Preferably high up, on a roof or pole, with as few obstacles between the gateway and the sensors as possible, like trees or buildings. Under ideal conditions, you can achieve distances of tens of kilometers this way. But if you just want to read sensors in your large garden, a range of 100 meters might be sufficient. Then it doesn’t matter that your gateway isn’t optimally placed. You can achieve those distances with indoor placement as well. Indoor gateways are also much cheaper than outdoor ones, as they don’t need to be weather-resistant.
MQTT Messages
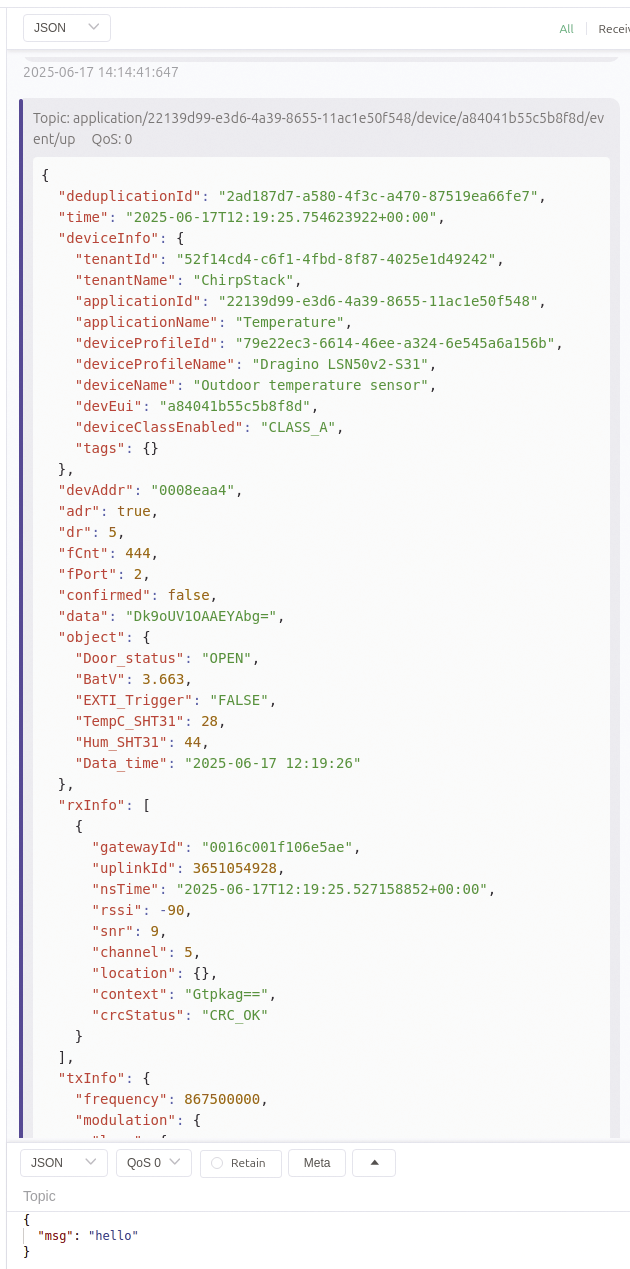
The network server is already decoding all your LoRaWAN sensors and transmitting their data in the form of MQTT messages to the MQTT broker. You can now let other software listen to these published messages, such as your home automation system. But first, you need insight into the data format. Use an MQTT client like MQTTX, which is available for Linux, Windows, and macOS. Enter the broker’s hostname or IP address and click Connect.
Then click New Subscription and type the MQTT topic you want to follow. The format of this topic is explained in ChirpStack’s MQTT documentation. To receive all uplinks from a specific device in the MQTT client, enter the topic application/APPLICATION_ID/device/DEV_EUI/event/up. You can find the Application ID on ChirpStack’s application page next to the name, and the Device EUI similarly on the device’s page. You can also use single-level wildcards (+) to see all uplinks from all devices of all applications with the topic application/+/device/+/event/up. After creating the subscription, change the default Plaintext display mode to JSON at the top to view the structure of the messages (Figure 10).
Processing your Sensor Measurements
You can now integrate sensor readings into your home automation system if it supports MQTT. I’ll demonstrate how this works in Node-RED. The creators of ChirpStack provide a package for Node-RED, node-red-contrib-chirpstack. Install it on the Linux server or in the Docker container where your Node-RED is running, using:
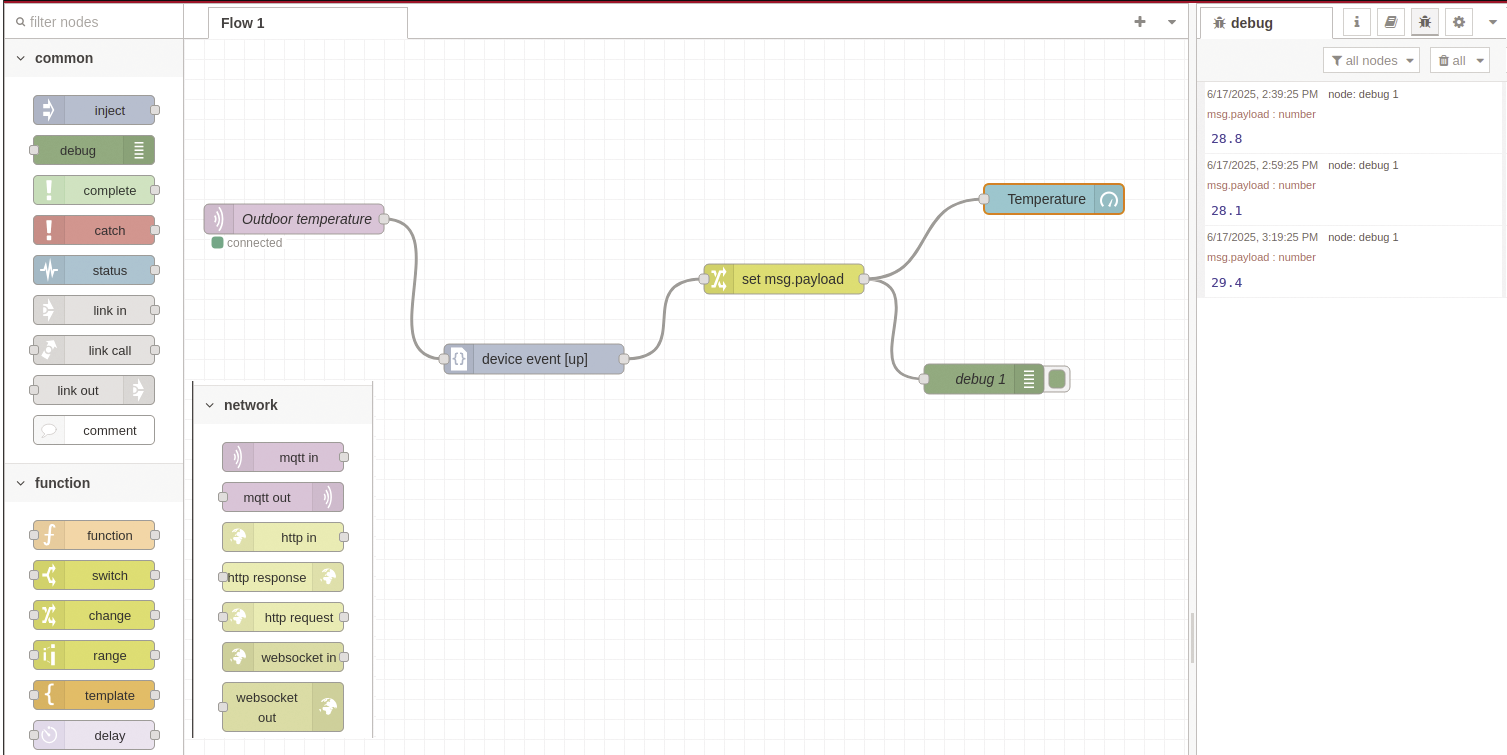
npm install @chirpstack/node-red-contrib-chirpstackAfter restarting Node-RED, you’ll see two new nodes at the bottom left in the ChirpStack category. Add an mqtt in node from the network section to your flow, add a new broker, and choose the MQTT topic for your device’s uplink. If you click Deploy now, a green icon with connected should appear next to the node, which means that Node-RED is able to receive messages from your MQTT broker.
Next, connect a device event node from the ChirpStack section to your mqtt in node, ensuring Event Type is set to Uplink (the default). Attach a change node from the function section after that, equating msg.payload to msg.payload.object.TempC_SHT31 (change this according to your device’s attributes). Attach a debug node from the common section to this. Click Deploy again, and when your LoRaWAN sensor sends another uplink, you’ll see the temperature in the debug window (Figure 11). The output from the change node can now be further processed, for instance, by sending notifications when the temperature rises above a certain threshold (use the switch node from the function section for this). One possible notification mechanism would be an HTTP POST request (with the http request node in the network section) to a ntfy server, as explained in a previous article.
Creating a Dashboard
You can also create a dashboard that visualizes sensor measurements received in ChirpStack’s MQTT messages. I’ll also show how to do this with Node-RED. First install the Node-RED dashboard by clicking the hamburger menu at the top right and then Manage palette. Then install node-red-dashboard from the Install tab, after which you’ll see a message that a lot of new nodes have been installed.
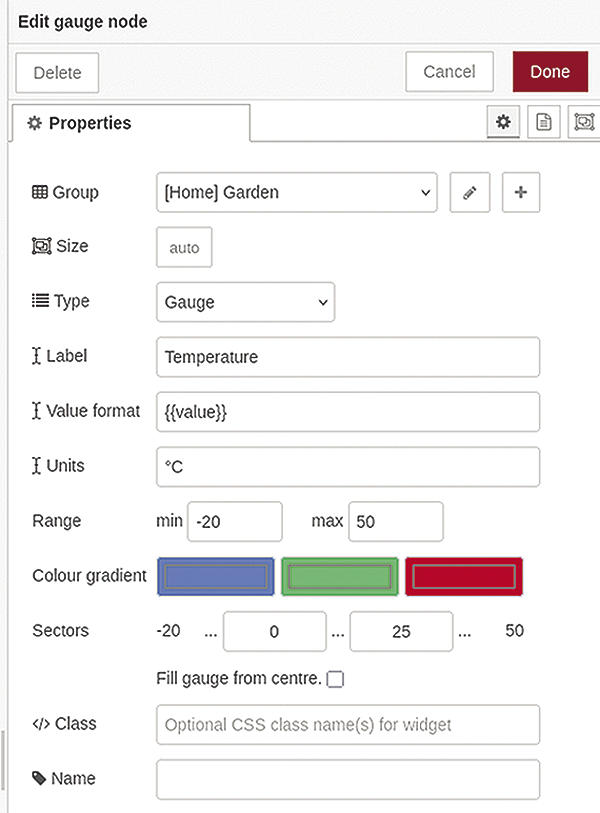
At the bottom of the palette at the left, there’s now a dashboard section with a lot of widgets. Drag a gauge node to the right of the change node on your canvas and connect both nodes. Double-click on the gauge. Next to Group, you’ll see Add new dashboard group… with a red outline. Click on the plus icon next to it and enter the name of your sensor for the Name field.
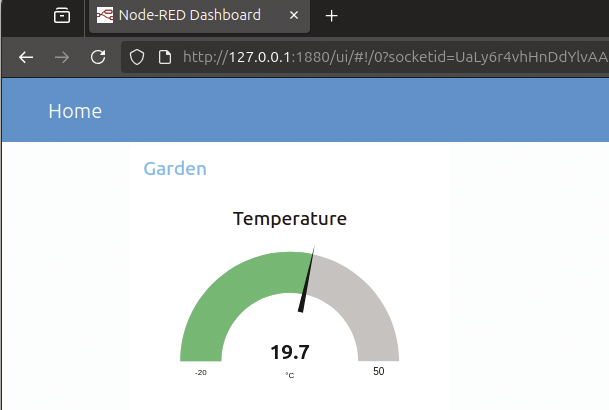
Then click on the plus icon right to Add new dashboard tab… to create a new tab and give this tab a name (the default value Home is probably appropriate). After clicking Add, you return to the group properties. Click on Add again to create the group. Now you return to the gauge properties. Change the Label field to Temperature, choose your unit, and enter a range with minimal and maximal values, as well as threshold values and corresponding colors (Figure 12). Finally, click on Done. Then click on Deploy and visit the dashboard by clicking on the small triangle at the top right (Dashboard) and then the icon of a square with an arrow. After the next uplink of your LoRaWAN device, the dashboard shows its value (Figure 13).
Repeat this procedure for other sensors, adding a new group for each sensor. You can also add other types of widgets to the dashboard, such as charts that plot the temperature over time.
Conclusion
With ChirpStack’s software running on a LoRaWAN gateway and on a network server, you can link LoRaWAN sensors over a long range to your home automation system. I’ve illustrated this with Node-RED, but thanks to the use of MQTT, you can link your sensors to a lot of other software, such as Home Assistant or openHAB. All of this works completely locally on your own hardware, without any dependence on cloud systems. Now you can start thinking about automating your garden, orchard, or greenhouse.

